Google Photos to OneDrive: 3 Innovative Transfer Strategies
Learn three effective methods to transfer your Google Photos to OneDrive. Explore Web-Based Transfers, Rclone, and CloudsLinker for an efficient shift.
Introduction
As cloud storage solutions evolve, moving your cherished images from Google Photos to OneDrive has become increasingly popular. Focused on ease of use and integration with Microsoft's ecosystem, it's crucial to choose the right method for transferring your photos. This guide unveils 3 Innovative Strategies for Transferring Photos from Google Photos to OneDrive. Ranging from simple Web-Based Transfers to advanced options like Rclone and CloudsLinker, this guide serves both novices and tech aficionados. Discover these approaches to make transferring your photos to OneDrive smooth and effortless. For a whole library with albums, CloudsLinker can also unpack a Google Takeout export right inside OneDrive.
Understanding OneDrive and Google Photos
What is OneDrive?
OneDrive, a part of Microsoft's suite of online services, is a cloud storage solution renowned for its integration with Windows and Office 365. It provides users with a secure and convenient way to store, share, and access files from anywhere. With features like file versioning, real-time collaboration, and ample storage options, OneDrive appeals to both personal and professional users. Its deep integration with Microsoft's ecosystem allows for seamless file management and collaboration, making it a versatile choice for diverse storage needs.
What is Google Photos?
Google Photos, a widely-used cloud service by Google, offers photo and video storage and sharing capabilities. It stands out for its advanced image recognition technology, facilitating easy organization and accessibility of media. Users appreciate Google Photos for its user-friendly design, automatic backup, and AI-powered features like smart albums and photo editing tools. However, individuals seeking enhanced integration with productivity tools or different privacy options might opt for alternatives like OneDrive.The shift from Google Photos to OneDrive is gaining popularity among users seeking more integrated and flexible digital photo management. This transition is driven by several key advantages:
- Seamless Integration with Microsoft Ecosystem: OneDrive's integration with Office 365 and Windows enhances productivity, making it easy to edit and share photos within the Microsoft suite.
- User-Friendly Interface: OneDrive offers a straightforward, intuitive user experience, streamlining photo organization and access.
- Enhanced Security Options: With OneDrive, benefit from Microsoft's robust security measures, including advanced encryption and privacy controls.
- Collaboration and Sharing Capabilities: OneDrive excels in collaborative features, allowing for easy sharing and joint editing of photo albums.
- Ample Storage Space: OneDrive provides generous storage options, accommodating a large volume of photos and videos with ease.
Considering these benefits, the next sections will explore the methodologies to efficiently transfer your photos from Google Photos to OneDrive.
Method One: Web-Based Transfers
Step 1: Export Images from Google Photos
Begin by visiting Google Photos. Select the images or albums you wish to transfer. Use the 'Download' feature in the menu (symbolized by three dots) to save your chosen images to your device. Google Photos compiles a zip file for multiple items being downloaded together.
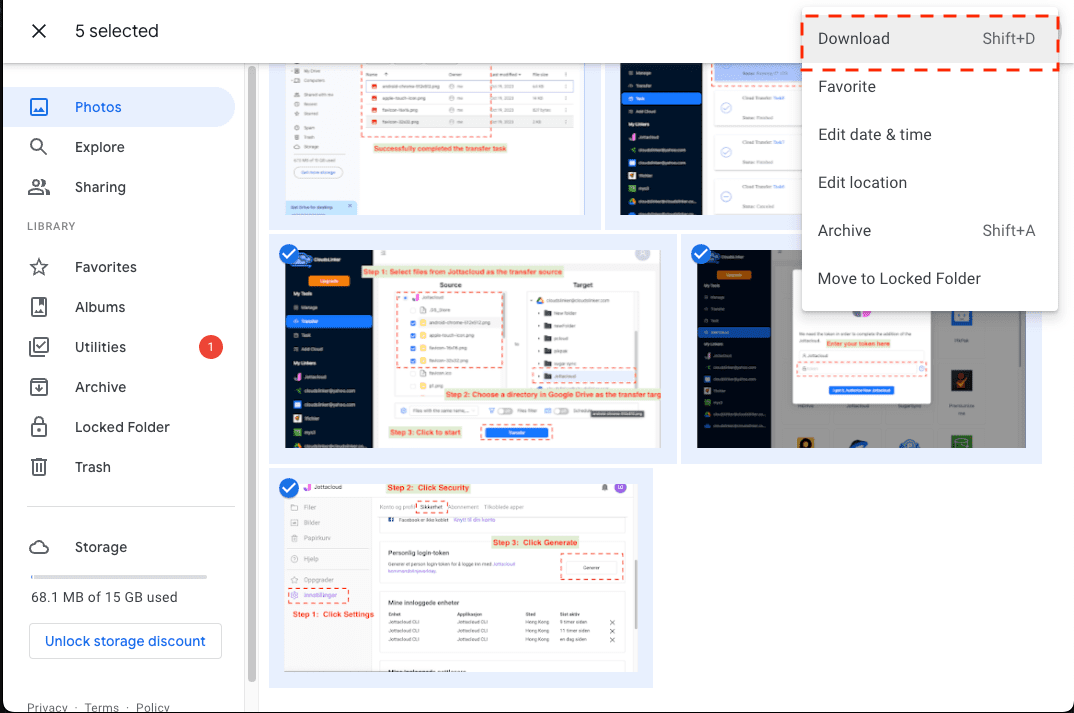
Step 2: Unzip and Prepare the Files
After downloading, unzip the files with the native tools on your macOS or Windows machine. This is a crucial step to get your images ready for the subsequent transfer process.
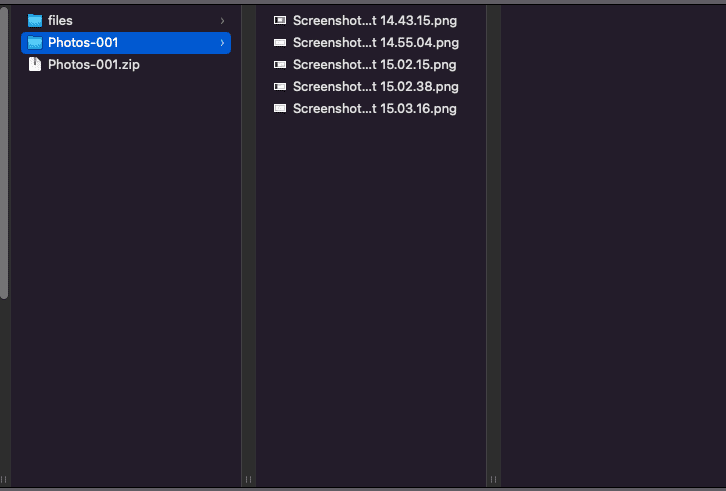
Step 3: Upload Images to OneDrive
Log into your OneDrive account. Choose the 'Upload' option (usually found in the right-click context menu) to start uploading the prepared images. Once the upload is complete, your photos from Google Photos will be available in your OneDrive storage.
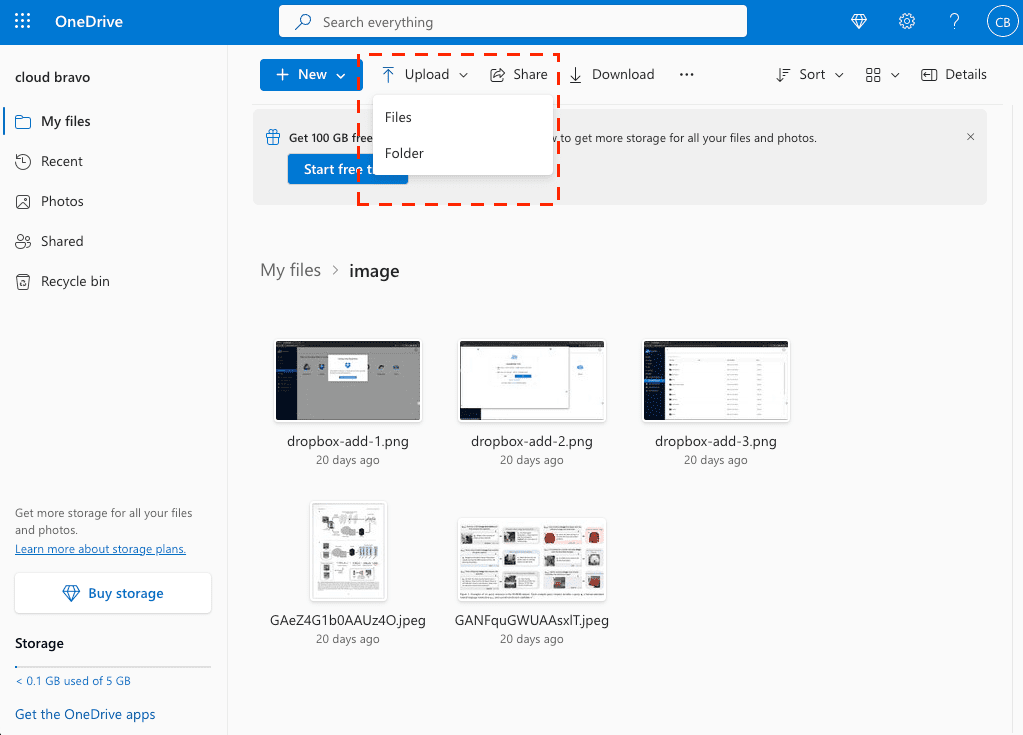
Method Two: Rclone-Assisted Migration
Step 1: Install and Configure Rclone:
Start by downloading Rclone from the official
site. Execute the rclone config command to begin the setup. For OneDrive
integration, select to create a new remote ('n') and name it, for example,
'myonedrive'. Enter your OneDrive credentials as prompted.

Step 2: Export Google Photos with Takeout:
rclone's Google Photos backend can no longer read your library: according to the rclone documentation, since March 31, 2025 it can only download photos that rclone itself uploaded. Export the library with Google Takeout instead (Method One), download every part and extract them all into one folder, for example ~/Takeout. That folder is the source for rclone.
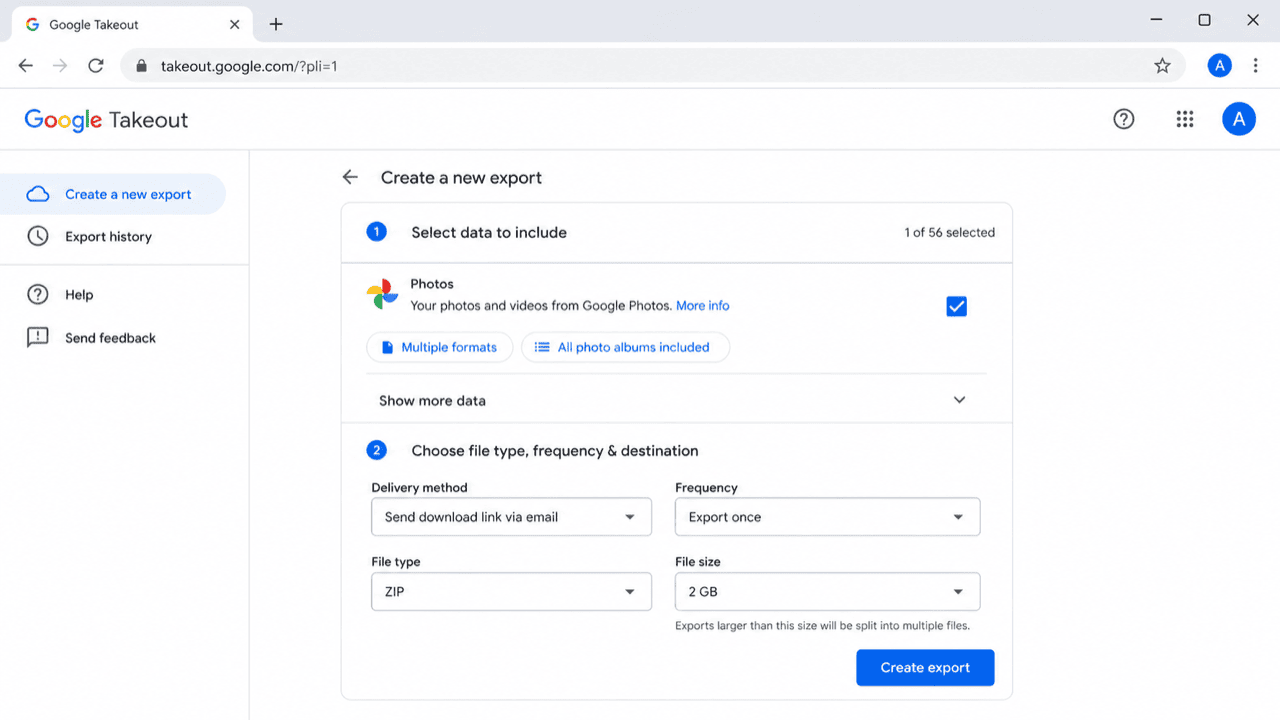
Step 3: Initiate the Migration Process:
Begin the transfer using the command rclone copy "~/Takeout/Google Photos" myonedrive:Pictures/Google --progress. Replace the source with the folder you extracted and setup and 'destination:' the OneDrive remote and folder with your own; --progress shows the transfer status. Add --exclude "*.json" to leave out Takeout's metadata files.

Step 4: Confirm Transfer Completion:
After completing the Rclone process, verify that your photos are successfully transferred to your OneDrive. This completes the efficient migration of your images from Google Photos to OneDrive using Rclone.
Method Three: Streamlined Transfer with CloudsLinker
Two CloudsLinker Routes — Pick One First
CloudsLinker signs in to OneDrive on Microsoft's own page and copies into it on its own servers. For the Google side, choose by how much you are moving:
| You want to move | Use | What arrives in OneDrive |
|---|---|---|
| The whole library, albums included | Google Takeout route — unpacked inside OneDrive | Google's original files in year and album folders |
| Up to 2,000 photos you pick | Photo Picker route (Steps 1–5) | Individual files; no albums, no location data; videos as Google's transcoded copy |
Selected Photos with the Photo Picker
Step 1: Integrating Google Photos with CloudsLinker:
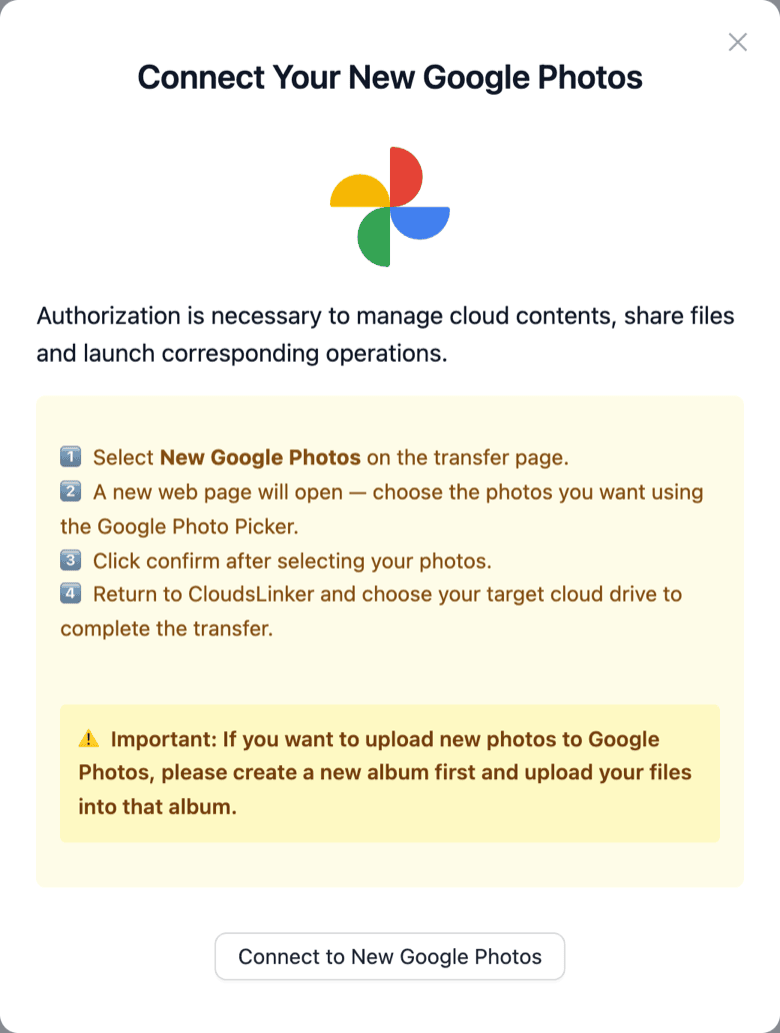
Sign in to CloudsLinker, click Add Cloud, choose New Google Photos and sign in on Google's own page. Since April 2025 Google no longer lets apps read a whole Photos library, so this connection does not list your albums; the photos are picked in Google's Photo Picker in Step 3.
Step 2: Connect OneDrive to CloudsLinker:
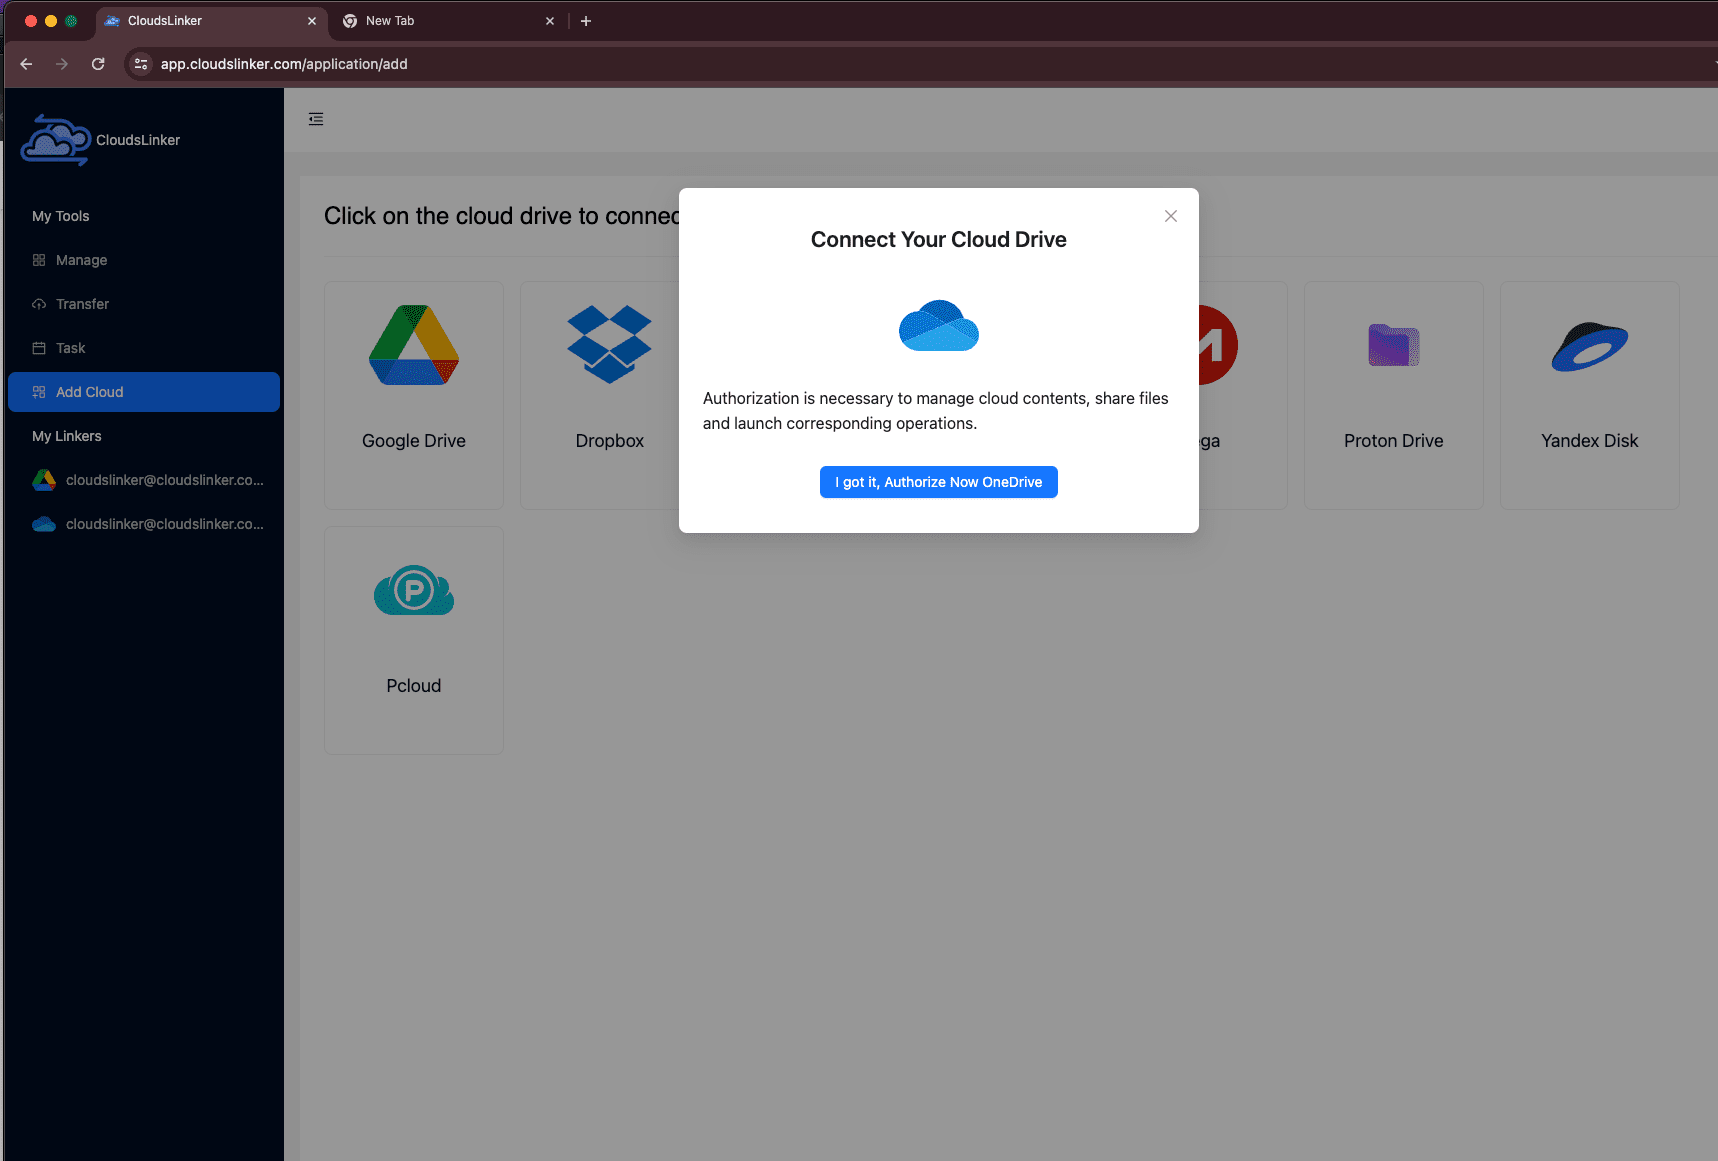
Next, click Add Cloud and choose OneDrive. You sign in on Microsoft's own page, where two-factor verification happens if your account uses it; CloudsLinker receives an access token, not your password.
Step 3: Configure the Transfer Process:
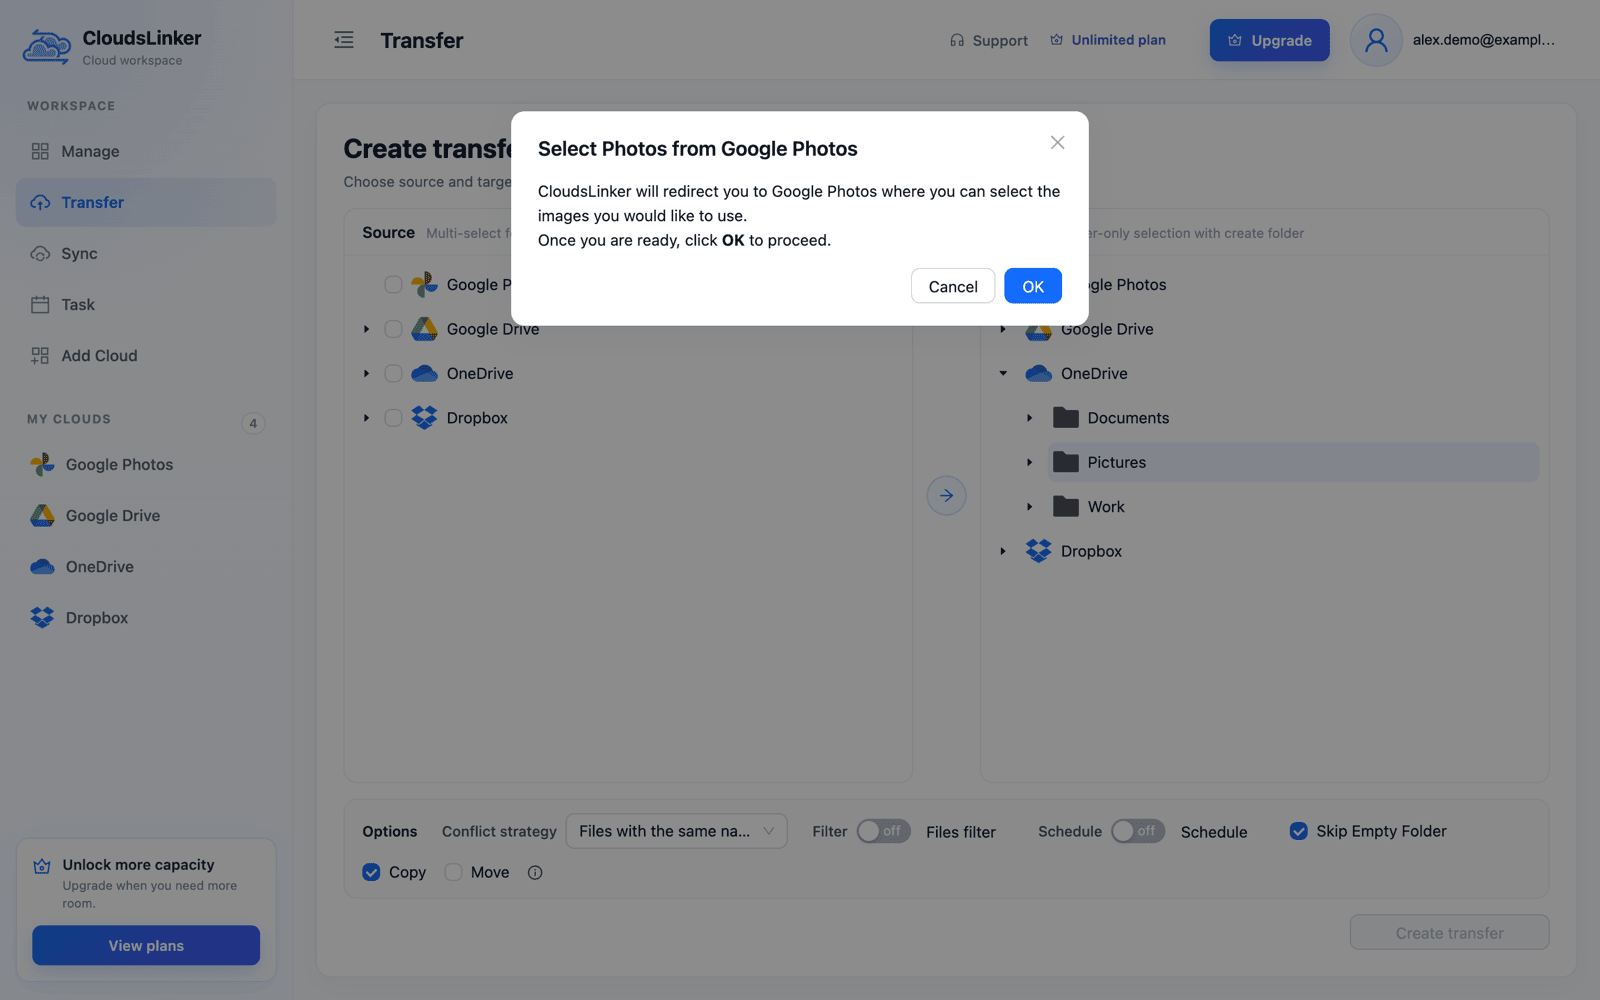
Open Transfer and tick New Google Photos as the source. Click OK in Select Photos from Google Photos, pick up to 2,000 photos and videos in the Google Photos tab that opens, confirm, and return to CloudsLinker. Select a OneDrive folder as the target and click Create transfer; file-type and size filters are optional. Picked items are copied as individual files — no albums, no location data, and videos as Google's transcoded copy.
Step 4: Monitor the Transfer Task:
Once the transfer starts, you can monitor the progress in the 'Task' section of CloudsLinker, where you can also manage or cancel ongoing tasks.

Step 5: Confirm the Transfer Completion:
When the transfer status updates to 'finished', your images will have been successfully moved from Google Photos to OneDrive. You can now access and manage your photos in OneDrive's user-friendly environment.

The Whole Library with Google Takeout, Unpacked Inside OneDrive
OneDrive is one of the four places Google Takeout can deliver an export to, so the whole library can get there without touching your PC. Microsoft's own advice for Takeout zips in OneDrive is to sync and extract them on a computer; CloudsLinker instead reads the zips where they are and copies the photos out of them into an ordinary OneDrive folder, album folders included.
Step 1: Have Takeout Deliver the Export to OneDrive
At takeout.google.com select only Google Photos, keep .zip with 2 GB or 10 GB parts, and choose Add to OneDrive as the delivery method. The parts are placed under Apps › Google Download Your Data in your OneDrive, and Google emails you when every part has arrived. Until you delete the zips the library takes up about twice its size in OneDrive, so check your free space first.
Step 2: Add the Zips as a Google Takeout
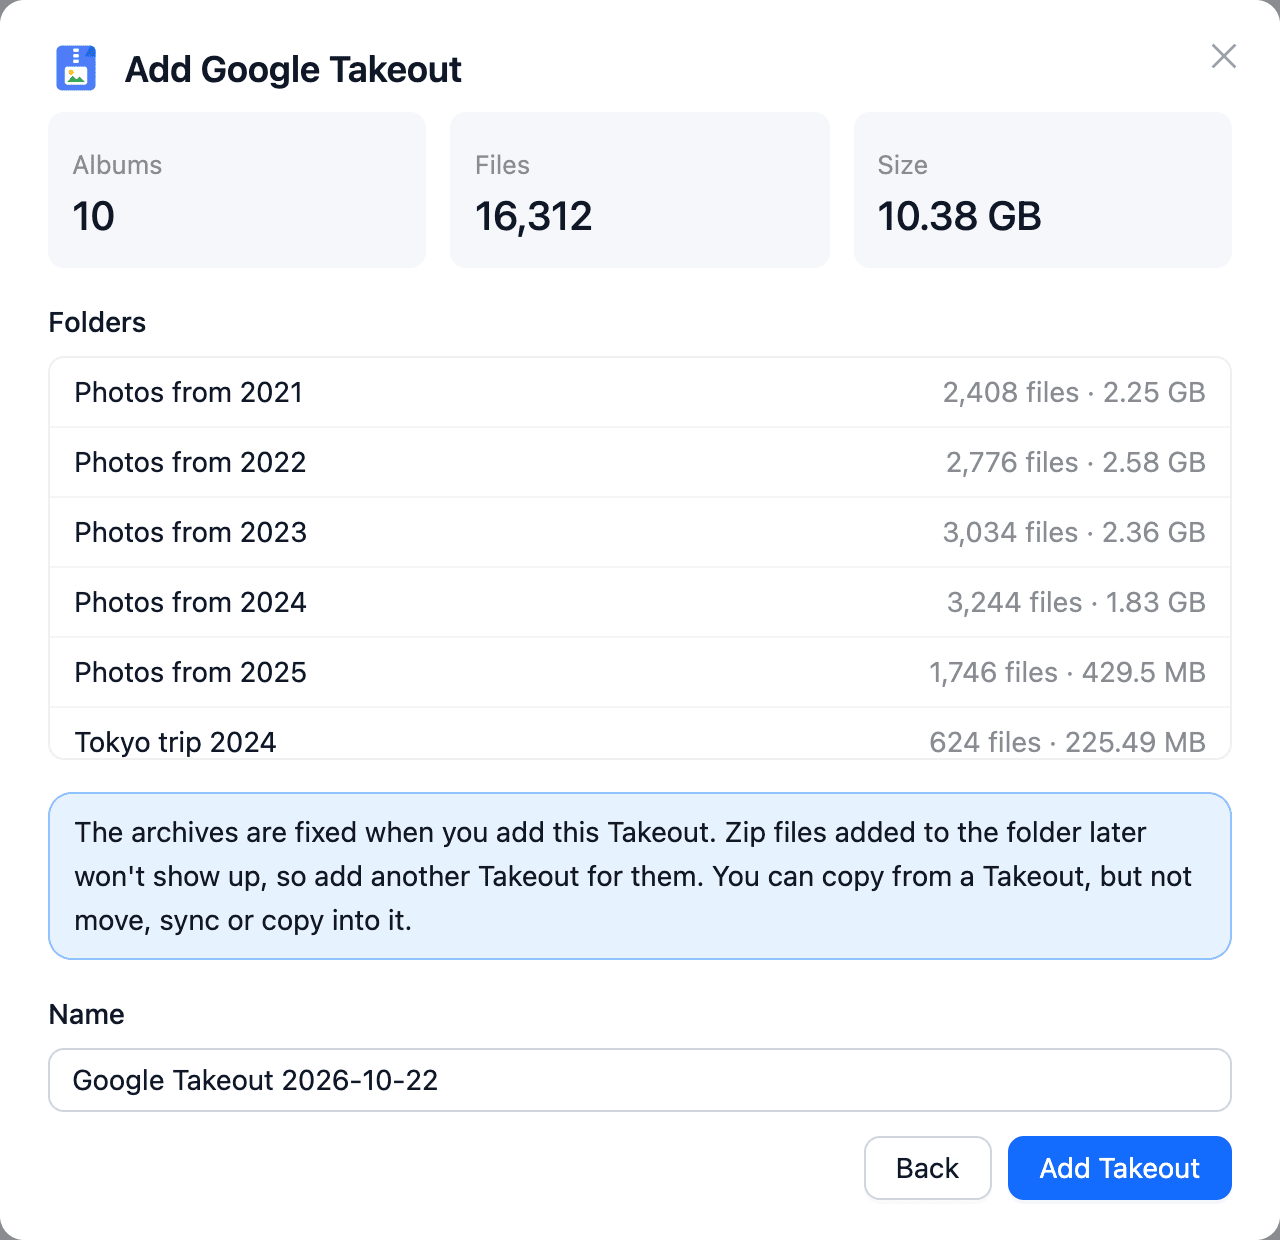
In CloudsLinker choose Add Cloud → Google Takeout, select your OneDrive under Cloud with your export, tick the folder that holds the zips and click Check archives. Look over the folders, file count and unpacked size, then click Add Takeout.
Step 3: Copy the Folders into Pictures
On Transfer, tick the Takeout's Photos from YYYY folders and select a folder in the same OneDrive as the target, for example a new Pictures/Google Photos. Keep Copy — the only mode for a Takeout — and click Create transfer.
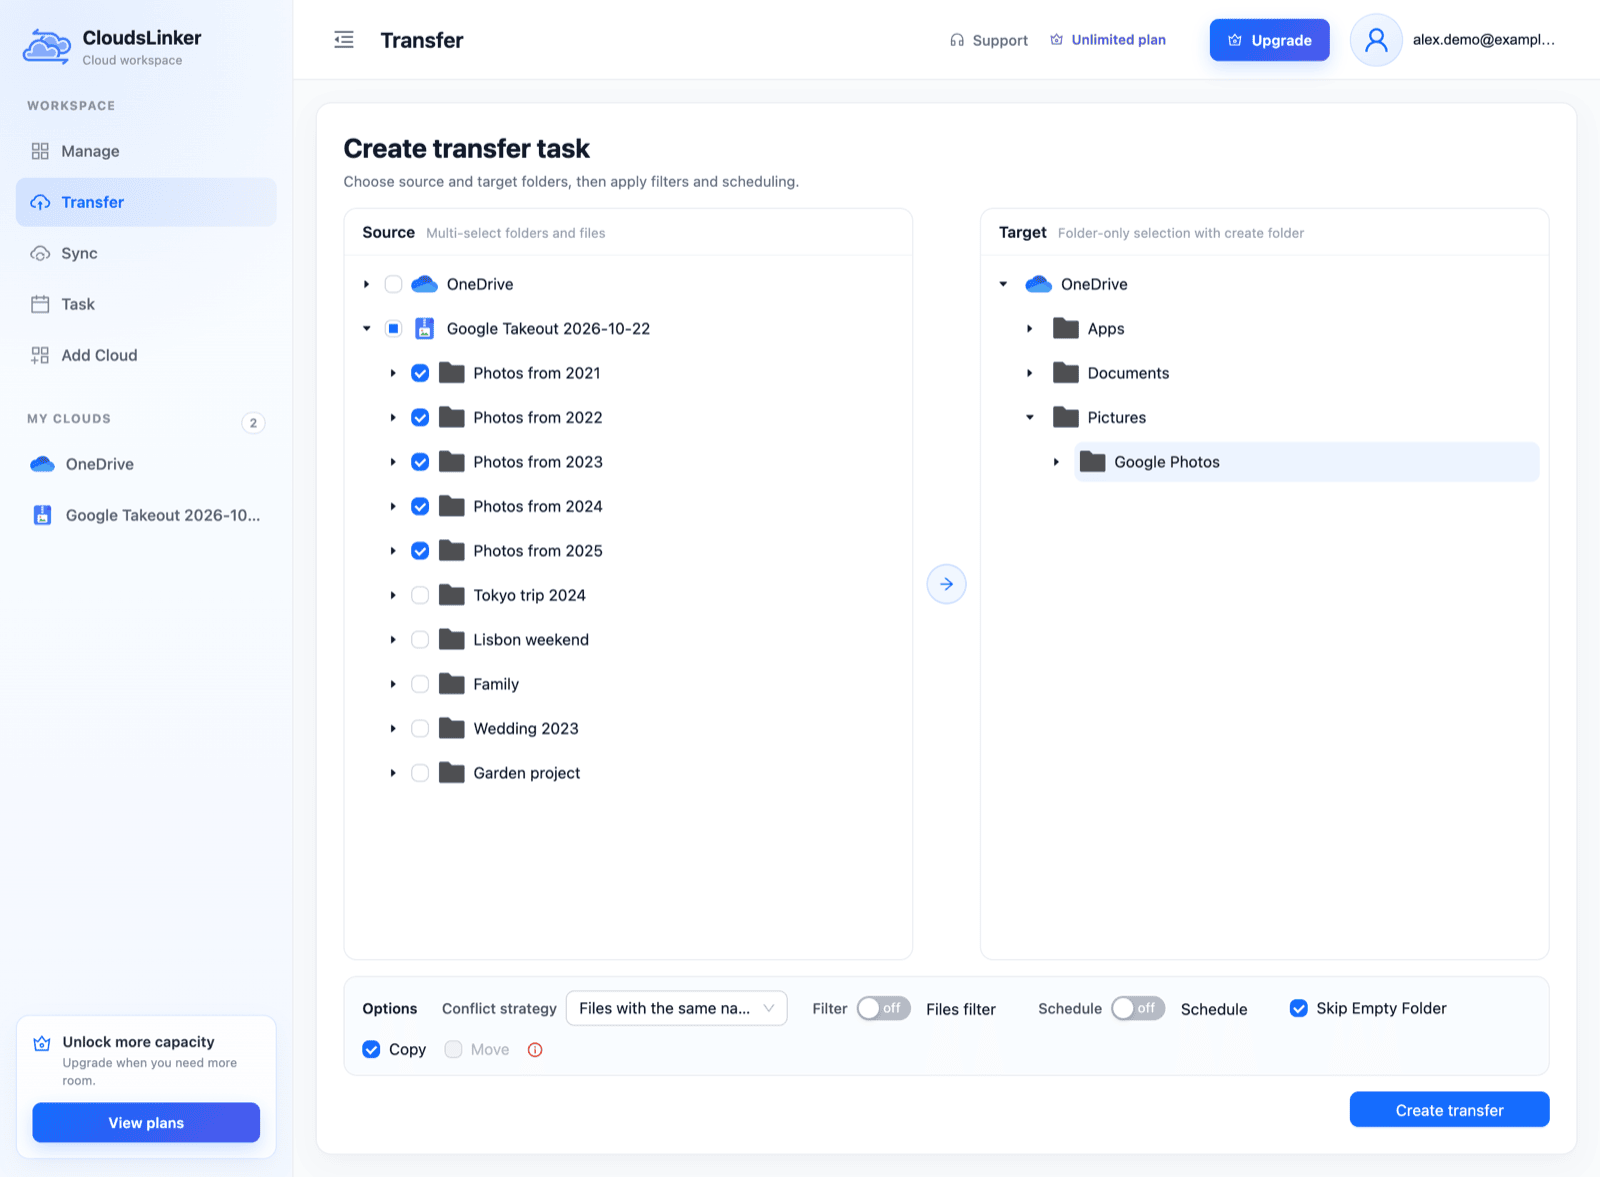
When the task is done, delete the zips from Apps › Google Download Your Data and remove the Takeout from CloudsLinker. Album folders repeat photos that are already in the year folders, so copy them as well only if you want the album grouping. Takeout also adds a .supplemental-metadata.json file to every photo; exclude json with Filter if you don't want them. Full walkthrough: Unzip Google Takeout in the Cloud.
Comparative Analysis of the Transfer Methods
| Method | Advantages | Disadvantages |
|---|---|---|
| Web-Based Transfers | Convenient and straightforward, ideal for users with basic needs. No software installation required. | Can be slower for larger photo collections; relies on internet connectivity and browser performance. |
| Rclone-Assisted Migration | Provides granular control and flexibility. Effective for managing large datasets and automated transfers. | Requires technical know-how for command-line usage; initial setup may be challenging for novice users. |
| Streamlined Transfer with CloudsLinker | Copies a whole Google Takeout export inside OneDrive, albums included, or up to 2,000 photos picked in Google's Photo Picker; nothing is downloaded to your computer. | Depends on a third-party service. Requires initial setup for cloud service integrations. |
Frequently Asked Questions (FAQ)
Watch Our Detailed Tutorial
Conclusion
Each transfer method from Google Photos to OneDrive offers unique benefits tailored to different user needs. Web-Based Transfers cater to simplicity and ease of use, making them perfect for quick, small-scale migrations. For tech-savvy users requiring advanced control, Rclone-Assisted Migration offers extensive customization and automation options. CloudsLinker stands out for its user-friendly interface and efficient cloud-to-cloud transfer, ideal for users who prefer a streamlined and fast process. Its Google Takeout route also unpacks a whole library, album folders included, inside OneDrive. Ultimately, the choice depends on your specific requirements and technical comfort level. By selecting the right method, you can ensure a smooth and effective transition of your photos to OneDrive.
Online Storage Services Supported by CloudsLinker
Transfer data between over 60 cloud services with CloudsLinker

OneDrive

Google Drive

Google Photos

Google Takeout

Shared Drive

OneDrive for Business

Dropbox

Box

Mega

pCloud

Yandex

ProtonDrive

AWS

GCS

iDrive

Storj

DigitalOcean

Wasabi

1fichier

PikPak

TeleBox

OpenDrive

Backblaze B2

Fastmail file

SharePoint

Nextcloud

ownCloud

Premiumize me

HiDrive

Put.io

Sugar Sync

SmugMug

Jottacloud

Seafile

Ftp

SFtp

NAS

WebDav

4shared

Icedrive

Cloudflare R2

Scaleway

Hetzner Object Storage

Synology C2 Object Storage

S3 Compatible

Doi

iCloud Drive

iCloud Photos

FileLU

Zoho WorkDrive

Telia Cloud / Sky

Drime

Filen

TeraBox

Internxt

Degoo

Gofile

Pixeldrain

Shade

Koofr
Didn' t find your cloud service? Be free to contact: [email protected]
Further Reading
Effortless FTP connect to google drive: Transfer Files in 3 Easy Ways
Learn More >
Google Photos to Proton Drive: 3 Effective Transfer Techniques
Learn More >
Smooth Transition from FTP to MEGA: Comprehensive File Migration Guide
Learn More >