Google Photos to Proton Drive: 3 Effective Transfer Techniques
Discover three practical methods to move your Google Photos to Proton Drive. Learn about Web-Based Uploading, Rclone, and CloudsLinker for a smooth transition.
Introduction
In the dynamic world of cloud storage, shifting your precious memories from Google Photos to Proton Drive has become a necessity for many. With an emphasis on privacy and security, selecting an appropriate method to transfer your photos is vital. This guide highlights 3 Practical Techniques to Shift Your Photos from Google Photos to Proton Drive. From the simple Web-Based Uploading to the more advanced Rclone and CloudsLinker, our guide caters to both beginners and tech enthusiasts. Explore these methods and make your photo migration to Proton Drive a breeze! For a whole library with albums, CloudsLinker can also copy a Google Takeout export from Google Drive to Proton Drive.
Understanding Proton Drive and Google Photos
What is Proton Drive?
Proton Drive is a secure cloud storage service that emphasizes privacy and security. Developed by the
team behind the well-known ProtonMail, Proton Drive offers end-to-end encrypted storage solutions,
ensuring that your data is protected from unauthorized access. It's a platform designed for individuals
and organizations who prioritize data security, offering features like zero-knowledge encryption, which
means even Proton Drive cannot access your stored data. This focus on privacy and security makes Proton
Drive a preferred choice for confidential and sensitive data storage.
What is Google Photos?
Google Photos is a popular cloud-based photo sharing and storage service provided by Google. It allows
users to upload, share, and store photos and videos. Known for its powerful search capabilities and
user-friendly interface, Google Photos provides features like automatic organization and categorization
of photos, face recognition, and location tagging. While it offers convenience and ease of use, some
users have concerns about privacy and data usage, leading them to look for more secure alternatives like
Proton Drive.
Why Migrate from Google Photos to Proton Drive?
The trend of moving images from Google Photos to Proton Drive is growing amongst users who prioritize enhanced control over their digital memories. This shift is motivated by several compelling reasons:
- Superior Privacy for Your Photos: Proton Drive ensures that your photos are protected with state-of-the-art privacy and security measures, a notch above what Google Photos offers. Utilizing end-to-end encryption, Proton Drive guarantees that your photos remain confidential and accessible only to you.
- Jurisdictional Data Protection: Storing your images on Proton Drive means benefiting from stringent privacy laws of the jurisdictions where your data is stored, adding an extra layer of security against data intrusions. Discover more about this with an in-depth look at Swiss privacy laws.
- Ad-free and Tracking-free Experience: Proton Drive’s commitment to maintaining an ad-free and tracking-free environment assures that your photographic memories are not exploited for advertising purposes.
- Intuitive User Interface: The simplicity and intuitiveness of Proton Drive's interface make managing and sharing your photos both easy and efficient.
- Commitment to Open Source: Proton Drive's reliance on open-source solutions like OpenPGP.js for encryption highlights its dedication to data security and user privacy.
These compelling features position Proton Drive as an attractive option for individuals and businesses seeking a secure, private photo storage platform. We will now delve into the methods for migrating your photos from Google Photos to Proton Drive.
Method One: Direct Web Transfer from Google Photos
Step 1: Export Images from Google Photos
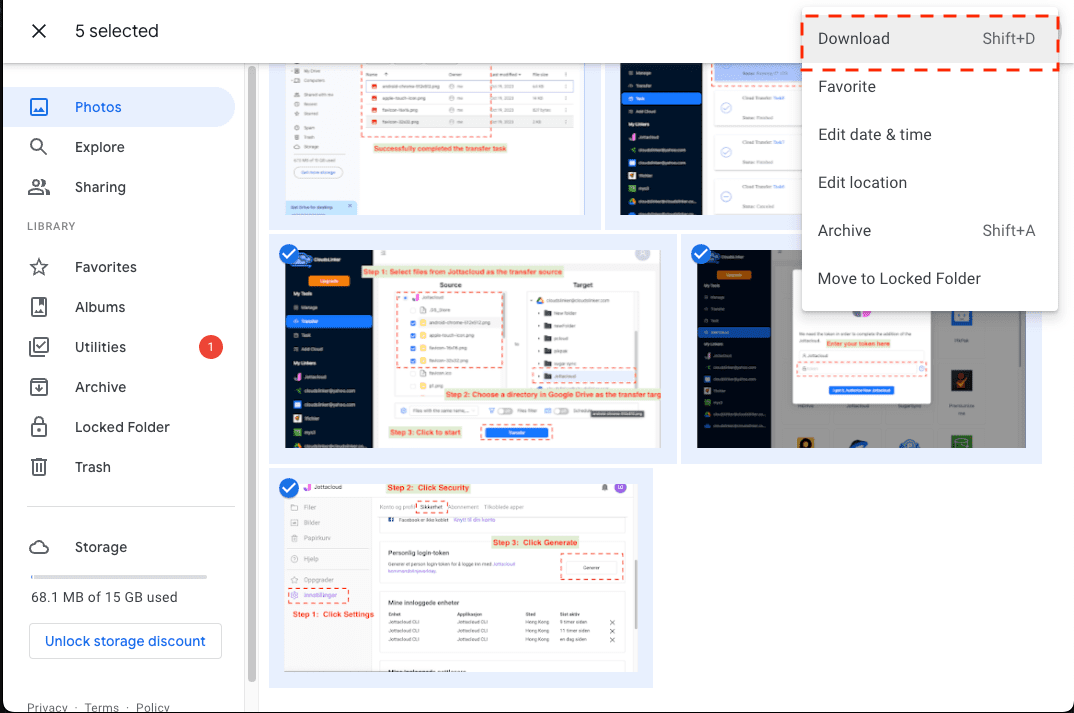
Initiate the process by navigating to Google Photos. Choose the images or albums you want to move. Utilize the 'Download' option found in the menu (indicated by three dots) to save the selected images to your device. Google Photos will automatically create a zip file when downloading multiple items.
Step 2: Unzip and Prepare Files
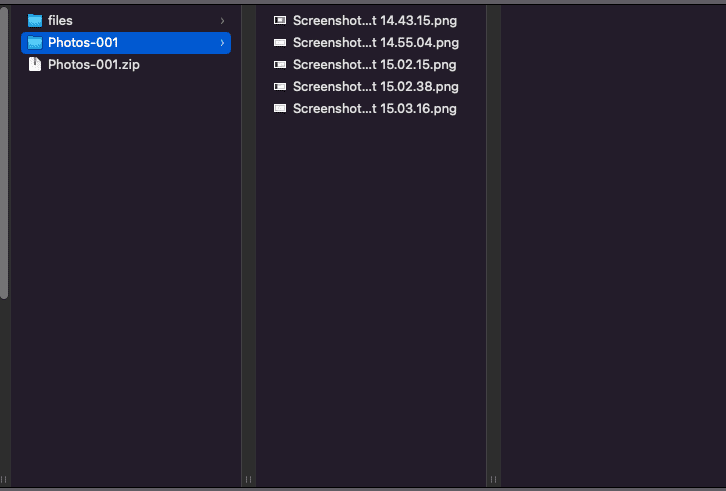
Once the download is complete, extract the files using the built-in tools on your macOS or Windows system. This step is essential to prepare your images for the next phase of the transfer.
Step 3: Upload Images to Proton Drive
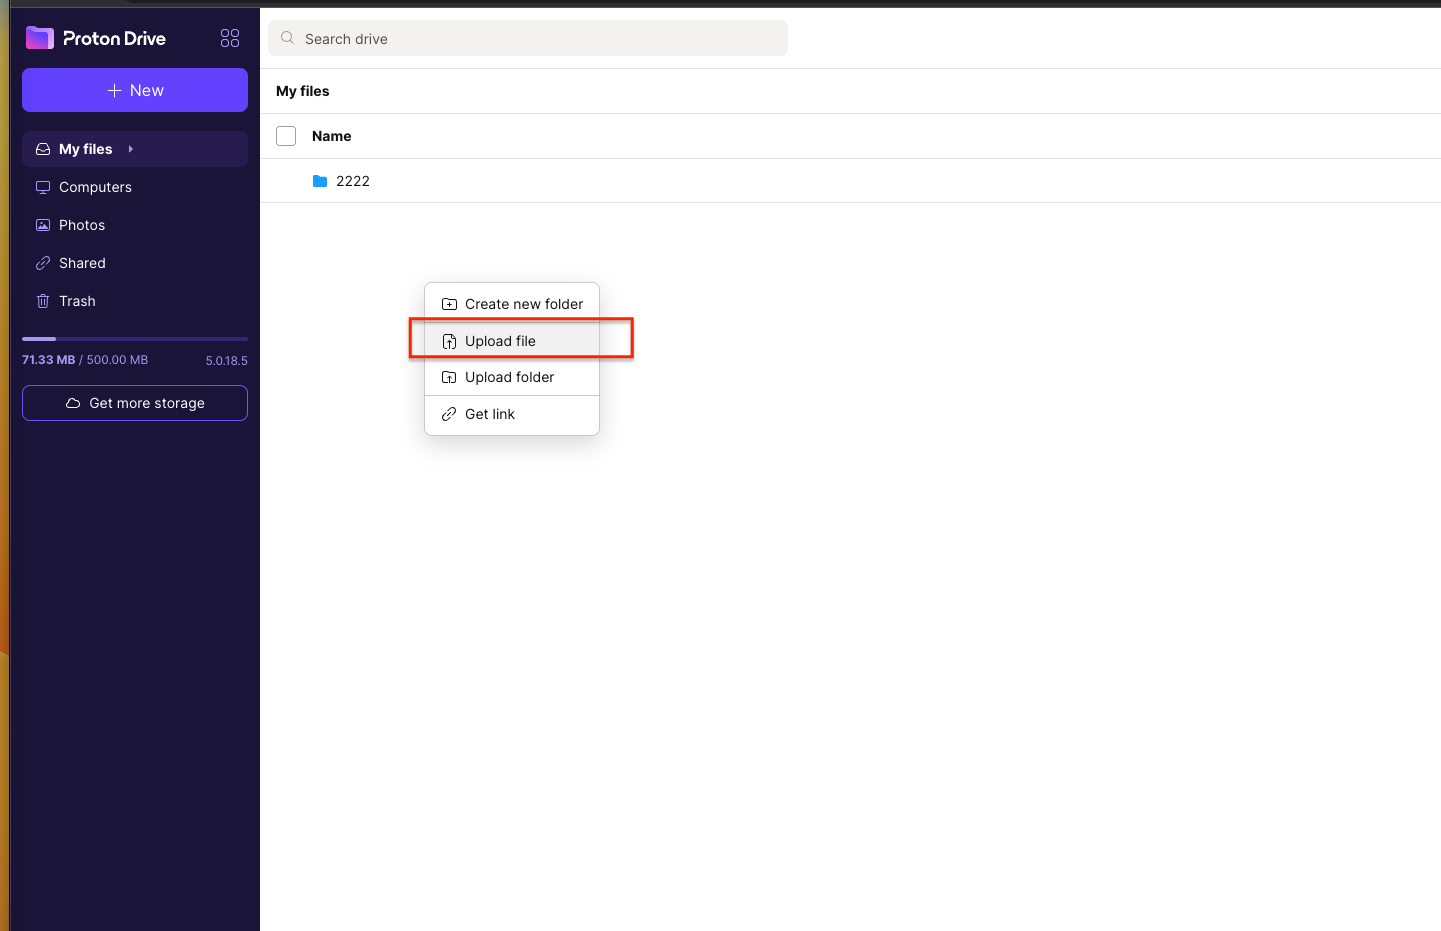
Log in to your Proton Drive account. Choose the 'Upload' option (usually accessible via right-click) to begin uploading the extracted folder. After the upload process is complete, your images from Google Photos will be securely stored on Proton Drive.
Method Two: Efficient Migration Using Rclone
Step 1: Install and Configure Rclone:
Begin by downloading Rclone from the official
site. Run the rclone config command to initiate the configuration process. For
integrating
with Proton Drive, choose to create a new remote ('n') and name it, for instance,
'myprotondrive'. Enter
your Proton Drive credentials when prompted.

Step 2: Export Google Photos with Takeout:
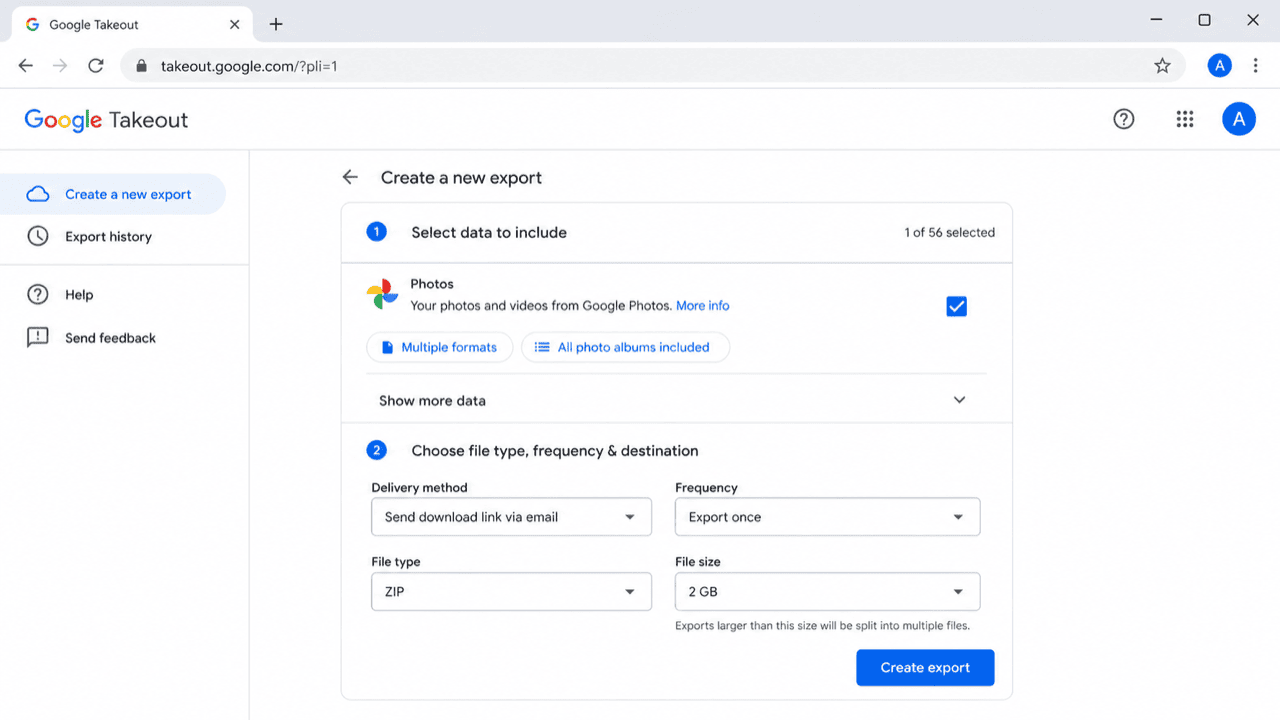
rclone's Google Photos backend can no longer read your library: according to the rclone documentation, since March 31, 2025 it can only download photos that rclone itself uploaded. Export the library with Google Takeout instead (Method One), download every part and extract them all into one folder, for example ~/Takeout. That folder is the source for rclone.
Step 3: Initiate the Migration Process:
To start transferring your photos, use the command rclone copy "~/Takeout/Google Photos" myprotondrive:Photos --progress. Replace the source with the folder you extracted and configuration and 'destination:' the Proton Drive remote and folder with your own; --progress shows the transfer status. Add --exclude "*.json" to leave out Takeout's metadata files.

Step 4: Confirm Transfer Completion:
Once the Rclone process is complete, verify that your photos are now available in your Proton Drive. This marks the successful migration of your images from Google Photos to Proton Drive using Rclone.
Method Three: Simplified Transfer with CloudsLinker
Two CloudsLinker Routes — Pick One First
CloudsLinker signs in to Proton Drive with your Proton email and password and uploads on its own servers; Proton encrypts each file as it arrives. On the Google side there are two sources:
| You want to move | Use | What arrives in Proton Drive |
|---|---|---|
| Everything, albums included | Google Takeout route | Original files in Takeout's year and album folders |
| A selection of up to 2,000 photos | Photo Picker route (Steps 1–5) | Loose files without albums or location data; transcoded videos |
Selected Photos with the Photo Picker
Step 1: Integrating Google Photos with CloudsLinker:
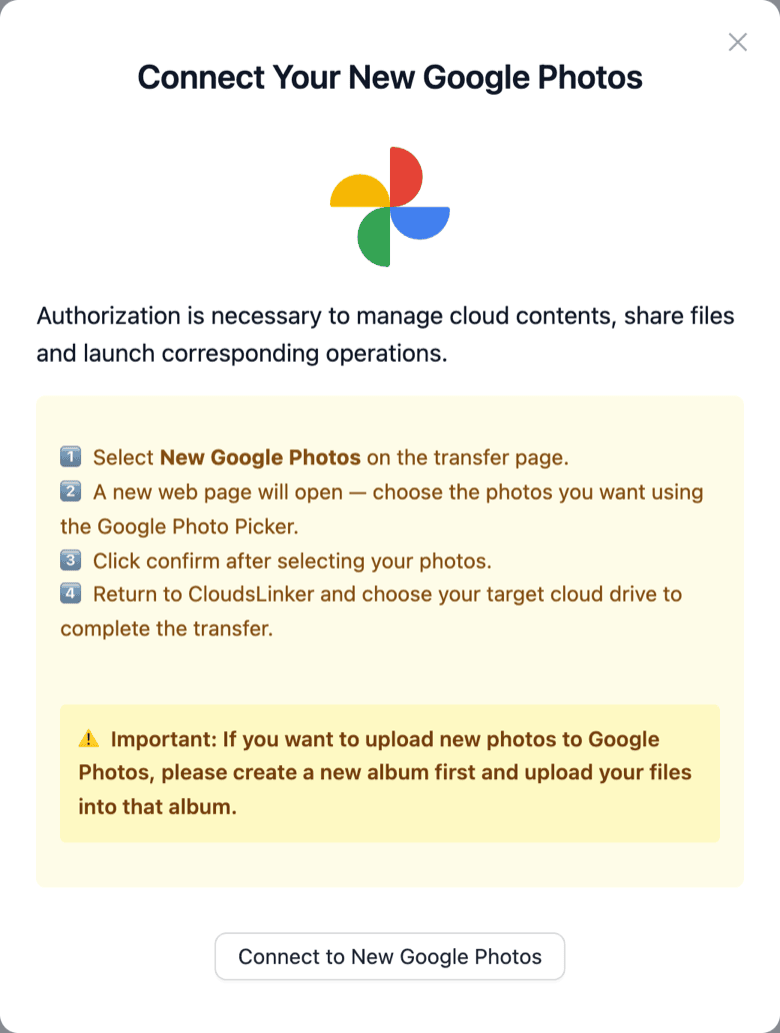
Sign in to CloudsLinker, click Add Cloud, choose New Google Photos and sign in on Google's own page. Since April 2025 Google no longer lets apps read a whole Photos library, so this connection does not list your albums; the photos are picked in Google's Photo Picker in Step 3.
Step 2: Connect Proton Drive to CloudsLinker:
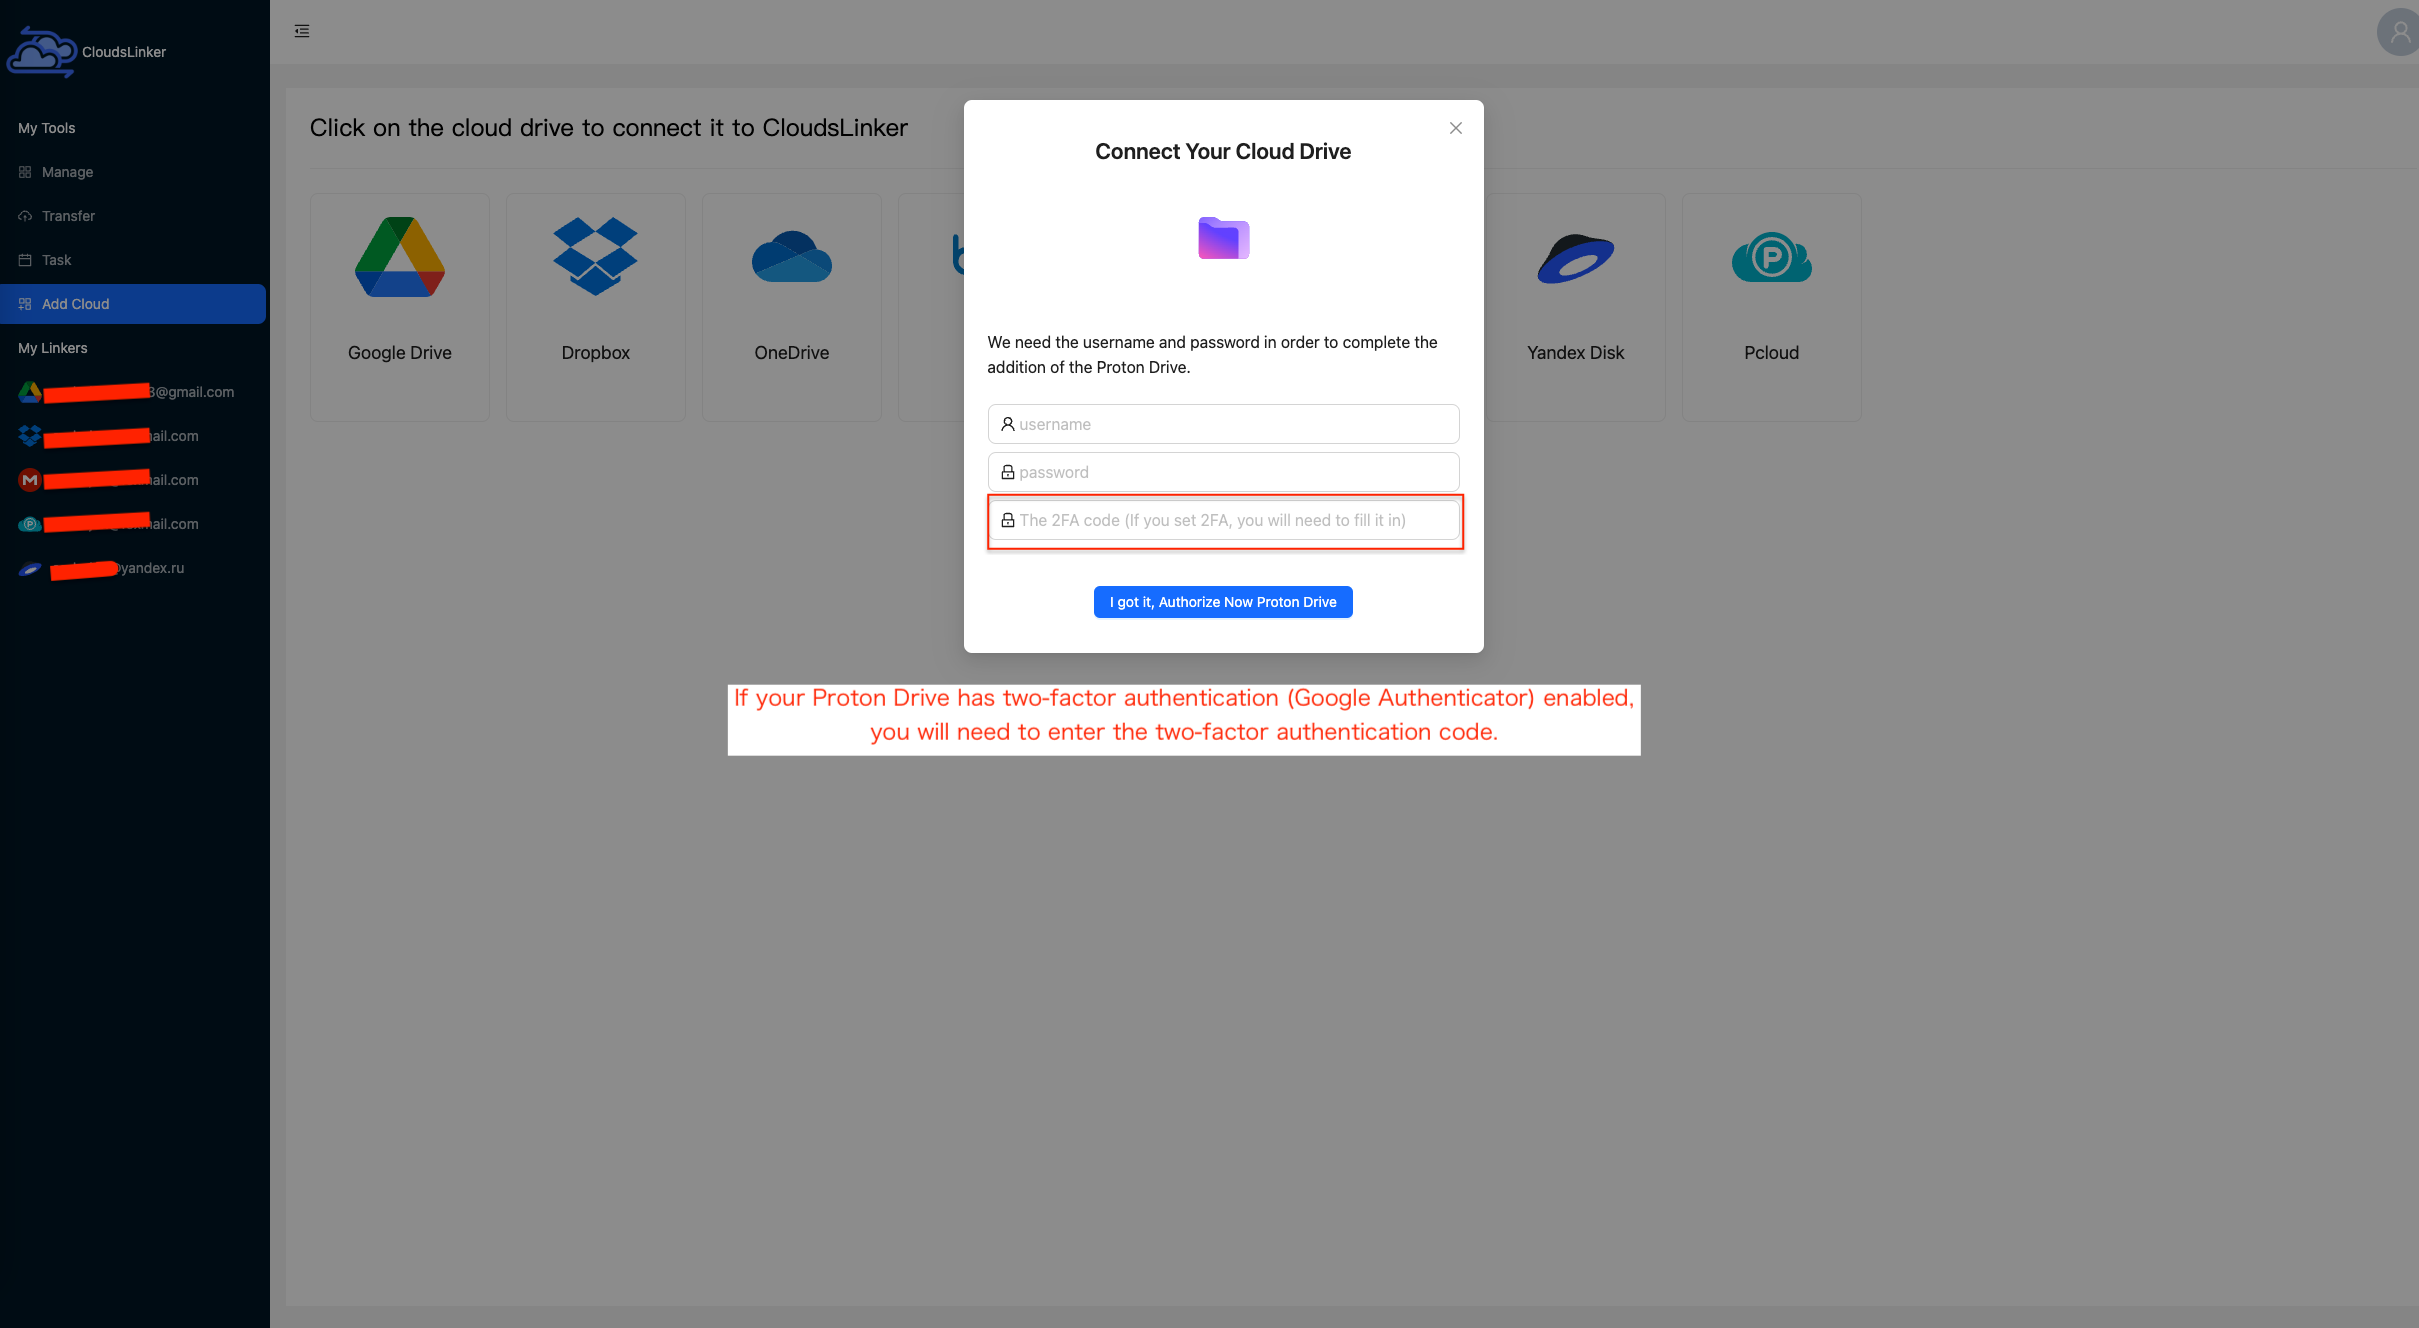
The next step is to link your Proton Drive account. Enter your Proton email and password. Two-factor authentication has to be switched off on the Proton account first — CloudsLinker signs in server-side and has no field for a code.
Step 3: Configure the Transfer Process:
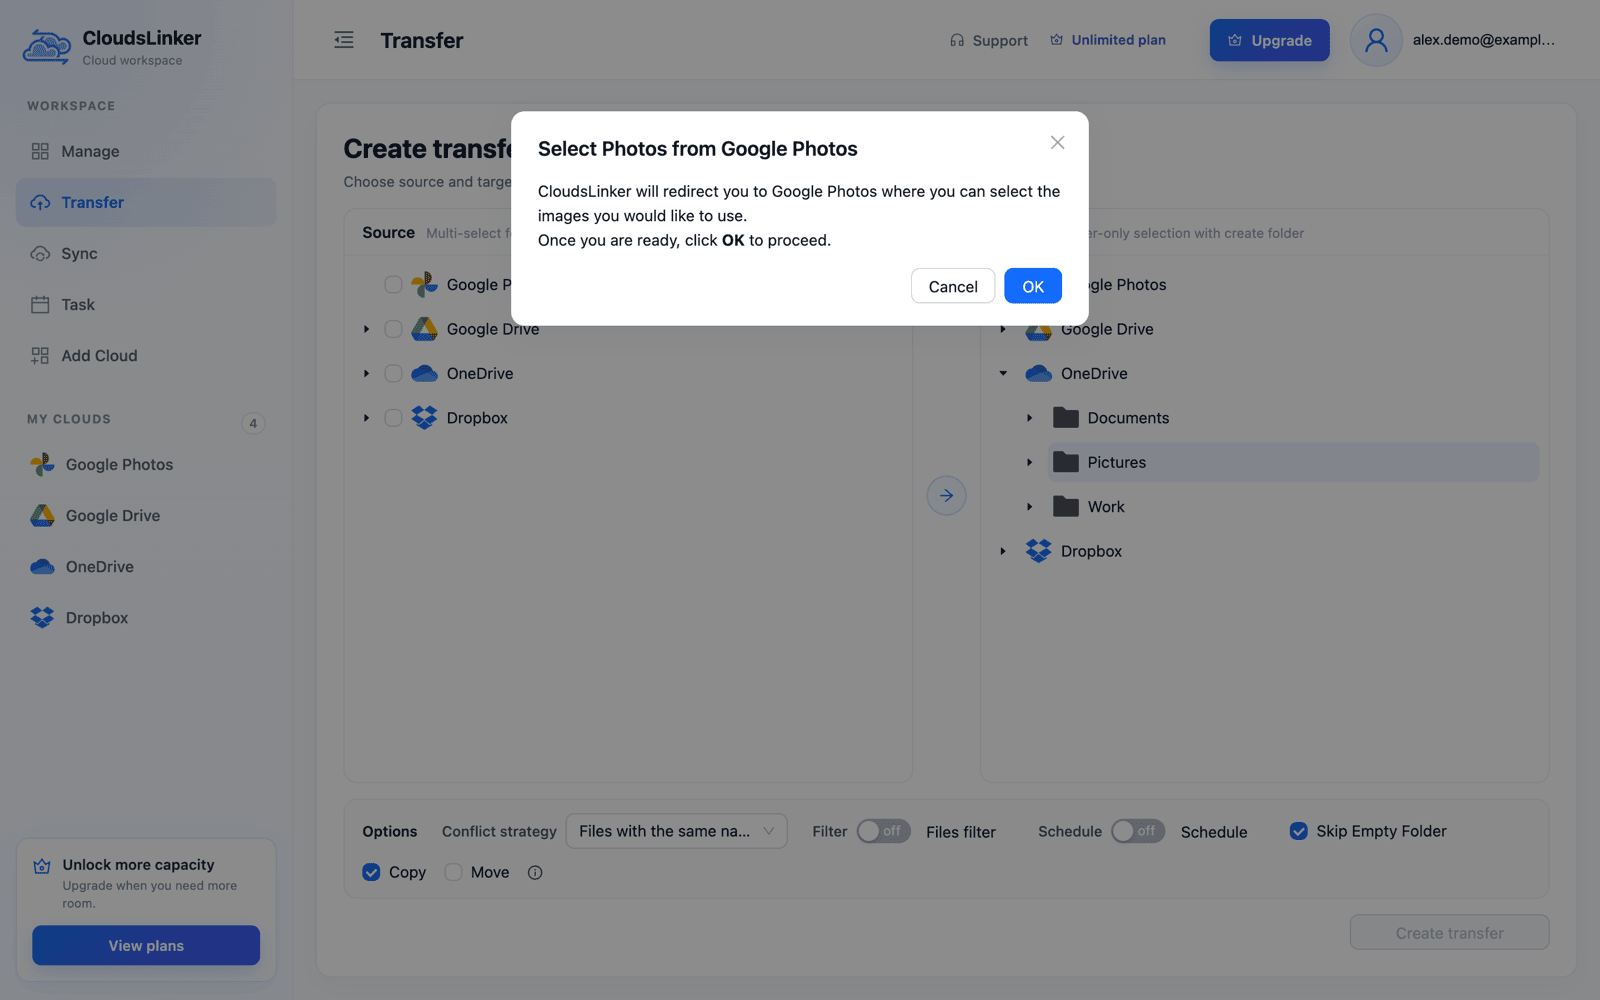
Open Transfer and tick New Google Photos as the source. Click OK in Select Photos from Google Photos, pick up to 2,000 photos and videos in the Google Photos tab that opens, confirm, and return to CloudsLinker. Select a Proton Drive folder as the target and click Create transfer; file-type and size filters are optional. Picked items are copied as individual files — no albums, no location data, and videos as Google's transcoded copy.
Step 4: Monitor the Transfer Task:
Once you initiate the transfer, you can track the progress under the 'Task' section of CloudsLinker, where you can also manage or cancel tasks.

Step 5: Confirm the Transfer Completion:
After the transfer is complete and the status updates to 'finished', your images will be successfully transferred from Google Photos to Proton Drive. You can now access and manage your photos in Proton Drive's secure environment.

The Whole Library with Google Takeout
If you are leaving Google Photos for good, Google Takeout is the export to use: it is the only one that still contains every photo and video as an original file, with a folder per album. CloudsLinker reads the export from Google Drive and copies it into Proton Drive, so the zips never have to be downloaded.
Step 1: Export Google Photos to Google Drive
At takeout.google.com select only Google Photos, choose .zip with 2 GB or 10 GB parts and Add to Drive as the delivery method. Wait for Google's email that the export is complete, then connect that Google Drive in CloudsLinker. The zips count toward your Google storage until you delete them.
Step 2: Add the Export as a Google Takeout
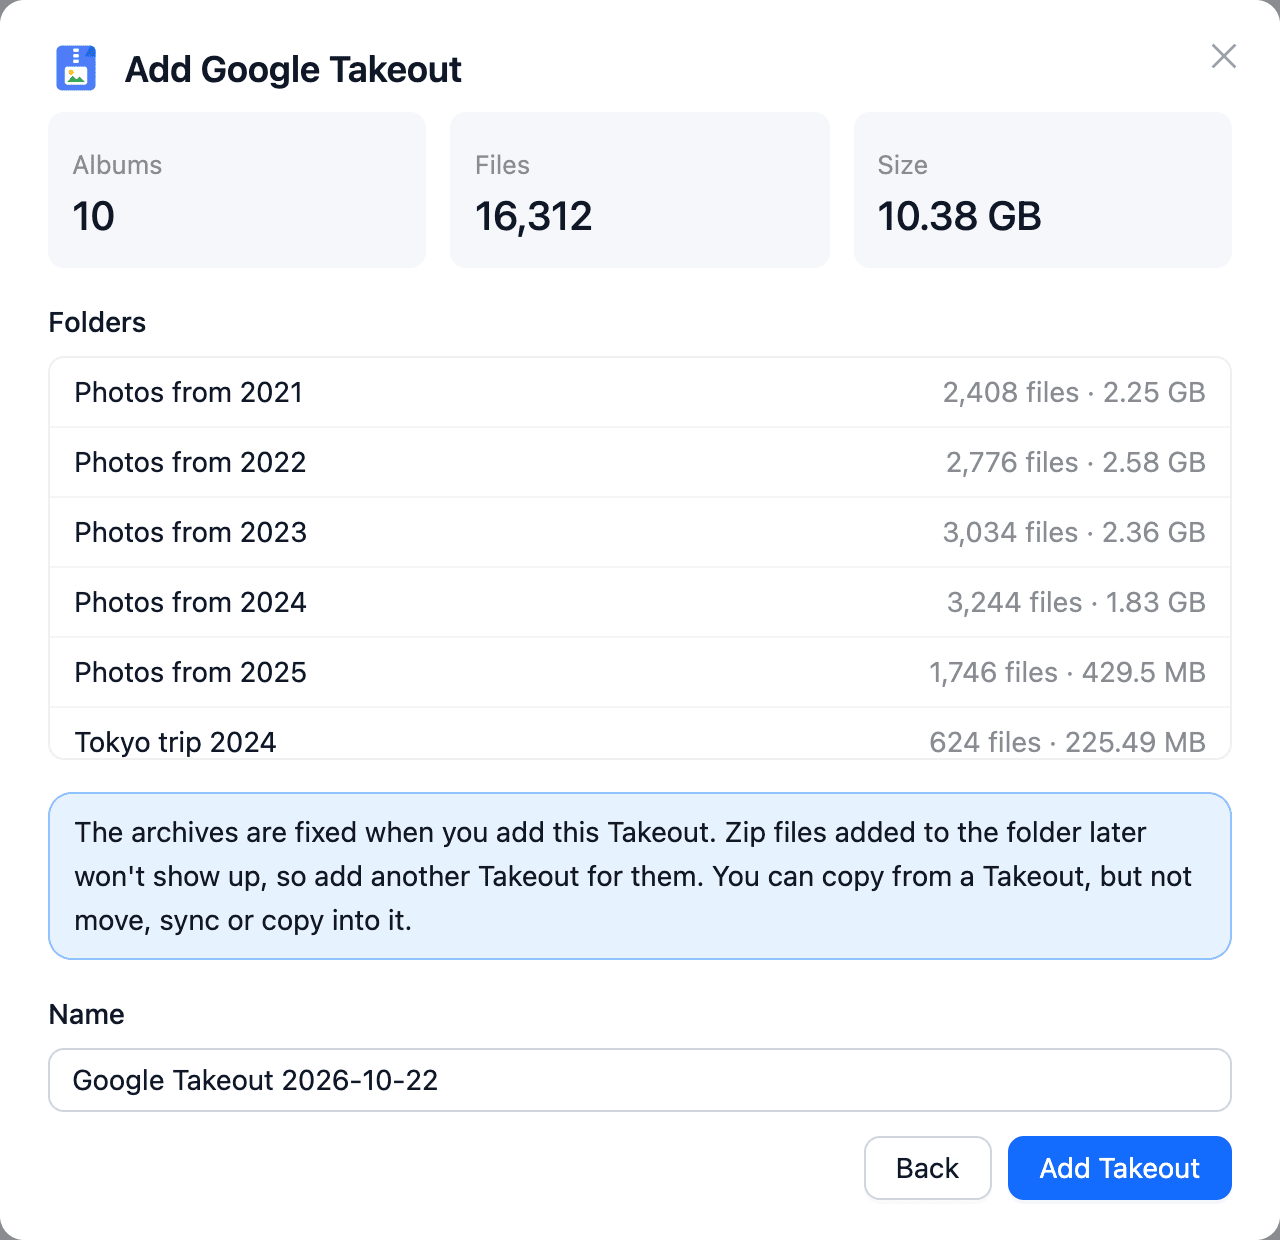
Choose Add Cloud → Google Takeout, pick the Google Drive with the export, tick its Takeout folder and click Check archives. The review shows the year and album folders and the unpacked size — compare it with your Proton storage — then click Add Takeout.
Step 3: Copy the Folders to Proton Drive
On Transfer, tick the Takeout's Photos from YYYY folders and select Proton Drive as the target — connected as in Step 2 above, with two-factor authentication off — then create a folder such as Google Photos. Click Create transfer; only Copy is available.
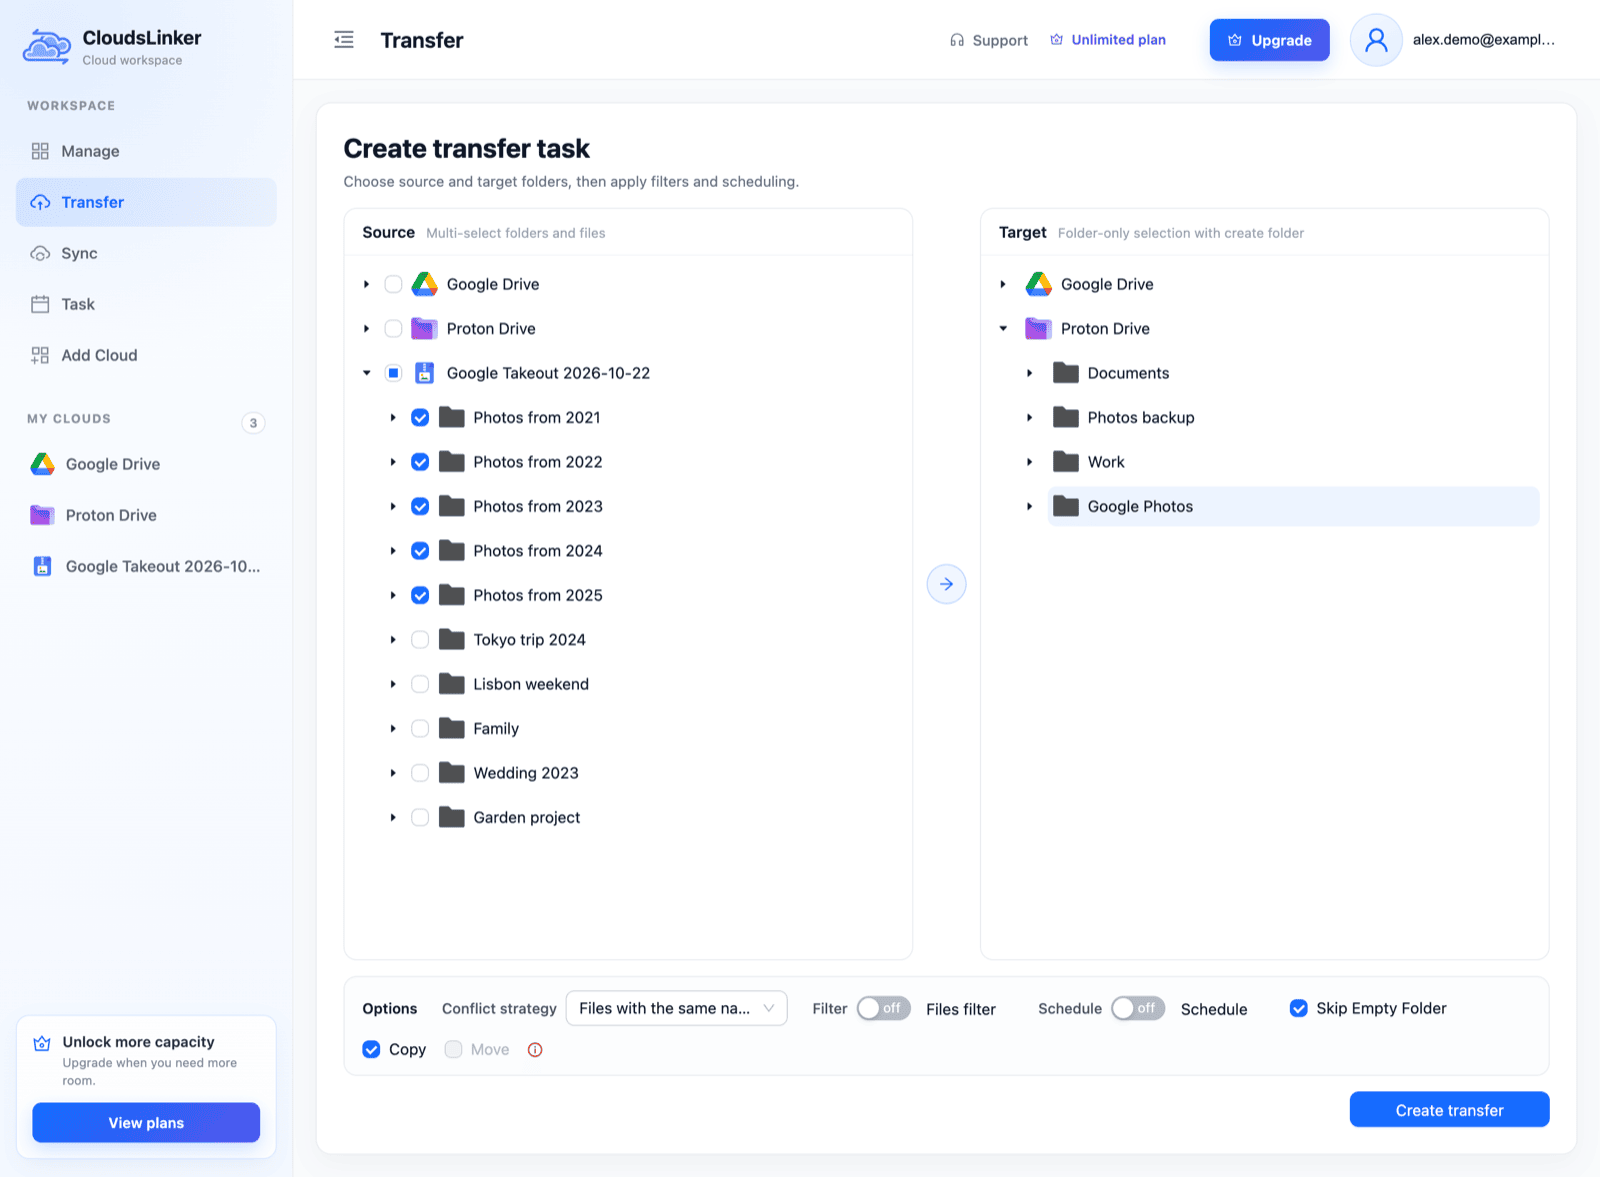
The copies are end-to-end encrypted by Proton like anything else you upload. Album folders repeat photos from the year folders, and Takeout adds a .supplemental-metadata.json file to every photo — exclude json with Filter if you don't need them. Once you've checked Proton Drive, delete the zips from Google Drive and, if you are leaving, the library from Google Photos. Full walkthrough: Unzip Google Takeout in the Cloud.
Comparative Analysis of the Methods
| Method | Advantages | Disadvantages |
|---|---|---|
| Direct Web Transfer | Simple and intuitive, no need for additional software. Ideal for less tech-savvy users. | Time-consuming for large batches of photos; depends on web browser speed and internet connection. |
| Efficient Migration Using Rclone | Offers high-level control and customization. Suitable for batch transfers and automation. | Requires command-line knowledge; setup can be complex for beginners. |
| Simplified Transfer with CloudsLinker | Copies a whole Google Takeout export (albums included) or up to 2,000 picked photos to Proton Drive, with no local storage used. | Dependent on third-party service; requires cloud platform integrations and authorizations. |
Watch Our Step-by-Step Video Tutorial
Master the techniques of transferring your photos from Google Photos to Proton Drive with our comprehensive video tutorial. Whether you're a beginner or experienced in cloud storage, our video will guide you through each step. Discover the ease of photo migration and enhance your digital workflow. Watch now and elevate your file transfer capabilities!
Frequently Asked Questions (FAQ)
Conclusion
Each approach offers unique benefits. Web-Based Uploading is straightforward and user-friendly, Rclone is best for those who prefer control and security, while CloudsLinker strikes a balance with its speed and advanced features, including copying a whole Google Takeout export with its albums. Whether you're moving photos from Google Photos to Proton Drive, pick the technique that aligns with your needs for a smooth and efficient transfer.
Online Storage Services Supported by CloudsLinker
Transfer data between over 60 cloud services with CloudsLinker

OneDrive

Google Drive

Google Photos

Google Takeout

Shared Drive

OneDrive for Business

Dropbox

Box

Mega

pCloud

Yandex

ProtonDrive

AWS

GCS

iDrive

Storj

DigitalOcean

Wasabi

1fichier

PikPak

TeleBox

OpenDrive

Backblaze B2

Fastmail file

SharePoint

Nextcloud

ownCloud

Premiumize me

HiDrive

Put.io

Sugar Sync

SmugMug

Jottacloud

Seafile

Ftp

SFtp

NAS

WebDav

4shared

Icedrive

Cloudflare R2

Scaleway

Hetzner Object Storage

Synology C2 Object Storage

S3 Compatible

Doi

iCloud Drive

iCloud Photos

FileLU

Zoho WorkDrive

Telia Cloud / Sky

Drime

Filen

TeraBox

Internxt

Degoo

Gofile

Pixeldrain

Shade

Koofr
Didn' t find your cloud service? Be free to contact: [email protected]
Further Reading
Effortless FTP connect to google drive: Transfer Files in 3 Easy Ways
Learn More >
Google Photos to OneDrive: 3 Innovative Transfer Strategies
Learn More >
Smooth Transition from FTP to MEGA: Comprehensive File Migration Guide
Learn More >