Back-Up NAS to OpenDrive: A Comprehensive Guide
Learn how to securely back up your NAS (Network Attached Storage) to OpenDrive for enhanced data security, accessibility, and peace of mind. Discover step-by-step instructions, tips, and best practices.
Introduction
As data accumulation grows, backing up your NAS (Network Attached Storage) to a cloud service like OpenDrive becomes essential. This guide walks you through the advantages of OpenDrive’s infinite storage and how it facilitates access across any platform, anywhere, anytime. Transitioning your NAS backups to OpenDrive not only ensures data safety but also leverages cloud accessibility to its fullest.
Quick Navigation
The Significance of NAS for Data Storage
NAS devices stand out for their efficiency in centralized data storage, allowing users to easily access and manage files across a network. Their reliability and scalable storage options make them ideal for personal and professional use. However, even with robust local storage solutions, the risk of data loss due to hardware failure or physical damage remains a concern, highlighting the need for a secure and reliable backup solution.
Backing up NAS data to OpenDrive introduces a new dimension of data protection and accessibility, combining the physical storage benefits of NAS with the flexibility and security of cloud storage. OpenDrive's unlimited storage space and cross-platform access elevate your data management strategy to new heights.
NAS: Key Features and Advantages
- Centralized Storage: Facilitates easy access and management of files from any networked device, streamlining data sharing and collaboration.
- Scalable Storage Solutions: Offers flexible storage capacity that can be adjusted according to needs, ensuring your storage grows with your data.
- Data Redundancy: Supports multiple drives for data redundancy, reducing the risk of data loss due to hardware failures.
Unlocking OpenDrive's Cloud Storage Capabilities
OpenDrive emerges as a premier cloud storage service with its offer of unlimited storage capacity and sophisticated file management tools. It stands out for its comprehensive security measures, customizable storage solutions, and extensive file sharing and collaboration features. OpenDrive is designed to cater to the evolving needs of digital storage, offering secure, flexible, and accessible data management solutions.
With OpenDrive, users experience a transformative cloud storage solution that goes beyond mere data storage. It includes end-to-end encryption, custom storage plans, and an array of tools aimed at enhancing collaboration and file sharing. OpenDrive redefines the boundaries of cloud storage, providing a platform for secure and efficient data management.
Why Back-Up NAS to OpenDrive?
Backing up your NAS data to OpenDrive offers a strategic advantage by ensuring your data is protected and accessible across any platform, anytime, leveraging OpenDrive's unlimited storage capacity:
- Infinite Storage Space: OpenDrive distinguishes itself with its unlimited storage offering, enabling extensive data backup without the constraints of physical storage limits.
- Universal Cloud Access: Ensures your backed-up data is available from any device, anywhere, providing unparalleled access and convenience.
- Enhanced Data Protection: Utilizes top-tier encryption and security protocols to safeguard your data, offering peace of mind that your NAS backups are secure in the cloud.
- Streamlined Data Management: OpenDrive's advanced file organization and management tools facilitate efficient handling of your backed-up NAS data.
Choosing OpenDrive for your NAS backups not only enhances your data protection strategy but also provides unlimited storage and universal access. This ensures your data is both secure and easily manageable, regardless of where you are or what device you're using.
Preparing Your NAS for Backup to OpenDrive
To ensure a seamless backup of your NAS data to OpenDrive, thorough preparation is critical. Follow these steps to ready your system for an efficient transition to unlimited cloud storage:
- Check NAS Accessibility: Confirm that the SMB protocol on your NAS is enabled and properly configured for network access. This step ensures that your NAS can be accessed from the network for backup processes.
- Verify User Credentials: Ensure that you have the correct username and password for your NAS. These credentials are essential for establishing a connection between your NAS and the backup software or service you'll use to transfer data to OpenDrive.
- Organize NAS Data: Before backing up, organize your data within the NAS. A well-structured data layout facilitates efficient backup and future retrieval. Consider grouping files by type, project, or importance, which will also aid in utilizing OpenDrive's file management capabilities.
- Familiarize with OpenDrive Features: Gain an understanding of OpenDrive's unlimited storage, advanced file management, and cross-platform access. Knowing how to leverage these features will enhance your backup experience, ensuring efficient data management and accessibility.
Proper preparation is crucial for a smooth backup of your NAS to OpenDrive. By ensuring your NAS is accessible, verifying your credentials, organizing your data, and understanding OpenDrive's features, you're setting the stage for a successful backup experience. This will allow you to take full advantage of OpenDrive's unlimited storage and sophisticated file management capabilities, ensuring your data is secure and easily accessible across any device.
Step-by-Step Guide: Backing Up Your NAS to OpenDrive
Step 1: Access NAS via SMB Protocol
Begin by connecting to your NAS using the SMB protocol. This involves navigating to your network settings and entering the NAS's IP address. Once connected, authenticate using your NAS username and password to access the files you wish to backup.
Step 2: Download Files from NAS
With access to your NAS, select the files or folders you intend to backup. You can download these directly to your local computer using the file manager interface. Ensure you maintain the organization of your files to facilitate an easy upload process to OpenDrive.
Step 3: Log into OpenDrive
Open your web browser and visit OpenDrive. Log into your account using your OpenDrive credentials. For enhanced security, activating two-factor authentication is recommended if you haven't already done so.
Step 4: Upload Files to OpenDrive
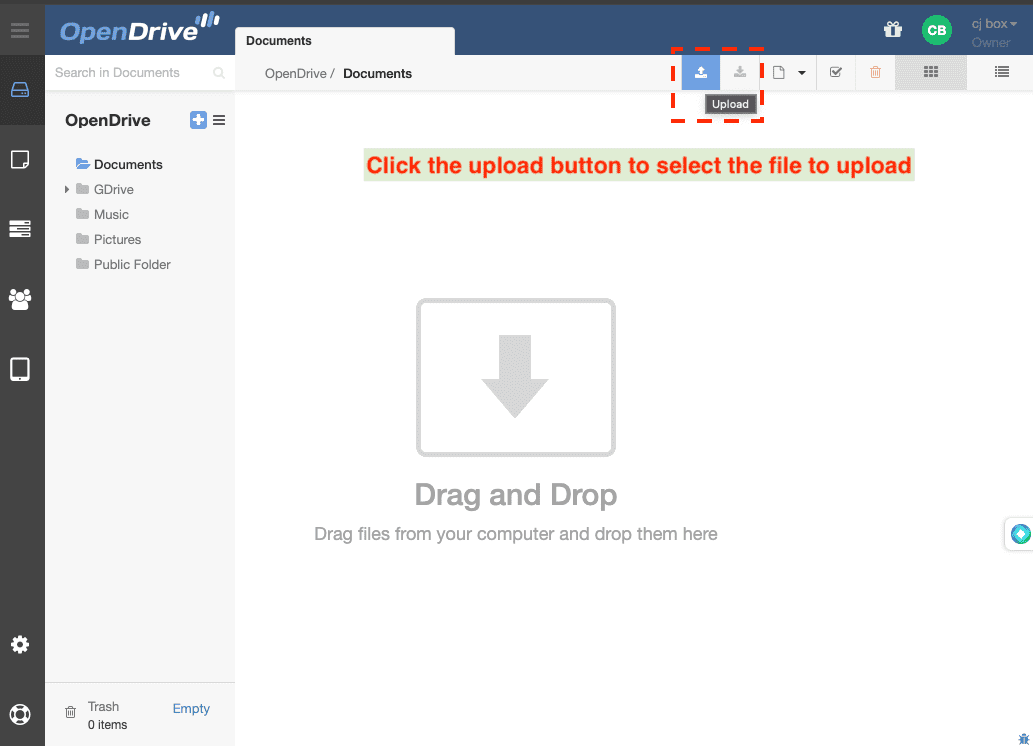
In OpenDrive, find the 'Upload Files' button, usually located at the top of the interface. Select the files you previously downloaded from your NAS and start the upload process. OpenDrive's platform allows for uploading multiple files at once, maximizing efficiency and leveraging its unlimited storage capacity.
Alternative Method: Direct Backup from NAS
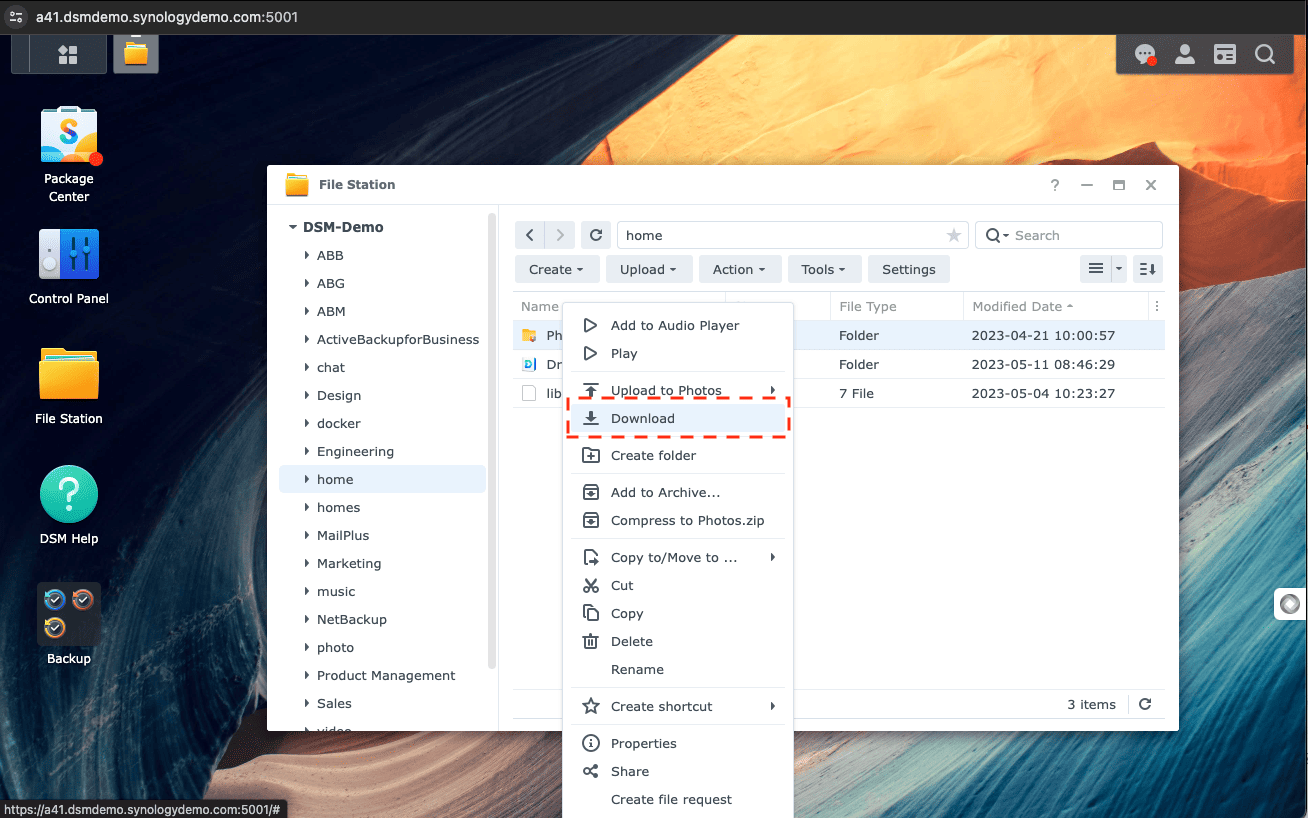
If your NAS supports a web-based operating system, like DiskStation Manager, you can log in to the NAS interface, navigate to the file manager, select the files for backup, and use the 'Download' option. This method bypasses the need to download files to your local computer, streamlining the backup process directly to OpenDrive.
Optimizing NAS Backups to OpenDrive with CloudsLinker
Maximizing Efficiency with CloudsLinker:
CloudsLinker revolutionizes the way we think about NAS backups by facilitating seamless, bandwidth-efficient migrations to OpenDrive. This innovative platform supports direct cloud-to-cloud transfers, significantly reducing the need for local bandwidth and accelerating the backup process. With CloudsLinker, users can take full advantage of OpenDrive's unlimited storage capacity without overloading their local network, making it an indispensable tool for modern data management. Discover more about leveraging CloudsLinker for efficient data transfers in our detailed Support Center.
Step 1: Integrating NAS with CloudsLinker
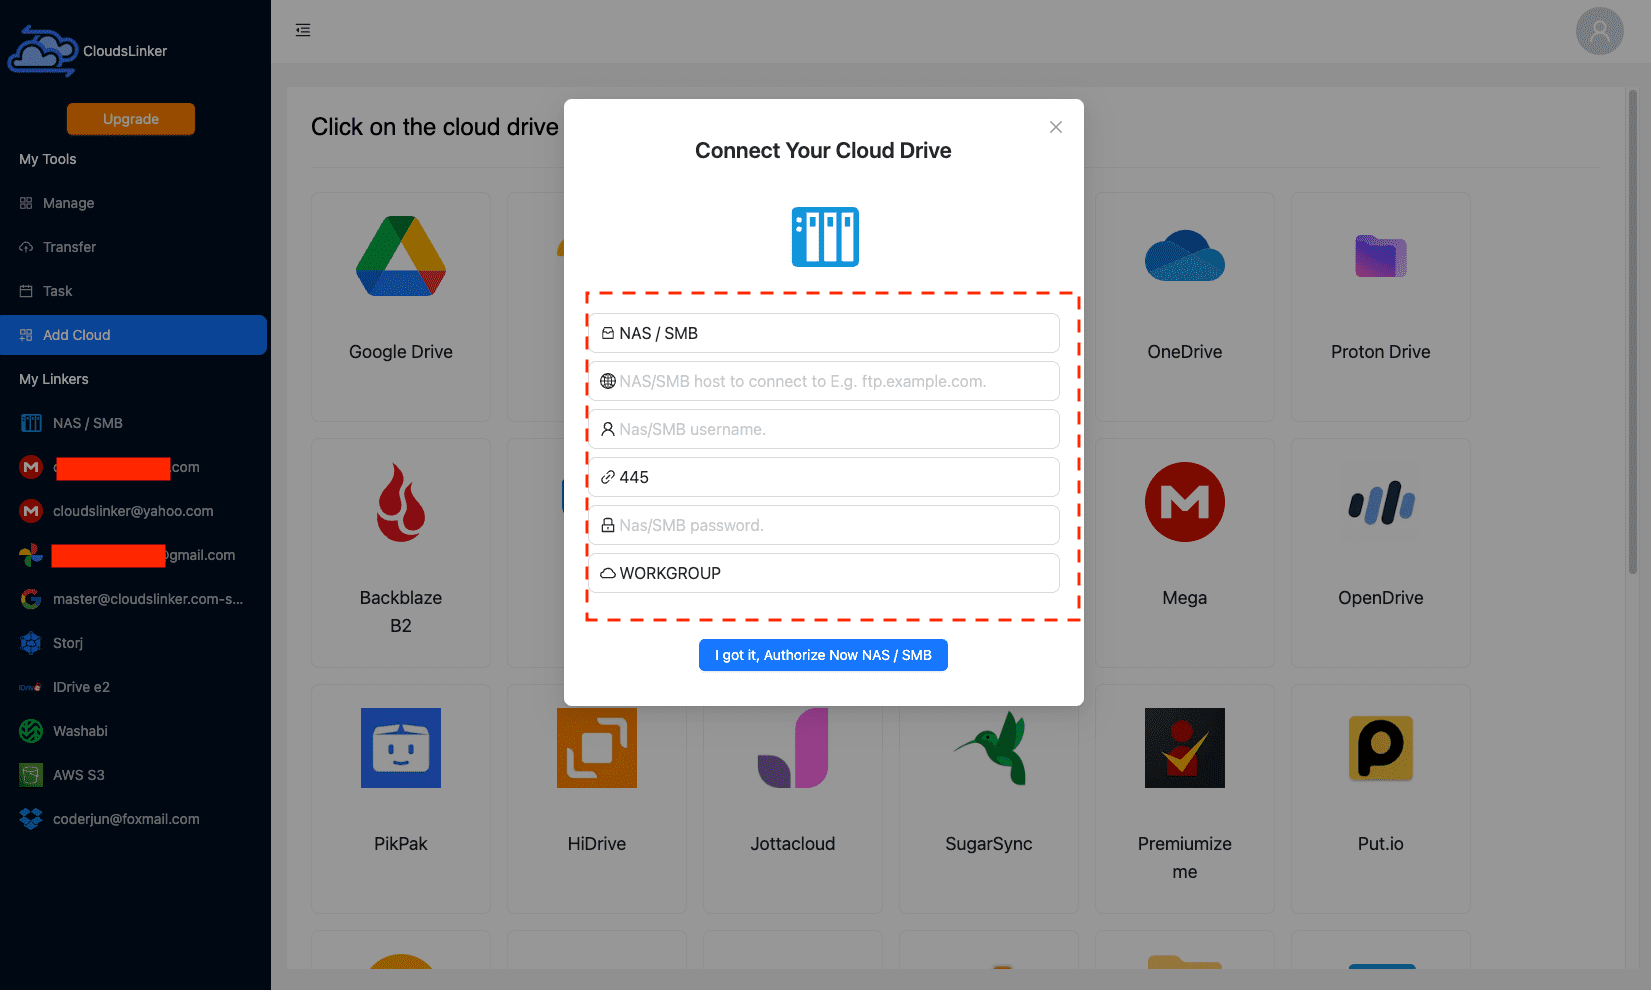
Start by ensuring your NAS is internet-accessible, as CloudsLinker requires online connectivity. From CloudsLinker's 'Add Cloud' option, select NAS, then input your NAS access host, username, password, and domain (typically 'WORKGROUP'). This establishes a secure connection for your NAS, readying it for backup to OpenDrive.
Step 2: Adding Your OpenDrive Account
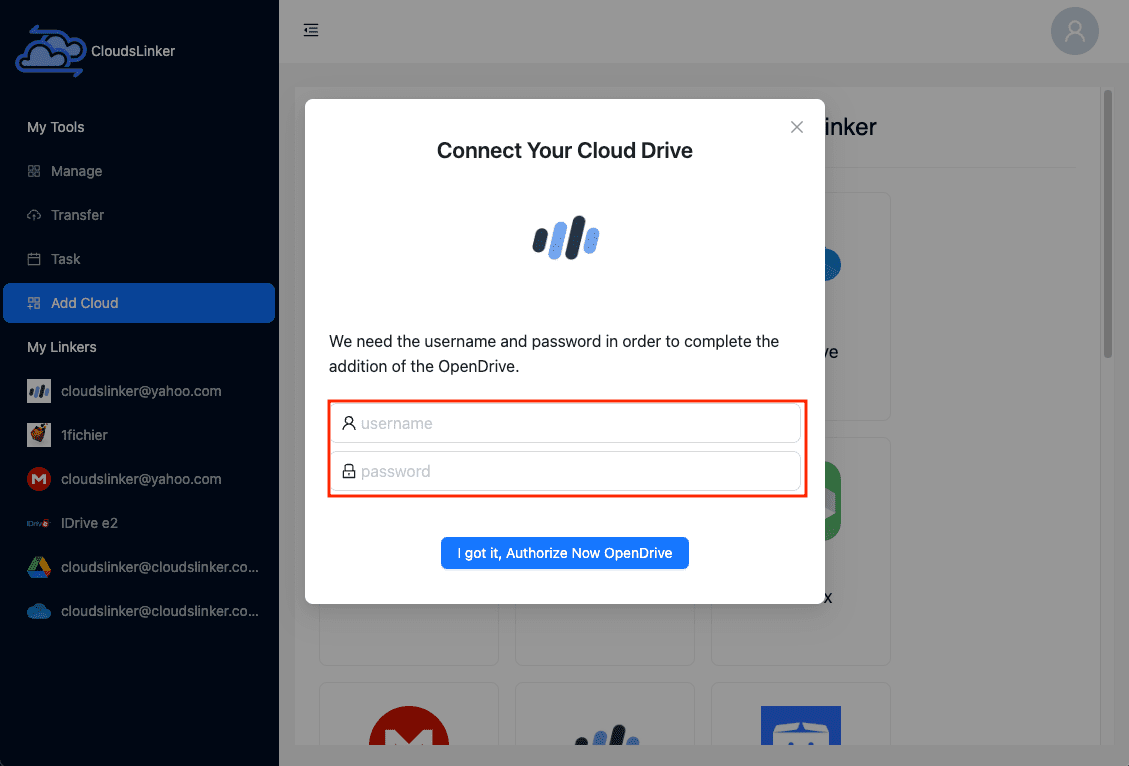
In CloudsLinker, click the OpenDrive icon to integrate your account. Enter your OpenDrive username and password on the provided page. CloudsLinker's advanced encryption protects your credentials, ensuring a secure link between your OpenDrive account and CloudsLinker.
Step 3: Configuring NAS to OpenDrive Backup
With both NAS and OpenDrive accounts added, navigate to CloudsLinker’s 'Transfer' section. Select your NAS as the source and OpenDrive as the destination. Customize your backup settings according to your preferences, such as specifying folders to backup or scheduling regular backups.
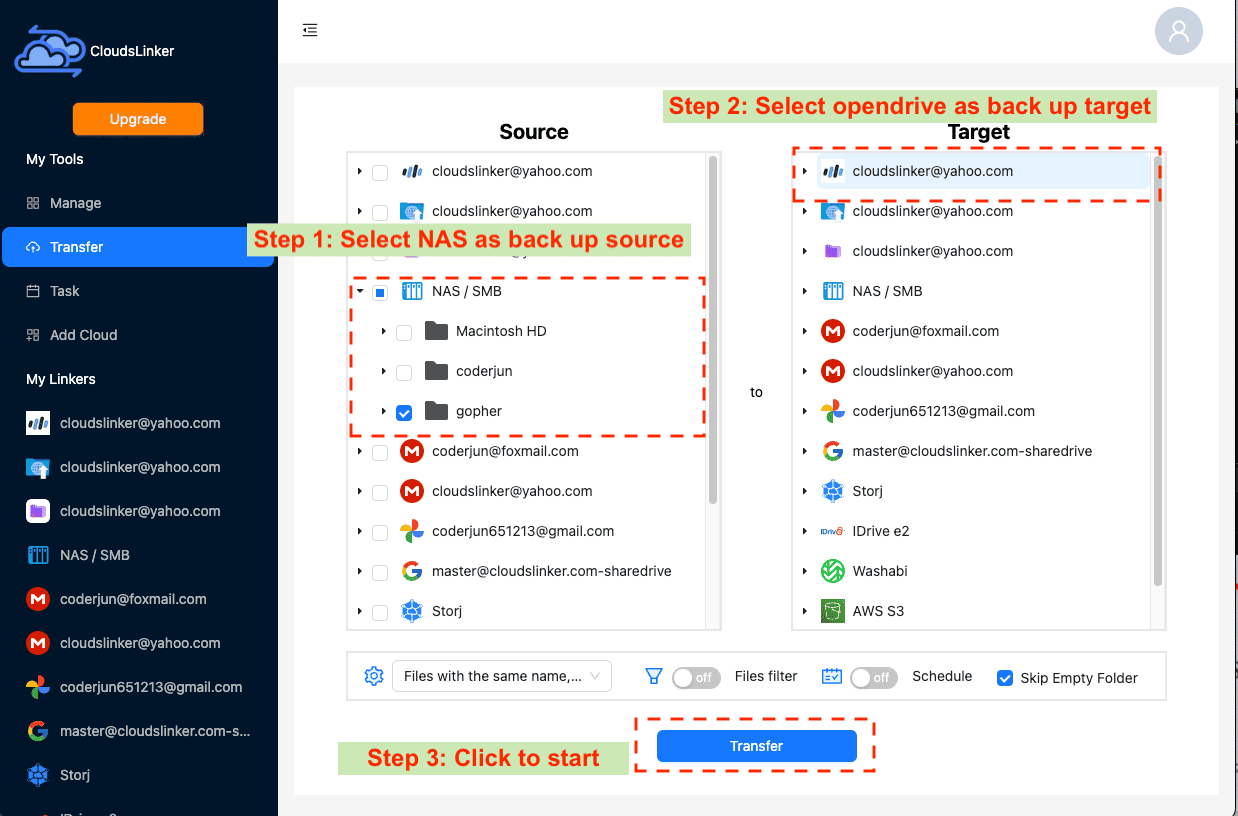
Step 4: Initiating the Backup
Execute the backup from NAS to OpenDrive directly within CloudsLinker. This process is carried out over the cloud, conserving your local bandwidth. CloudsLinker's high-speed service bandwidth ensures fast and efficient data transfers.
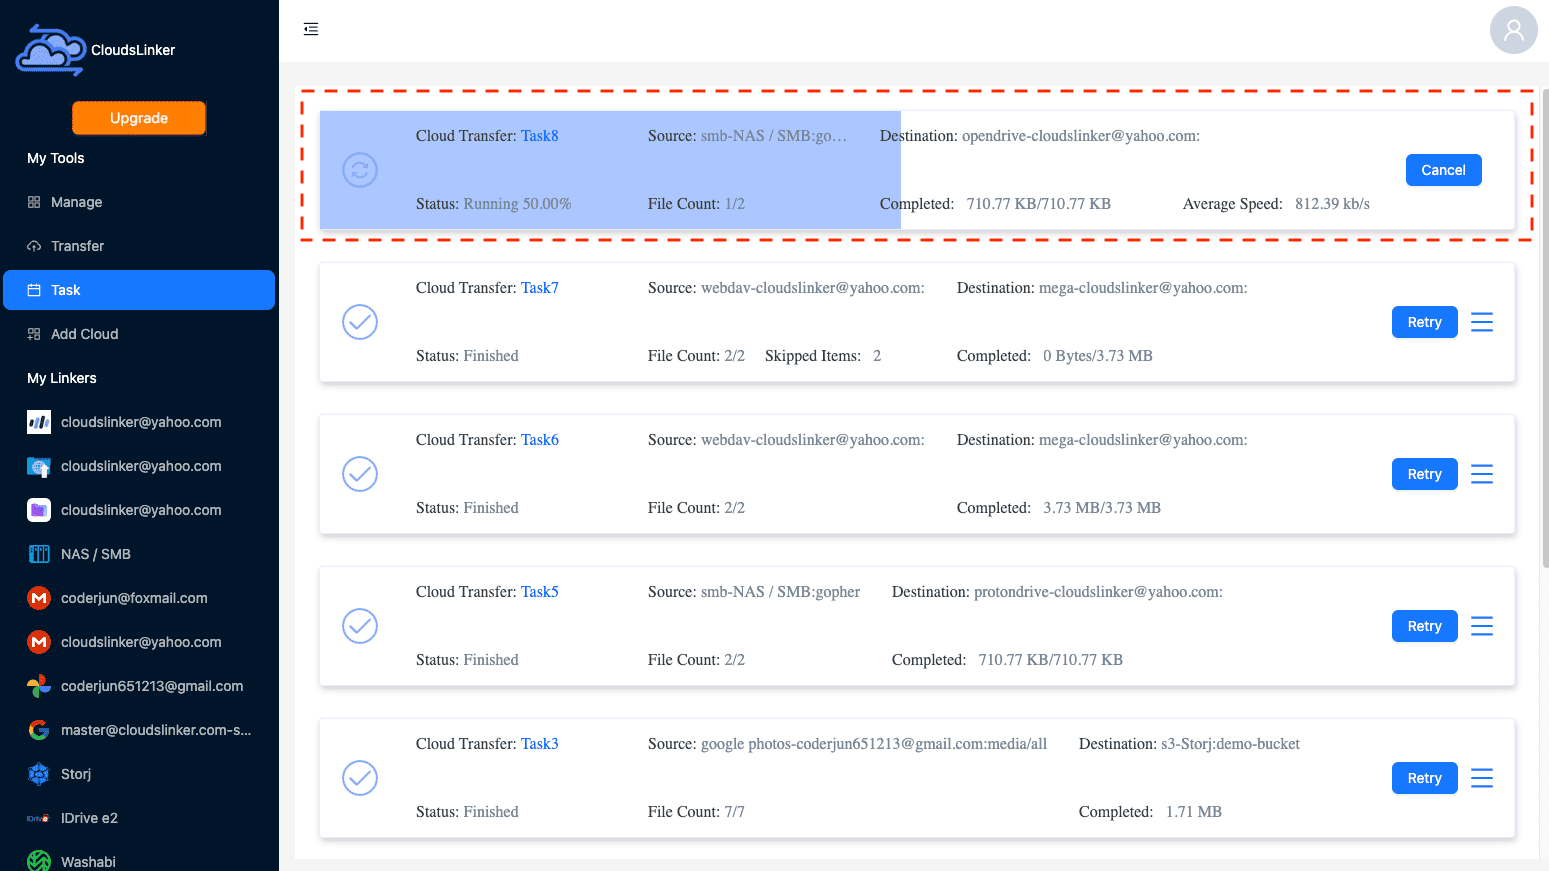
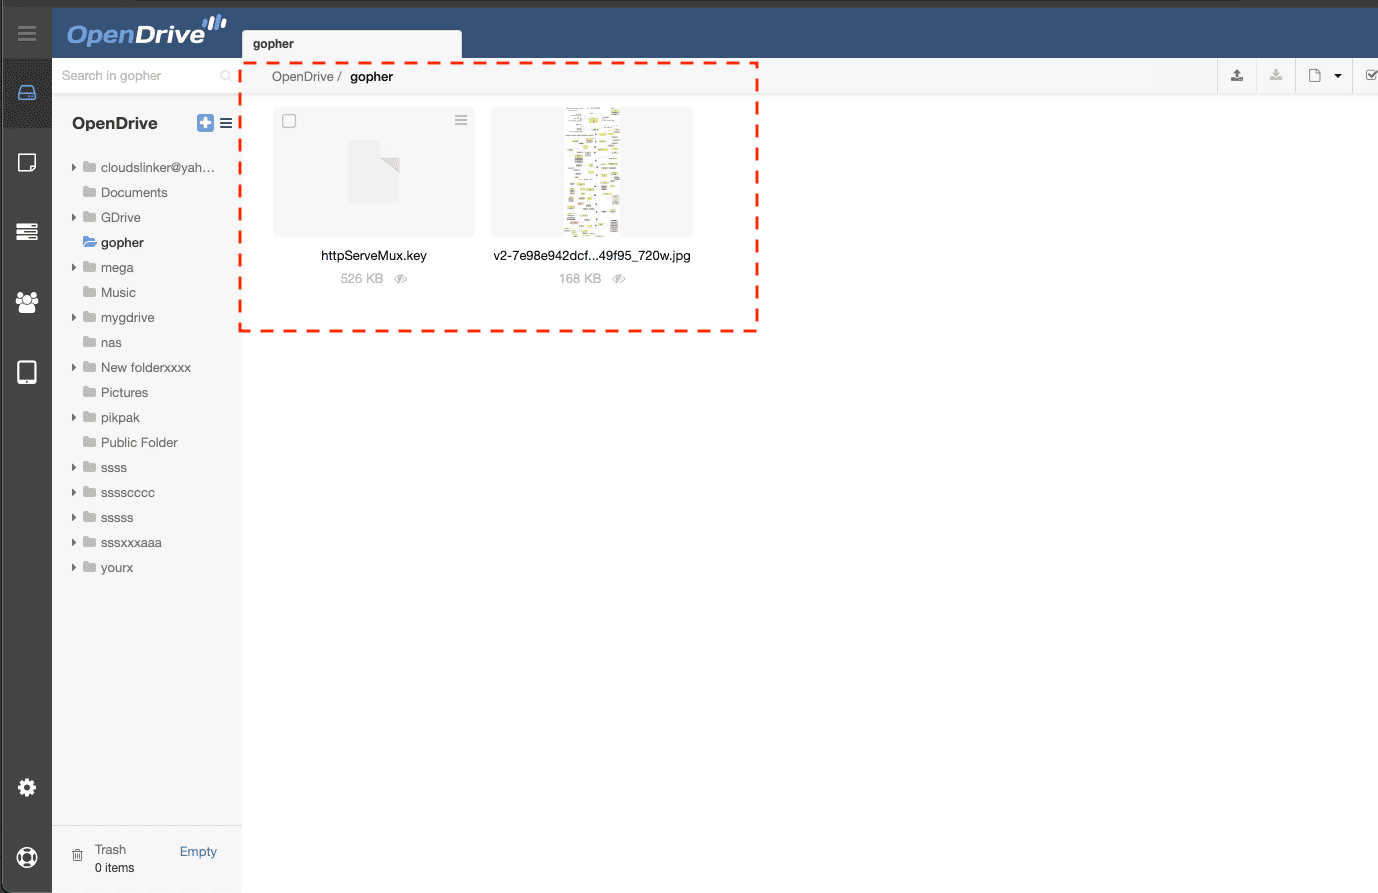
Step 5: Verifying Backup Completion
After the backup completes, verify the transfer by logging into your OpenDrive account. Ensure all files from your NAS are correctly backed up and accessible. CloudsLinker maintains an activity log for you to check the status and details of your backup process.
Optimizing Your Digital Workspace with OpenDrive After NAS Backup
Streamlining File Organization in OpenDrive
Post-backup, the organization of your data within OpenDrive is key to ensuring seamless access and management:
- Develop a Logical Folder Structure: Craft a clear, logical folder hierarchy in OpenDrive to classify your files efficiently, enhancing the ease of navigation and retrieval.
- Utilize Advanced Sharing Options: Employ OpenDrive's advanced sharing features to distribute files and folders securely, controlling access with precision and flexibility.
- Implement Version Control: Take advantage of OpenDrive’s version control capabilities to maintain historical versions of files, allowing for easy tracking and reversions when necessary.
Elevating Security Post-Backup
Securing your OpenDrive account is essential to protect your digital assets after the backup:
- Activate Two-Factor Authentication: Enhance account security by enabling two-factor authentication, adding an additional layer of verification to deter unauthorized access.
- Update Passwords Regularly: Improve account safety by periodically updating your OpenDrive password, ensuring it remains strong and uncompromised.
- Manage Sharing Permissions with Care: Regularly review and fine-tune file and folder sharing permissions to ensure only the intended recipients have access.
Leveraging OpenDrive for Enhanced Productivity
Explore the full range of OpenDrive features to boost your productivity and collaboration after the backup:
- Explore the OpenDrive Mobile Application: Access your files on the go with the OpenDrive mobile app, providing you with the flexibility to work from anywhere, on any device.
- Integrate with Essential Apps: Connect OpenDrive with other critical applications to streamline your workflows and enhance collaboration across platforms.
- Customize Your Storage Plan: Adjust your OpenDrive storage plan to fit your specific needs, ensuring you have the optimal amount of space and features for your tasks.
Key Questions on NAS to OpenDrive Backup Strategy
How often should I back up my NAS to OpenDrive?
Can I access my backed-up files from any device?
What happens if my NAS fails after I've backed up to OpenDrive?
How does OpenDrive ensure the security of my data?
Are there any file size or format limitations when backing up to OpenDrive?
Conclusion
This guide underscores the unmatched benefits of backing up NAS to OpenDrive. Emphasize OpenDrive's limitless storage and its ability to provide access from any device, ensuring your data is secure and readily available.
Online Storage Services Supported by CloudsLinker
Transfer data between over 40 cloud services with CloudsLinker
Didn' t find your cloud service? Be free to contact: [email protected]
Further Reading
Effortless FTP connect to google drive: Transfer Files in 3 Easy Ways
Learn More >
Google Photos to OneDrive: 3 Innovative Transfer Strategies
Learn More >
Google Photos to Proton Drive: 3 Effective Transfer Techniques
Learn More >


