How to Move Files from Dropbox to iCloud Drive: 4 Practical Methods (2025)
Looking to switch from Dropbox to Apple’s iCloud Drive? This 2025 guide walks you through four practical methods—from simple drag-and-drop uploads to advanced cloud-to-cloud automation—so you can move your files smoothly without stressing your internet connection.
Introduction
As Apple users grow more dependent on iCloud Drive, many are leaving Dropbox behind for a more integrated experience with iPhone, iPad, and Mac. The real question: what’s the best way to migrate? That depends on your situation—sometimes a quick browser download is enough, while other times you’ll want automation to handle thousands of files. In this guide, we’ll break down four strategies, including browser transfers, iOS workflows, the command-line tool Rclone(https://rclone.org/dropbox/), and cloud-to-cloud services like CloudsLinker(https://www.cloudslinker.com).
Dropbox is one of the earliest mainstream cloud storage services, known for its simplicity and cross-platform reach. Free accounts start with 2 GB of space, while paid plans go up to multiple terabytes with Dropbox Plus or Business.
- Cross-platform support: Works on Windows, macOS, Linux, iOS, Android, and browsers.
- Collaboration: Real-time co-editing with Dropbox Paper and shared folders.
- File recovery: Deleted files can often be restored within a 30-day window.
- Large file transfers: Share links with up to 2 GB on free plans, or much larger with paid tiers.
- Third-party integration: Connects with Slack, Zoom, Trello, and more.
iCloud Drive is Apple’s own file storage service, designed to keep your content synced across iPhone, iPad, Mac, and even Windows PCs. Every Apple ID includes 5 GB free storage, and you can expand this up to 12 TB with iCloud+.
- Seamless Apple integration: Desktop and Documents folders on Mac are instantly available on other Apple devices.
- File size support: Allows individual uploads up to 50 GB, suitable for media projects.
- Multi-device access: Use Finder (Mac), Files app (iOS/iPadOS), File Explorer (Windows), or the iCloud.com portal.
- Collaboration tools: Share folders and collaborate in real-time on Pages, Numbers, or Keynote files.
- Enhanced security: End-to-end encryption and Advanced Data Protection for sensitive content.
For many years, Dropbox has been a go-to cloud service thanks to its simplicity and strong cross-platform support. It was one of the first tools people trusted for syncing files between work and home computers. But if you now rely heavily on Apple devices—whether that’s an iPhone, iPad, or Mac—sticking with Dropbox often means juggling apps and switching contexts. Moving your data to iCloud Drive can simplify that experience and keep everything running in Apple’s ecosystem.
- Tight Apple Integration: iCloud Drive appears directly in Finder on macOS and the Files app on iOS/iPadOS, which means your content is always just a tap or click away.
- Convenience on Mobile: Photos, documents, and app data sync seamlessly without needing to install a separate app like Dropbox.
- Stronger Security: Apple’s end-to-end encryption and optional Advanced Data Protection provide peace of mind for sensitive files.
- Handles Large Files: iCloud supports individual uploads up to 50 GB—handy for big design projects or 4K video.
- Collaboration Made Easy: Share files or folders with others and co-edit in Apple’s Pages, Numbers, or Keynote.
- Flexible Plans: Start with 5 GB free, or upgrade all the way up to 12 TB on iCloud+ depending on your needs.
For anyone tired of splitting storage between Dropbox and Apple, consolidating in iCloud makes life easier. It keeps your files organized in one place and ensures they work seamlessly across all Apple devices you already use every day.
Wondering how Dropbox stacks up against iCloud Drive? Both offer reliable cloud storage, but they’re built with different priorities in mind. Dropbox shines in cross-platform flexibility and third-party integrations, while iCloud focuses on being deeply integrated into the Apple ecosystem.
| Feature | Dropbox | iCloud Drive |
|---|---|---|
| Free Storage | 2 GB (free tier) | 5 GB |
| Platform Integration | Works on Windows, macOS, Linux, iOS, Android, and the web | Best within Apple devices (Finder, Files app, iOS/macOS) |
| Collaboration | Dropbox Paper and shared folders with granular permissions | Real-time editing in Pages, Numbers, and Keynote |
| Third-Party Apps | Extensive (Slack, Zoom, Adobe, Trello, etc.) | Mostly limited to Apple’s ecosystem |
| File Size Limit | Up to 2 TB transfers with Dropbox Transfer (paid) | 50 GB per file upload |
| Security | 2FA + encryption in transit and at rest | End-to-end encryption + Advanced Data Protection option |
In short, Dropbox is a strong choice if you work across multiple platforms or rely on third-party apps. But if your daily workflow is anchored in Apple’s ecosystem, iCloud Drive feels more seamless and requires less effort to manage.
Before starting your transfer, it’s smart to review how much space your Dropbox account is using and compare it with the iCloud+ plan you intend to use. Since iCloud only includes 5 GB for free, most users with large photo collections or project files will likely need to upgrade.
Double-check that iCloud Drive is enabled on your Apple devices. On iOS: Settings → [Your Name] → iCloud → iCloud Drive. On macOS: System Settings → Apple ID → iCloud. This ensures your files will sync smoothly once uploaded.
It’s also worth doing some housekeeping before you migrate—delete old files, sort your folders, and decide on a transfer method. You can move files manually, set up automation with Rclone, or let a service like CloudsLinker handle the entire process. A bit of preparation will make the migration faster and help preserve your existing folder structure.
Method 1: Move Files Using Your Web Browser
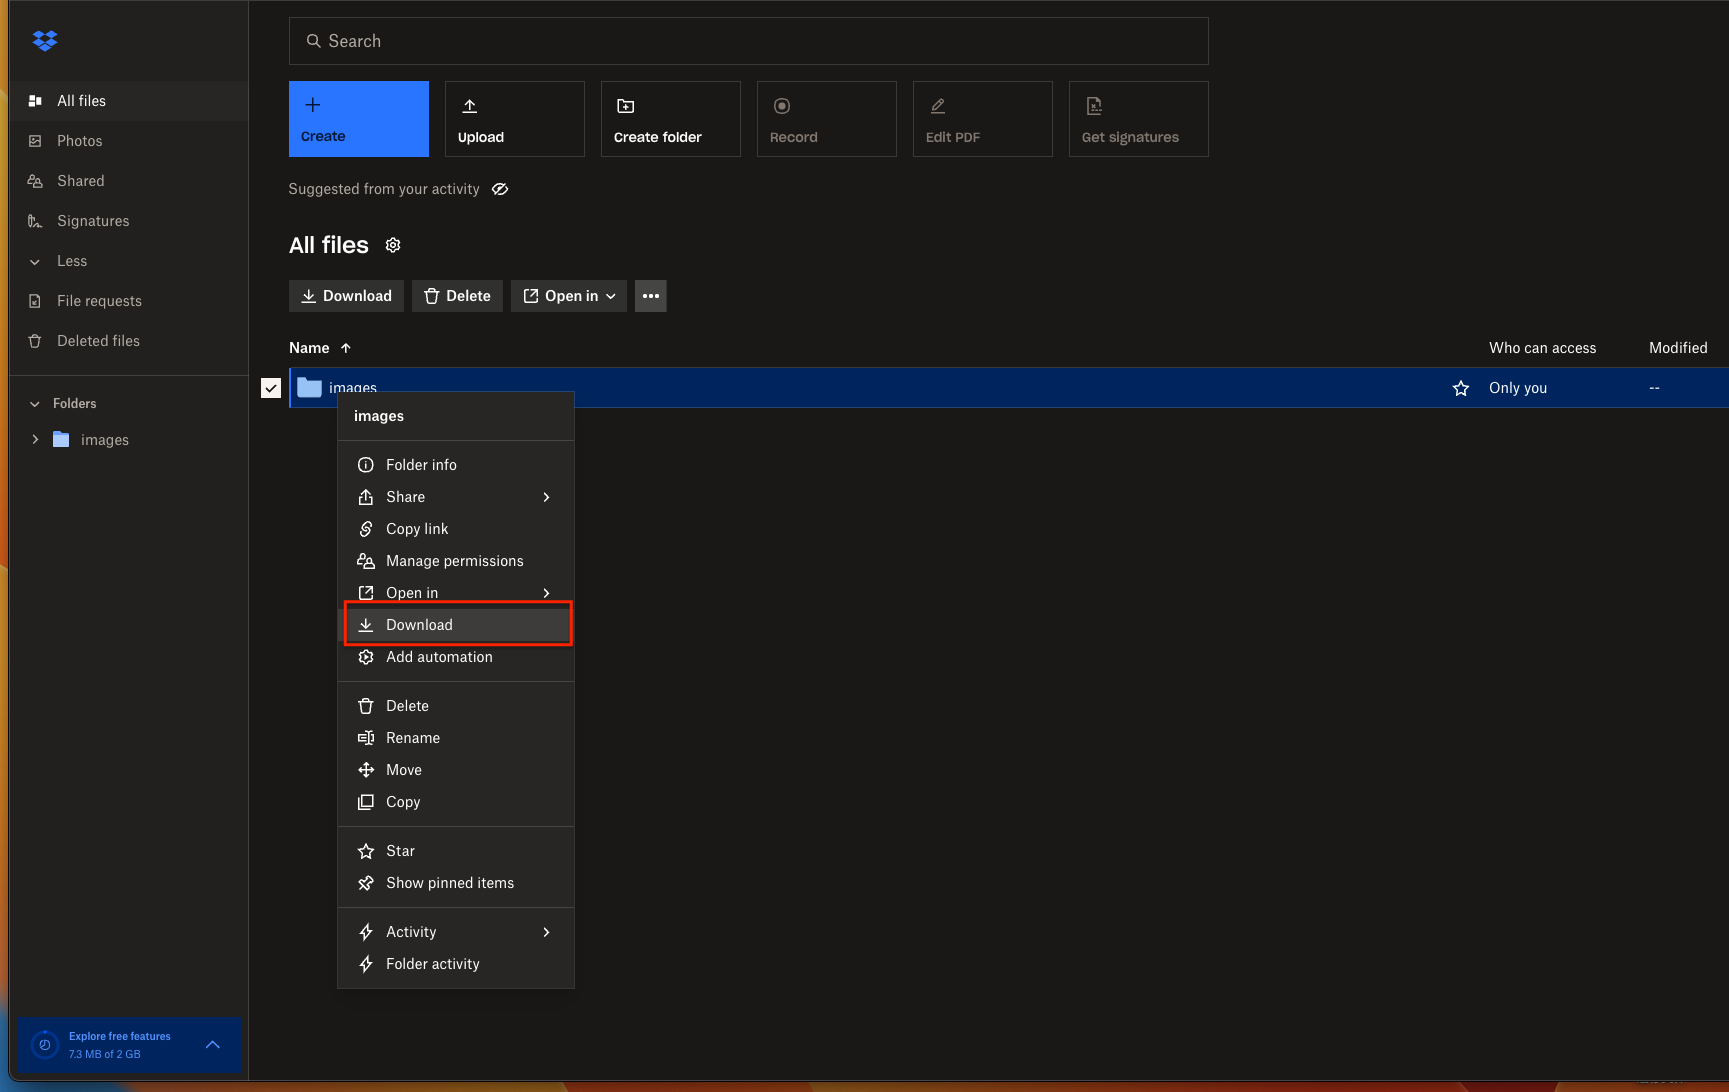
Step 1: Download from Dropbox
Go to Dropbox.com
and log in. Select the files or folders you’d like to transfer. You can highlight multiple items with
Ctrl (Windows) or Command (macOS).
Click Download, and Dropbox will bundle them as a ZIP archive.
Once finished, unzip the file locally.

Step 2: Upload to iCloud Drive
Head to iCloud.com, sign in with your Apple ID, and upload the files. You can drag-and-drop directly into the browser window or use the upload button. To stay organized, recreate your Dropbox folder structure inside iCloud.
This is the simplest method for small batches of files. For larger archives, you’ll save time with Rclone or automated transfers via CloudsLinker.
Method 2: Transfer Using Your iPhone or iPad
Step 1: Open the Dropbox App and Choose Files
On your iPhone or iPad, launch the Dropbox app and sign in with your account. Browse through your folders and locate the files you want to move. Tap the three-dot menu next to a file or folder, then select “Export” or “Send a Copy”. This option lets you either save a copy locally or pass it directly into Apple’s Files app.
Step 2: Save to iCloud Drive via Files App
When the iOS share sheet pops up, choose “Save to Files”. From there, pick iCloud Drive as the storage location. You can drop the file into the root folder or select an existing subfolder to keep your documents organized. Once saved, the file uploads to iCloud Drive and syncs automatically across all your Apple devices.
This workflow is perfect for small-scale moves—like shifting a few photos, PDFs, or work documents when you’re away from your desk. Since it uses Apple’s native Files app, there’s no need for extra software. Keep in mind, however, that transferring large folders or thousands of files over mobile can be slow and tedious. For bigger jobs, a desktop tool or an automated service such as CloudsLinker will save you time and ensure the process completes smoothly in the background.
Method 3: Transfer with Rclone (Command Line)
Step 1: Install Rclone and Configure Your Remotes
For users who are comfortable working in a terminal, Rclone provides one of the most versatile ways to move files between clouds. It supports a wide range of services, including Dropbox and iCloud Drive.
Start by downloading Rclone from the
official release
page.
Once installed, launch your terminal (or Command Prompt if you’re on Windows) and type:
rclone config. This will bring up Rclone’s configuration wizard.
- Dropbox Remote: Select
dropboxas the backend. You’ll be prompted to log in through a browser window, where you grant Rclone access to your Dropbox files. Once complete, you’ll have a remote (e.g.,dropbox:) pointing to your storage. - iCloud Remote: Choose
icloudwhen adding your second remote. Rclone will generate an authentication token that gives it access to your iCloud Drive. Detailed steps are outlined in the iCloud backend documentation. - macOS Local Option: If you already have iCloud syncing on your Mac, you can also
point
Rclone at the local folder:
~/Library/Mobile Documents/com~apple~CloudDocs.
Step 2: Run Your Transfer Commands
Once both remotes are set up, you can start moving files. For example:
rclone copy dropbox:/Projects icloud:/ProjectsBackup --progressrclone sync dropbox:/Photos icloud:/Photos --progress --exclude "*.tmp"
The first command copies everything from your Projects folder in Dropbox to a new folder
named
ProjectsBackup in iCloud Drive.
The second command keeps your Dropbox photo library synchronized with iCloud, skipping temporary files.
If you want to test before committing, add --dry-run to preview what will happen.
Rclone is best suited for users who want full control over the migration process. You can adjust bandwidth usage, apply filters, or schedule recurring jobs with cron (Linux/macOS) or Task Scheduler (Windows). The only downside: initial setup with iCloud authentication may require a bit of patience. Once configured, however, it’s one of the most efficient ways to handle bulk transfers.
Method 4: Cloud-to-Cloud Migration with CloudsLinker
Overview: Move from Dropbox to iCloud Without Local Downloads
CloudsLinker lets you transfer files directly between different cloud services—no downloading to your computer, no manual re-uploading, and no need to worry about local storage space. The platform currently supports 40+ cloud providers, including Dropbox and iCloud Drive. All transfers run entirely online, which means your home internet speed won’t slow the process down.
Step 1: Log in to CloudsLinker
Head over to app.cloudslinker.com and sign in with your account (or create a free one if you’re new). From your dashboard, click “Add Cloud” and select Dropbox. You’ll be redirected to Dropbox’s official OAuth login page—just confirm the connection to grant access securely.

Once authorized, your Dropbox account will appear in CloudsLinker’s interface as a ready-to-use storage source.
Step 2: Connect iCloud Drive
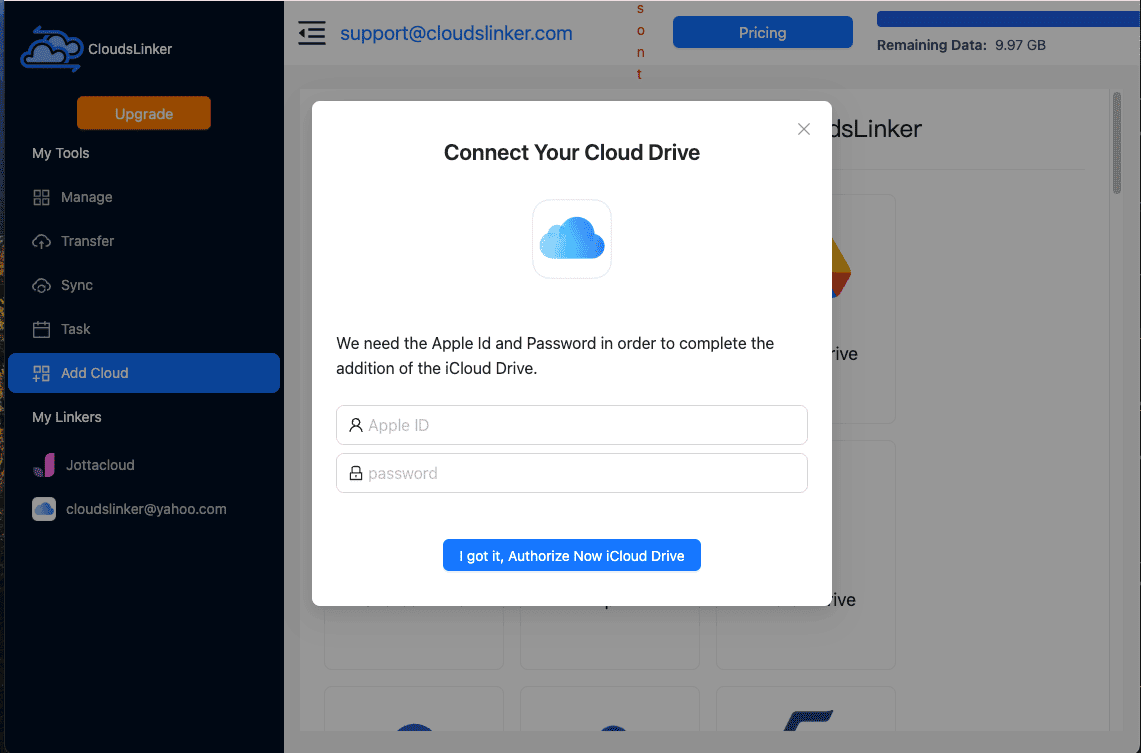
Next, add iCloud Drive from the list of supported clouds. Enter your Apple ID and, if prompted, provide the two-factor authentication code sent to your device. After a successful login, iCloud Drive will show up in your dashboard alongside Dropbox.

Step 3: Configure the Transfer
Go to the Transfer tab. On the left, pick Dropbox as your source and select the files or folders you want to migrate. On the right, choose iCloud Drive as the destination. You can preview the folder structures before starting the migration to make sure everything is mapped correctly.

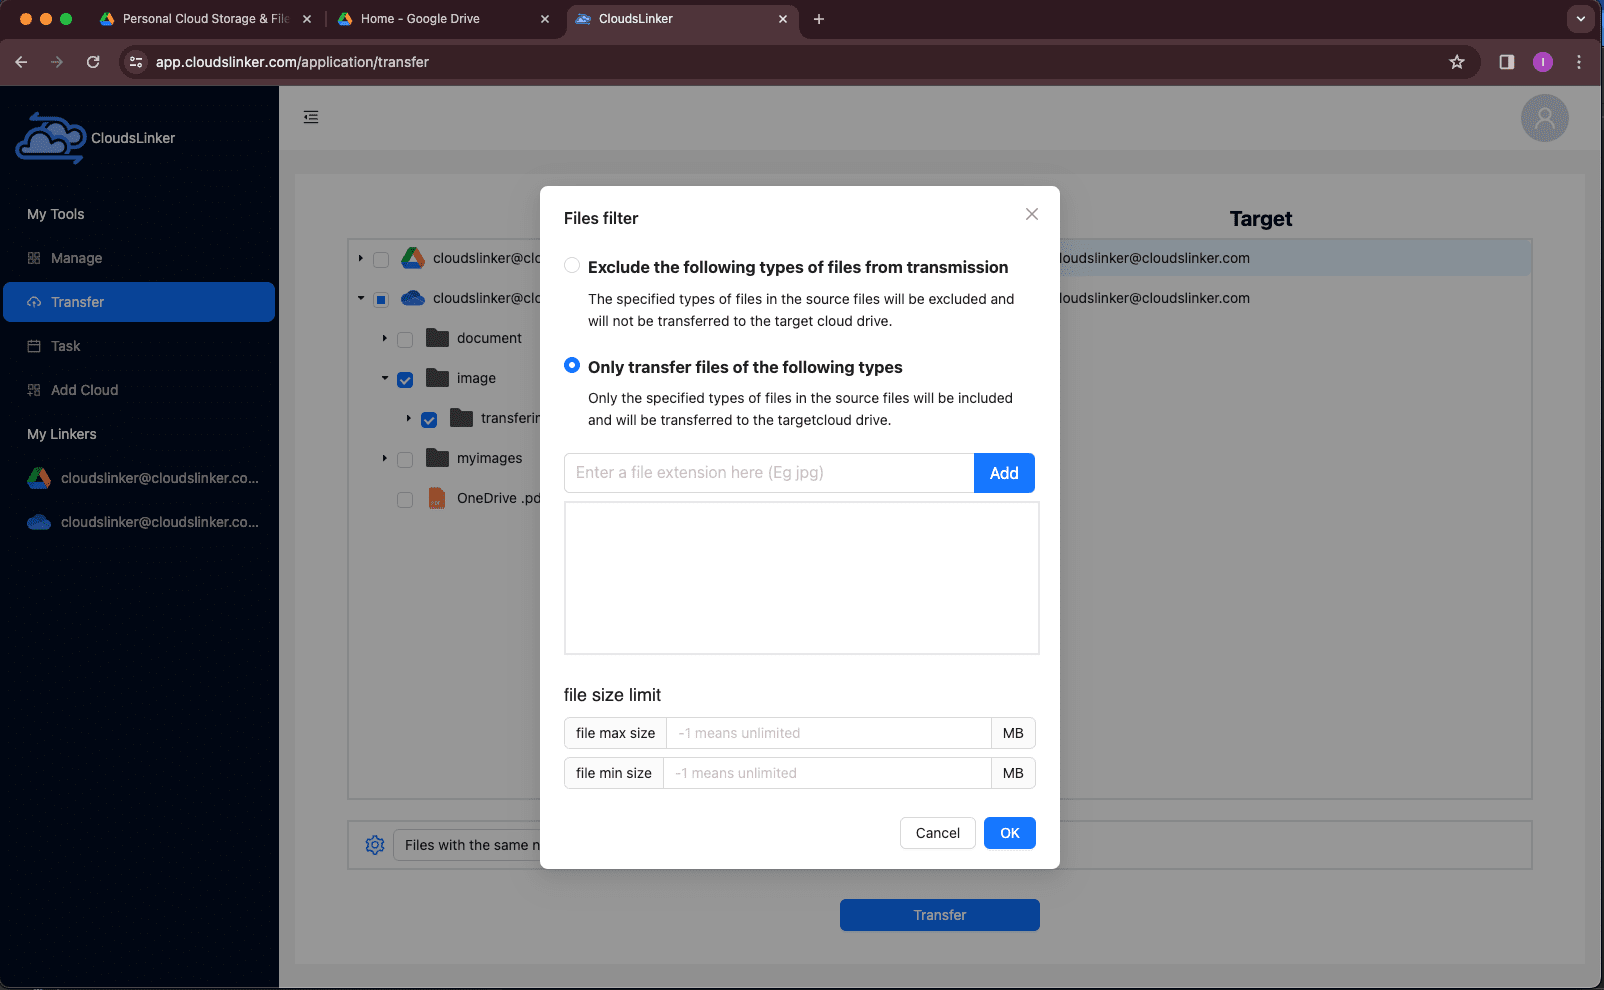
CloudsLinker also provides filters—so you can skip specific file types (like .tmp),
exclude very large
videos, or only migrate files modified within the last 30 days.
These options give you flexibility and help streamline the transfer.

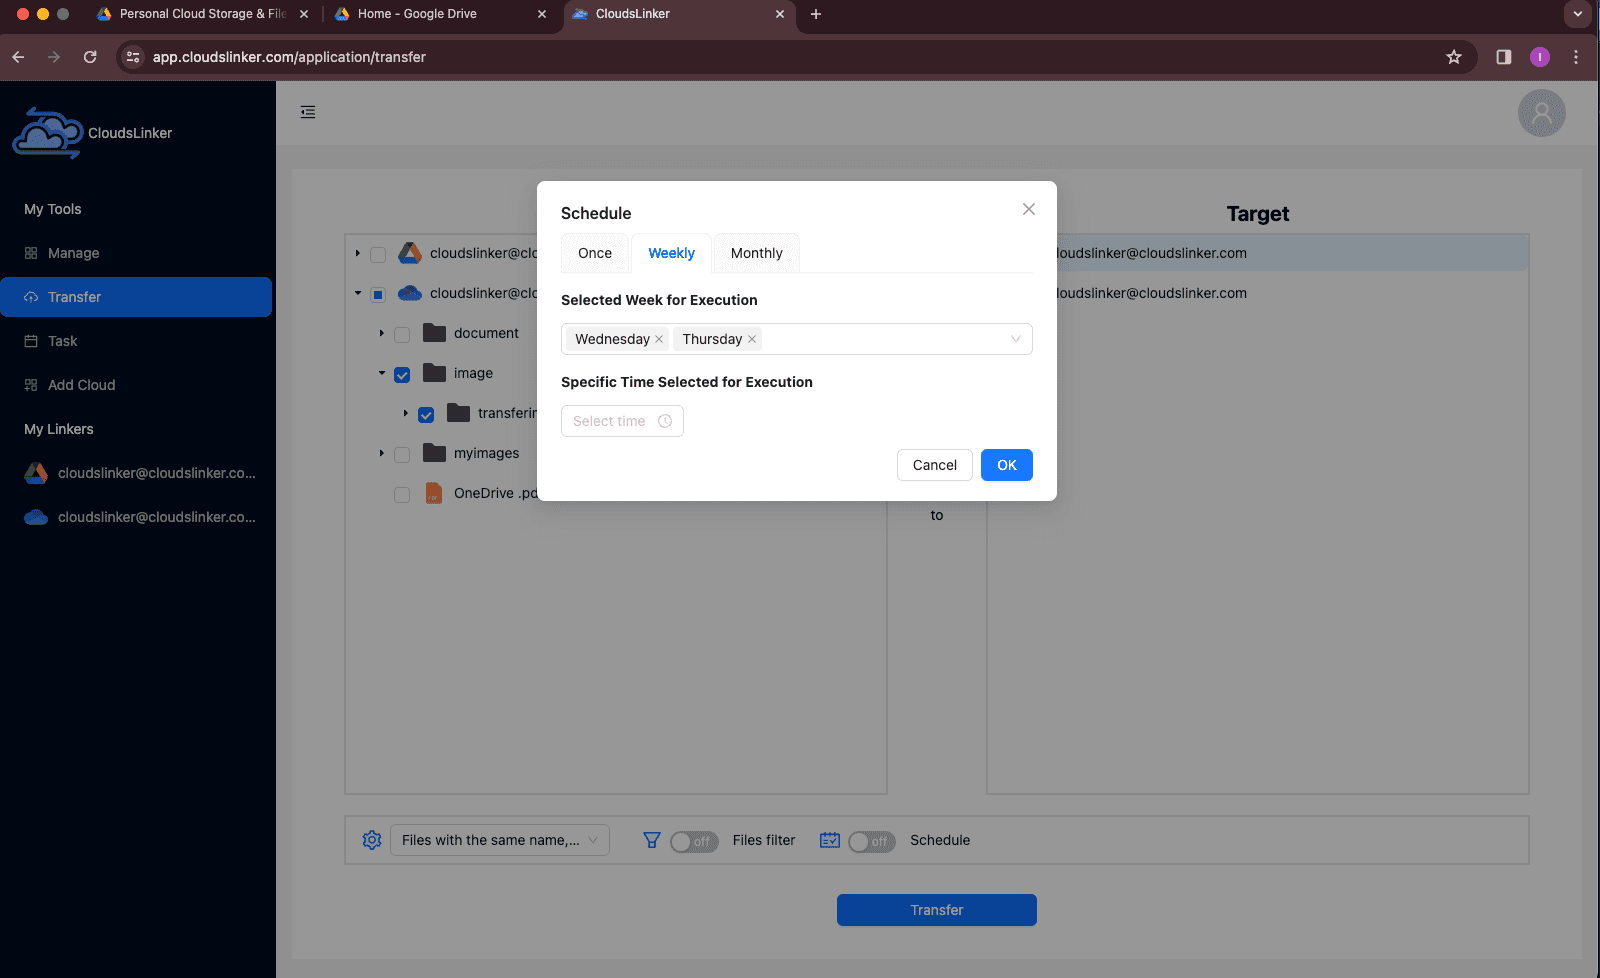
If you’d like your Dropbox and iCloud to stay in sync, open the Schedule tab. Here you can create automated jobs—daily, weekly, or at custom intervals. This way, any new changes in Dropbox will be reflected in iCloud without extra effort. For more details, check the CloudsLinker scheduling guide.

Step 4: Track and Manage Your Migration
Once you hit start, the task will appear in the Task List. From there, you can monitor live progress, view transfer speeds, or pause and resume if necessary. Any issues, such as permission problems or unsupported file types, are clearly flagged for review.
Step 5: Check the Completion Report
When the transfer finishes, CloudsLinker generates a summary report showing which files succeeded and which (if any) failed. By this point, your Dropbox files should be safely stored in iCloud Drive and ready to access from all your Apple devices.
For anyone who prefers a no-fuss, reliable solution, CloudsLinker is one of the best choices. It automates the heavy lifting, keeps your files secure, and ensures your transfer finishes even if your device goes offline.
Need to Move Files Between Other Clouds?
Whether you’re working with Dropbox, OneDrive, Google Drive, Box, or MEGA, CloudsLinker supports direct cloud-to-cloud migration—without draining your internet bandwidth. Everything is managed from your browser, while the transfers run on secure CloudsLinker servers in the background.
Comparing the 4 Ways to Transfer from Dropbox to iCloud Drive
There isn’t one universal “best” way to move files from Dropbox to iCloud Drive. The choice really comes down to your workflow: do you just want to quickly grab a few folders, or are you planning a full migration of your photo library or work projects? Here’s a side-by-side comparison of the four most common approaches:
| Method | Ease of Use | Speed | Best For | Uses Local Bandwidth | Skill Level |
|---|---|---|---|---|---|
| Web Browser (Manual) | ★★★★★ | ★★★☆☆ | Occasional moves, smaller folders | Yes | Beginner |
| iPhone / iPad (Files App) | ★★★★★ | ★★★☆☆ | Quick transfers while mobile | Yes | Beginner |
| Rclone (Command Line) | ★★☆☆☆ | ★★★★★ | Power users needing scripts or automation | Yes / No (depends on setup) | Advanced |
| CloudsLinker (Cloud-Based) | ★★★★★ | ★★★★★ | Bulk migrations, scheduled syncs, hassle-free moves | No | Beginner |
If you only need to relocate a couple of documents or pictures, the browser or Files app on iOS will do the job quickly. Those who want full control and scripting options might prefer Rclone, though the learning curve is steeper. For most people, especially anyone handling gigabytes of data, CloudsLinker is the easiest choice—it keeps everything in the cloud, so your laptop and internet connection aren’t bogged down.
Moving files from Dropbox to iCloud Drive is fairly straightforward, but keeping a few things in mind will help you avoid headaches—particularly if you’re shifting a large archive or using manual upload/download methods:
- Make Sure Files Are Available Offline: Dropbox sometimes keeps items as “online-only.” Ensure they are fully downloaded before exporting, otherwise they won’t upload correctly into iCloud.
- Be Aware of iCloud’s File Size Limit: iCloud Drive supports files up to 50 GB each. If you’re migrating large video files or archives, split them first or use a cloud service like CloudsLinker which bypasses these constraints.
- Avoid Overloading Your Network: Downloading from Dropbox and re-uploading to iCloud eats bandwidth. If your internet is slow or shared, server-side transfers can complete faster without clogging your connection.
- Check Your iCloud Storage Plan: Apple gives only 5 GB free, which is rarely enough. Upgrade to an iCloud+ plan ahead of time if you’re moving lots of data.
- Use Official Logins: Always connect Dropbox and iCloud using OAuth rather than sharing raw passwords. Services like CloudsLinker rely on secure tokens and AES-256 encryption to keep your accounts safe.
- Think Ahead for Large Jobs: If you’re dealing with hundreds of gigabytes, look for features like retry-on-error, background processing, and scheduled tasks. CloudsLinker includes these so the process continues even if your device disconnects.
A little preparation pays off. Whether you’re just transferring a few work files or your entire Dropbox archive, knowing the limits and choosing the right tool will make the move to iCloud Drive smooth and stress-free.
Frequently Asked Questions
Step-by-Step Video: Move Dropbox Files to iCloud Drive
Prefer watching over reading? In this walkthrough, we’ll guide you through the full process of transferring files from Dropbox into iCloud Drive. The video covers everything—from using a web browser for quick uploads to setting up automated transfers with CloudsLinker. You’ll also see practical tips for avoiding sync errors, managing large folders, and making sure your files stay organized across Apple devices. Whether you’re new to cloud storage or just want the easiest route, this guide has you covered.
Conclusion
There isn’t a universal ‘best’ way to move from Dropbox to iCloud Drive—it depends on your file sizes and how much control you want. Small sets of files are easiest through the browser or iOS Files app. If you’re comfortable with scripts, Rclone gives you fine-grained automation. And for those who want the simplest solution, CloudsLinker takes care of everything in the cloud. The key is making sure your data arrives safely in iCloud, ready to sync across all your Apple devices.
Online Storage Services Supported by CloudsLinker
Transfer data between over 44 cloud services with CloudsLinker
Didn' t find your cloud service? Be free to contact: [email protected]
Further Reading
Effortless FTP connect to google drive: Transfer Files in 3 Easy Ways
Learn More >
Google Photos to OneDrive: 3 Innovative Transfer Strategies
Learn More >
Google Photos to Proton Drive: 3 Effective Transfer Techniques
Learn More >


