How to Move Files from FTP to iCloud Drive: 4 Practical Approaches (2026)
Looking to shift your files from an old FTP server into Apple’s iCloud Drive? In this 2026 guide, we cover four reliable methods—from manual download to cloud migration services—so your data lands safely inside your Apple ecosystem.
Introduction
Many businesses and individuals still rely on FTP servers for file storage, but with Apple’s ecosystem getting tighter, moving everything into iCloud Drive is a common next step. Whether you want to sync office archives, photos, or project backups, the process can be handled in multiple ways. From the classic drag-and-drop to advanced cloud-to-cloud bridges, let’s explore your options.
File Transfer Protocol (FTP) is one of the oldest methods of moving files across the internet. While reliable, it’s gradually being replaced by more modern and secure solutions. FTP is still widely used for website maintenance, data archives, and connecting to legacy servers.
- Server–client model: Files are stored on a remote server and accessed through an FTP client.
- Cross-platform tools: Works with clients such as FileZilla, WinSCP, or Cyberduck.
- Batch transfers: Ideal for moving large groups of files at once, though speeds depend on your network.
- Limited encryption: Plain FTP lacks modern encryption, so FTPS or SFTP is often recommended for sensitive data.
- Legacy support: Many web hosts still provide FTP access for compatibility reasons.
iCloud Drive is Apple’s built-in cloud storage platform that connects seamlessly with iPhone, iPad, and Mac. Every Apple account includes 5 GB free, and you can expand storage up to 12 TB through iCloud+.
- Native Apple sync: Desktop and Documents folders stay consistent across all devices.
- Handles large files: Upload individual files up to 50 GB, perfect for creative projects.
- Universal access: Manage data via Finder, the iOS Files app, Windows integration, or iCloud.com.
- Collaboration ready: Real-time co-editing in Pages, Numbers, and Keynote.
- Security focused: Includes end-to-end encryption and Advanced Data Protection for extra safety.
For years, many companies and individuals relied on
FTP (File Transfer Protocol) to exchange files between servers and local
machines.
While FTP still works, it often feels outdated—especially when compared with the
seamless
experience of modern cloud storage. Limited encryption, clunky client software, and
manual configuration are some of the pain points users face.
On the other hand,
iCloud Drive is deeply integrated into Apple’s ecosystem. Whether you’re using
an iPhone, iPad, or Mac,
your files are just there—no extra steps. Migrating from FTP to iCloud Drive can save
you time,
improve collaboration, and tighten security.
- Built-in Integration: iCloud Drive connects directly with Finder on macOS and the Files app on iOS/iPadOS.
- Effortless Sync: Changes you make on one Apple device instantly appear on all others, without extra tools.
- Security First: Apple offers end-to-end encryption, plus optional Advanced Data Protection for maximum privacy.
- Large File Support: With uploads up to 50 GB per file, iCloud is ideal for videos, design files, or server backups.
- Collaboration: Share folders with your team or family and co-edit documents in real time.
- Flexible Storage: Every Apple ID starts with 5 GB free, while iCloud+ plans expand up to 12 TB for professional use.
If you’re still using FTP for file access, migrating to iCloud Drive means less manual work, tighter security, and direct integration with the Apple devices you already own.
FTP and iCloud Drive serve very different purposes. FTP is a classic protocol built for transferring files between servers and clients. iCloud Drive, by contrast, is a full-fledged cloud storage system designed for everyday productivity and mobility. Here’s how they stack up:
| Feature | FTP | iCloud Drive |
|---|---|---|
| Free Storage | No storage included; depends on your hosting/server provider | 5 GB free per Apple ID, expandable with iCloud+ plans |
| Platform Integration | Requires third-party clients like FileZilla, Cyberduck, or WinSCP | Native on iOS, iPadOS, macOS; Windows access via iCloud for Windows |
| Collaboration | Primarily file transfer; no built-in collaboration | Share and co-edit files in Pages, Numbers, Keynote, and more |
| Unique Features | Direct server access, batch file uploads/downloads | Seamless Apple ecosystem sync, Advanced Data Protection |
| File Size Limit | Depends on server configuration; often limited by host | Up to 50 GB per file |
| Security | Plain FTP has no encryption; SFTP/FTPS recommended for secure transfers | End-to-end encryption plus optional Advanced Data Protection |
FTP still works well for legacy workflows and direct server access, but if your daily life revolves around Apple devices, iCloud Drive offers a more modern, integrated, and secure experience. Tools like CloudsLinker can even bridge the gap by migrating your FTP data directly into iCloud without eating up your local bandwidth.
Before migrating, it’s smart to review the amount of data currently stored on your FTP server. Unlike modern cloud services, FTP doesn’t come with built-in storage plans—it usually depends on your hosting provider. Compare that storage usage with the iCloud+ options you’re considering. Since iCloud Drive only provides 5 GB free by default, most users will need to upgrade, especially if they’re moving large archives, design files, or photo libraries.
Next, confirm that your Apple ID is active and iCloud Drive is turned on across your devices. On iPhone or iPad: Settings → [Your Name] → iCloud → iCloud Drive. On macOS: System Settings → Apple ID → iCloud. Making sure these switches are enabled means your incoming files from FTP will sync instantly to Finder or the Files app.
It’s also a good moment to tidy up: clear out outdated files, standardize folder names, and decide which transfer method suits you best. You might prefer a manual approach by downloading files with an FTP client such as FileZilla and then re-uploading them to iCloud Drive. For automation, tools like Rclone allow scripted transfers. Or, if you’d rather skip local bandwidth entirely, a cloud-to-cloud platform such as CloudsLinker can connect directly to your FTP server and push everything into iCloud Drive online. A bit of preparation now will save time and reduce migration issues later.
Method 1: Move Files Using Your Web Browser
Step 1: Download from Your FTP Server
The simplest approach begins by logging into your FTP server with a browser-based client or a tool such as FileZilla or Cyberduck. Connect using your FTP host, username, and password. Once connected, browse to the directories you’d like to migrate into iCloud Drive. You can highlight multiple files or select entire folders for bulk transfer.
After making your selection, download the files to your computer. If your FTP client compresses folders into a ZIP archive, extract the contents locally so they’re organized and ready for upload in the next step.

Step 2: Upload to iCloud Drive
Head to iCloud.com and log in with your Apple ID. If iCloud Drive isn’t already active, make sure it’s enabled in your Apple ID settings. Once you’re in, either drag-and-drop the files into your browser window or click the Upload button (the cloud icon with an arrow).
You can recreate your existing FTP folder structure inside iCloud Drive to keep things organized. Setting this up now will make life easier later when accessing files across iPhone, iPad, or Mac.
This browser method works well for smaller collections of files or one-time moves. But if you’re dealing with larger archives, automation tools such as Rclone let you script transfers directly from FTP. For those who want to avoid local downloads entirely, cloud-to-cloud services like CloudsLinker can connect to your FTP server and migrate everything straight into iCloud Drive without using your bandwidth.
Method 2: Transfer with Your iPhone or iPad
Step 1: Access Files from FTP on Mobile
On iPhone or iPad, you can connect to your FTP server using third-party apps such as Documents by Readdle or File Explorer. After setting up your FTP credentials (server address, username, and password), navigate to the files you want to move. Most FTP apps allow you to download a file locally or share it directly with another app on iOS.
Step 2: Save Files into iCloud Drive
Once a file is open or selected, tap the Share option in your FTP app. From the iOS share sheet, choose “Save to Files”. Pick iCloud Drive as the destination, either placing the file in the main directory or inside a subfolder you’ve created for better organization. After saving, the item is instantly uploaded into iCloud Drive and will sync across your iPhone, iPad, and Mac.
This mobile workflow is best suited for moving a few documents, images, or PDFs when you’re away from a computer. Since it uses Apple’s native Files app, there’s no complicated setup. The drawback is that transferring large folders via Wi-Fi or mobile data can be slow. If you need to migrate entire directories, consider using a desktop solution or a cloud-to-cloud platform such as CloudsLinker, which connects directly to your FTP server and moves everything into iCloud Drive in the background—without consuming your phone’s bandwidth.
Method 3: Use Rclone from the Command Line
Step 1: Install Rclone and Configure Your Remotes
If you’re comfortable with the terminal, Rclone is one of the most versatile tools for moving data between different storage systems. It supports classic protocols like FTP as well as modern platforms such as iCloud Drive.
First, download the latest release from the
official Rclone
downloads page.
Once installed, open your terminal (or Command Prompt on Windows) and run:
rclone config.
This launches the setup wizard to add your remotes.
-
FTP Remote: Select
ftpas the backend. You’ll be asked for your server address, port, username, and password. If your host requires encryption, consider using SFTP for better security. -
iCloud Remote: Pick
icloudfor the second remote. Authentication for iCloud requires generating an app-specific password and following the iCloud backend guide. -
macOS Local Option: If iCloud Drive is already syncing on your Mac, you can point
directly to
~/Library/Mobile Documents/com~apple~CloudDocsinstead of setting up a remote.
Step 2: Copy or Sync Your Data
Once your remotes are ready, you can begin transferring files. For example:
rclone copy ftp:/backups icloud:/ServerBackups --progressrclone sync ftp:/media icloud:/Media --progress --exclude "*.log"
The first command copies everything from the backups folder on your FTP server into
ServerBackups on iCloud Drive.
The second keeps your media folder in sync while ignoring log files.
If you’d like to test the command before running it, add --dry-run to preview changes.
Rclone is highly valued by advanced users because of its flexibility: you can limit bandwidth, schedule tasks with cron (macOS/Linux) or Task Scheduler (Windows), and filter files with precision. The setup for iCloud can be a bit tricky the first time, but once configured, it’s efficient and reliable. For those who prefer not to manage command-line tools, a service like CloudsLinker can handle FTP-to-iCloud transfers directly in the cloud, without consuming your computer’s bandwidth.
Method 4: Cloud-to-Cloud Migration with CloudsLinker
Overview: Move from FTP to iCloud Without Local Downloads
CloudsLinker lets you migrate files directly from an FTP server into iCloud Drive without downloading them to your computer first. Since the transfer happens entirely in the cloud, your local bandwidth is never touched—you can even shut down your laptop and the process will keep running. CloudsLinker already supports 40+ popular storage platforms, including FTP and Apple iCloud Drive.
Step 1: Sign in to CloudsLinker
Visit www.cloudslinker.com and log in with your account (or create one for free). From the dashboard, click “Add Cloud” and choose FTP. Here you’ll need to enter your FTP server address, username, and password. Make sure your FTP service is accessible from the public internet—CloudsLinker cannot connect to servers locked behind a private network. If your FTP login is restricted to a specific folder, add the Access Path so that CloudsLinker knows where your root directory begins.

Once the details are confirmed, your FTP server will appear in the CloudsLinker dashboard as a connected source.
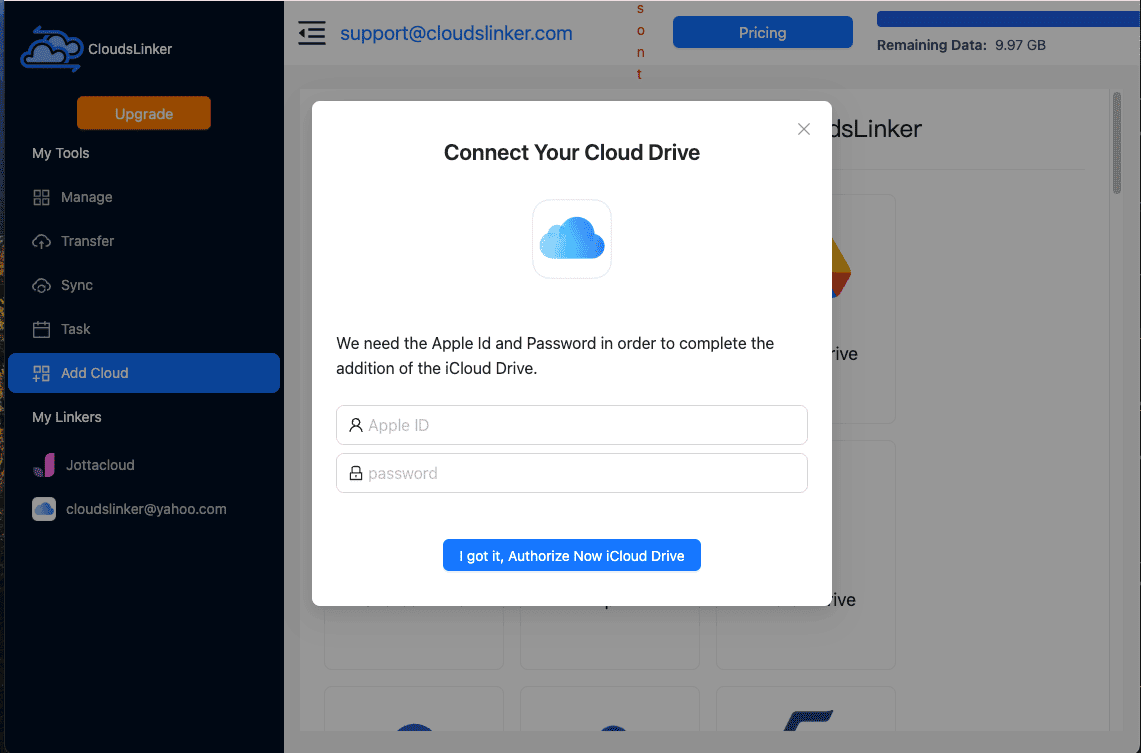
Step 2: Connect iCloud Drive
Next, select iCloud Drive from the same “Add Cloud” menu. Sign in using your Apple ID credentials. If you have two-factor authentication enabled, enter the verification code sent to your Apple device. When complete, iCloud Drive will be listed alongside your FTP connection in the CloudsLinker panel.
Step 3: Set Up the Transfer
Open the Transfer tab. On the left, pick FTP and select the folders or files you’d like to migrate. On the right, choose iCloud Drive as the destination. You can browse and confirm the folder structures on both sides before clicking Start Transfer.

If needed, you can set filters to exclude certain file types (like .tmp), skip
oversized archives,
or only move files modified within the last 30 days—perfect for incremental transfers.
Step 4: Schedule or Automate
Want FTP and iCloud Drive to stay in sync? Use the Schedule tab to set up automatic jobs—daily, weekly, or on a custom timeline. That way, new or updated files will flow into iCloud Drive without you having to repeat the process. For details, check the CloudsLinker scheduling guide.
Step 5: Monitor and Review
Once you start a transfer, it appears in your Task List. You can watch progress live, pause or resume, and see estimated completion times. When the migration finishes, CloudsLinker provides a summary report, highlighting both completed and skipped files. At this point, your FTP data is safely stored inside iCloud Drive and ready to use across your Apple devices.
Tip: Migrating from Other Platforms?
Beyond FTP, CloudsLinker also supports services like Google Drive, Dropbox, MEGA, and OneDrive. All transfers happen securely in the cloud, so your connection speed is never a bottleneck—and you don’t need to leave your device running while jobs complete.
Comparing the 4 Ways to Transfer from FTP to iCloud Drive
There’s no single “best” method for moving files from a classic FTP server into iCloud Drive. The right choice depends on your file size, whether you need a one-off transfer or an ongoing sync, and how comfortable you are with different tools. Here’s a side-by-side comparison of the four main approaches:
| Method | Ease of Use | Speed | Best For | Uses Local Bandwidth | Skill Level |
|---|---|---|---|---|---|
| Web Browser (Manual) | ★★★★★ | ★★★☆☆ | Occasional transfers or light usage | Yes | Beginner |
| iPhone / iPad (Files App) | ★★★★★ | ★★★☆☆ | Quick sharing while mobile | Yes | Beginner |
| Rclone (Command Line) | ★★☆☆☆ | ★★★★★ | Advanced users, scripted jobs, server sync | Yes / No (depends on setup) | Advanced |
| CloudsLinker (Cloud-Based) | ★★★★★ | ★★★★★ | Large migrations, recurring syncs, minimal manual work | No | Beginner |
If you just need to copy a few files, using a browser or the iOS Files app is quick and doesn’t require extra setup. For people who want full automation and script-based workflows, Rclone’s FTP backend is extremely powerful, though the learning curve is steeper. And for those moving larger libraries or business archives, CloudsLinker is the simplest choice—it handles everything directly in the cloud, saving both time and local bandwidth.
Moving files from an FTP server into iCloud Drive is usually straightforward, but a bit of preparation goes a long way. Here are some practical tips to avoid the common pitfalls—especially if you’re dealing with large archives or older server setups:
- Check FTP Access: Make sure your FTP server can be reached from the public internet. If your server only exposes a specific folder, set the correct Access Path when adding it in CloudsLinker.
- Mind iCloud’s File Size Limit: iCloud Drive supports uploads up to 50 GB per file. If you’re moving larger video projects or archives, split them first or use CloudsLinker which can handle large transfers more gracefully.
- Bandwidth Awareness: Manual download–upload processes will consume your local network. If your internet speed is limited or shared, prefer a direct cloud-to-cloud solution that runs in the background.
- Check Your iCloud Storage Plan: Every Apple ID comes with just 5 GB free. If your FTP storage holds tens or hundreds of gigabytes, upgrade to an iCloud+ plan before starting to avoid hitting space limits mid-transfer.
- Use Secure Protocols: If possible, prefer FTPS or SFTP instead of plain FTP. CloudsLinker and Rclone both support encrypted connections, keeping your credentials and data safer.
- Plan for Large Jobs: For multi-gigabyte migrations, tools like CloudsLinker can retry, resume, and schedule transfers automatically—far more reliable than manual uploads that may fail mid-way.
With these steps in mind, moving from FTP to iCloud Drive becomes a smooth process. Whether you’re transferring just a project folder or an entire server backup, the key is planning ahead, knowing iCloud’s limitations, and choosing the right tool for your workload.
Frequently Asked Questions
Watch Our Step-by-Step Video Guide
Prefer watching instead of reading? In this walkthrough, we’ll demonstrate how to transfer files from an FTP server into iCloud Drive. The video shows simple browser-based moves, iPhone workflows, and automated cloud-to-cloud transfers with CloudsLinker. Whether you’re just getting started or you manage larger archives, you’ll learn how to connect FTP securely, choose the right method, and avoid common mistakes. Follow along to make your FTP to iCloud migration straightforward and stress-free.
Conclusion
Migrating from FTP to iCloud Drive doesn’t have to be complex. If you only have a handful of files, Finder and iCloud.com are straightforward. If automation is your priority, Rclone scripts give you batch control. To avoid local bandwidth entirely, services like CloudsLinker provide a direct bridge from FTP to iCloud. Choose the workflow that matches your needs and your files will be available across iPhone, iPad, and Mac seamlessly.
Online Storage Services Supported by CloudsLinker
Transfer data between over 48 cloud services with CloudsLinker

OneDrive

Google Drive

Google Photos

Shared Drive

OneDrive for Business

Dropbox

Box

Mega

pCloud

Yandex

ProtonDrive

AWS

GCS

iDrive

Storj

DigitalOcean

Wasabi

1fichier

PikPak

TeleBox

OpenDrive

Backblaze B2

Fastmail file

SharePoint

Nextcloud

ownCloud

Premiumize me

HiDrive

Put.io

Sugar Sync

Jottacloud

Seafile

Ftp

SFtp

NAS

WebDav

4shared

Icedrive

Cloudflare R2

Scaleway

Doi

iCloud Drive

iCloud Photos

FileLU

Zoho WorkDrive

Telia Cloud / Sky

Drime

Filen
Didn' t find your cloud service? Be free to contact: [email protected]
Further Reading
Effortless FTP connect to google drive: Transfer Files in 3 Easy Ways
Learn More >
Google Photos to OneDrive: 3 Innovative Transfer Strategies
Learn More >
Google Photos to Proton Drive: 3 Effective Transfer Techniques
Learn More >