How to Efficiently Transfer Files from Google Drive to OpenDrive?
Transferring files between cloud storage services can often be a complex task. Cloudslinker simplifies this process, making the transition from Google Drive to OpenDrive smooth and hassle-free. This guide provides a detailed walkthrough on how to effectively shift your digital assets from Google Drive to OpenDrive, optimizing your cloud storage strategies
Introduction
In today's digital landscape, managing files across multiple cloud storage platforms is increasingly becoming a standard practice. This guide introduces Cloudslinker as a streamlined solution for those seeking to transfer files from Google Drive to OpenDrive. Covering each step of the process, this guide is designed to assist both individuals and professionals in efficient cloud storage management.
Moving from Google Drive to OpenDrive offers unique benefits, enhancing file management and storage capabilities:
- Superior Data Privacy: OpenDrive provides enhanced privacy features, which might be more appealing for users with sensitive data.
- High Storage Limits: OpenDrive often offers higher data storage limits, which is beneficial for users with large amounts of data.
- Customized Solutions: OpenDrive allows more customization options for personal or business use, adapting to various user needs.
- Less Restrictive Upload Limits: OpenDrive may have less restrictive upload limits compared to Google Drive, facilitating large file transfers.
While Google Drive is a popular choice due to its seamless integration with Google services and user-friendly interface, OpenDrive can offer a more tailored and flexible solution for specific user requirements in terms of privacy, storage capacity, and customization.
Maximizing Cloudslinker for Streamlined File Transfers to OpenDrive
Cloudslinker revolutionizes the way we handle file transfers between cloud services, specifically from Google Drive to OpenDrive. It facilitates direct transfers from one cloud platform to another, eliminating the need for any local data handling. This tool stands out for its ability to keep files in sync continuously, complemented by its sophisticated filtering features and user-friendly interface. For comprehensive instructions and tips, visit our Knowledge Base.
Step 1: Initiating Your Journey with Cloudslinker
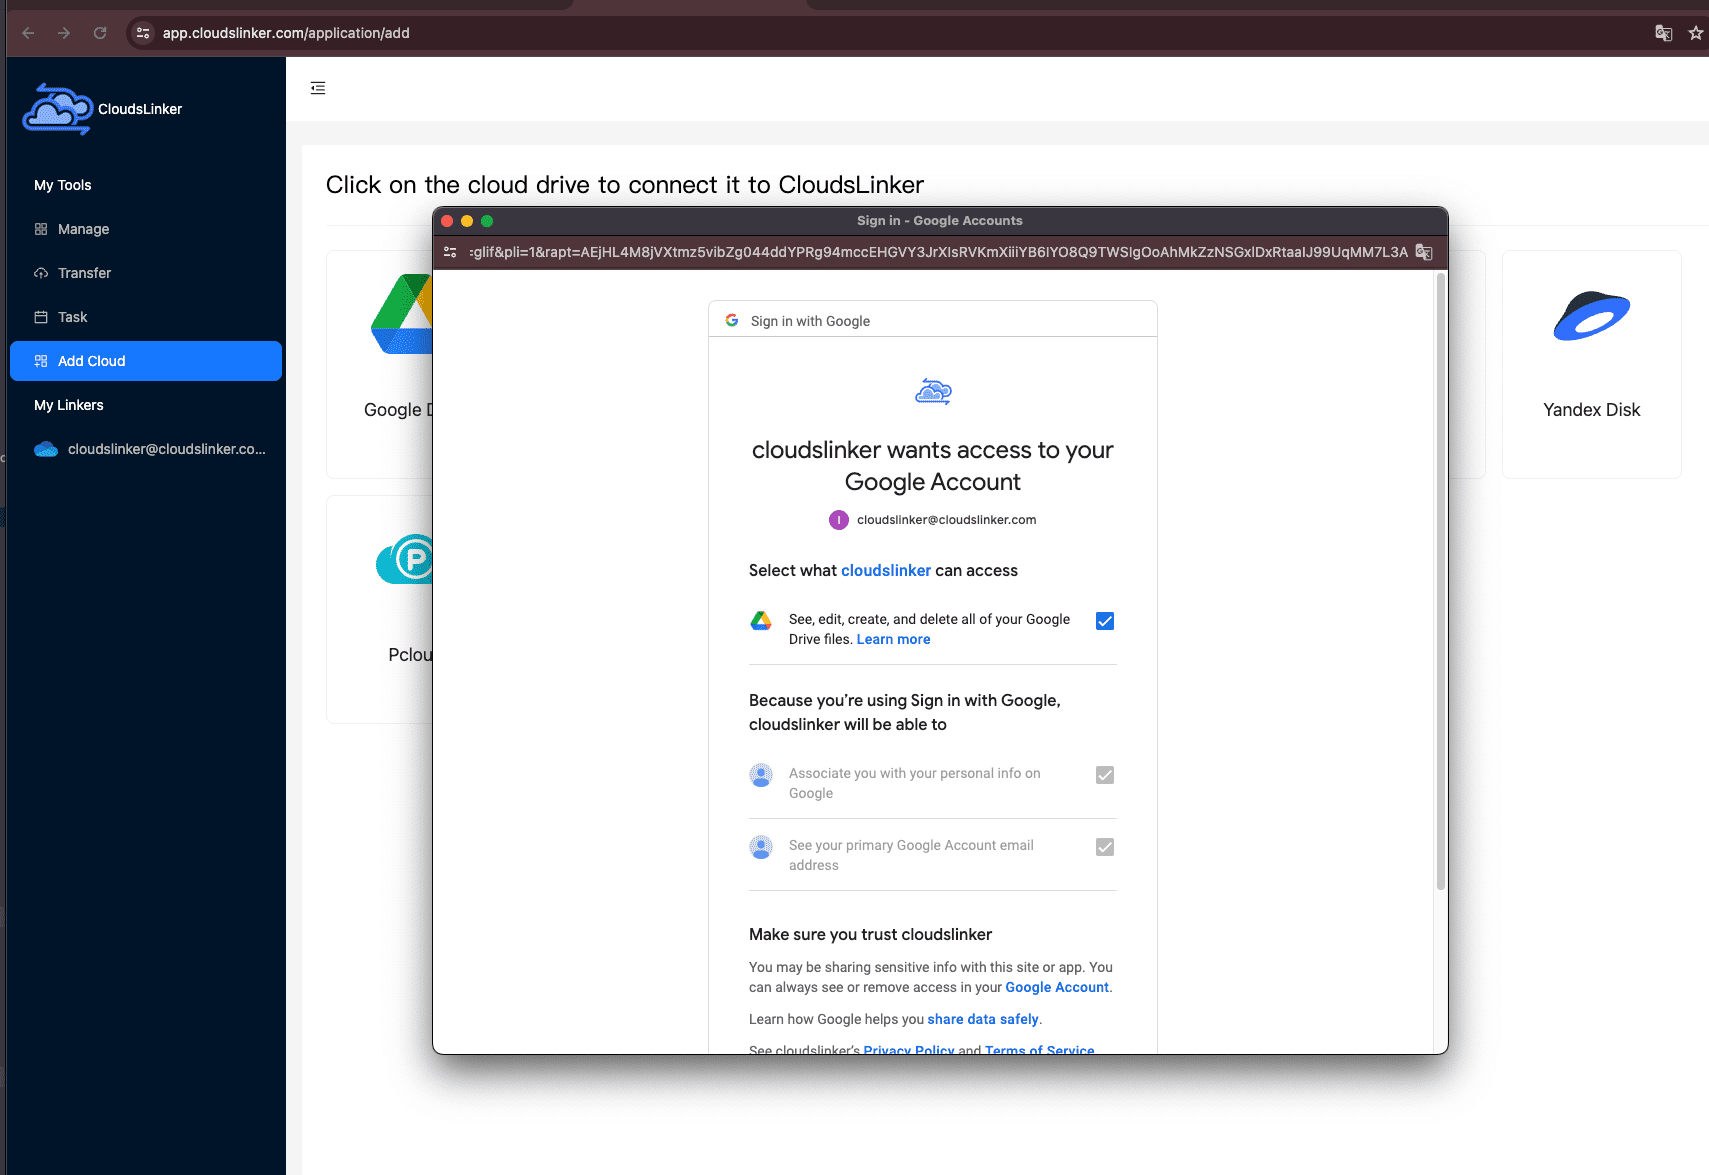
To commence, sign into Cloudslinker. This is where you will connect your cloud storage accounts. Start with linking your Google Drive account, granting Cloudslinker the necessary permissions to manage and execute file transfers.

Step 2: Syncing Your OpenDrive Account
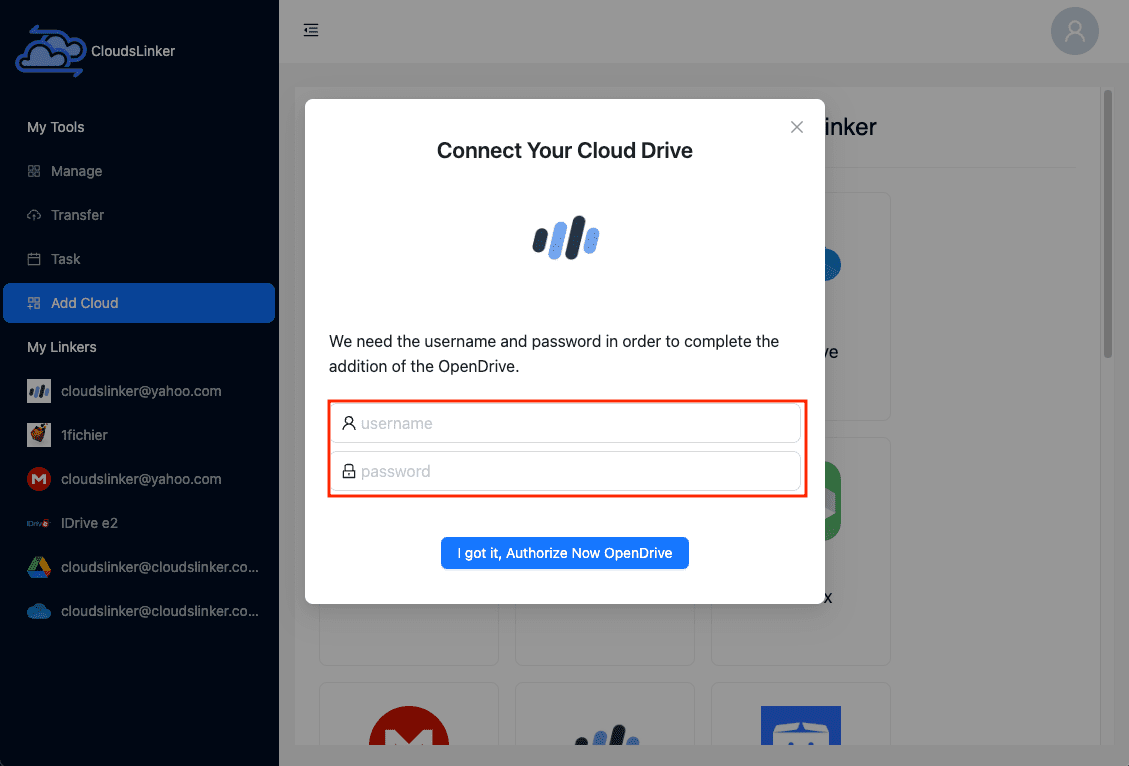
Integrating your OpenDrive account with Cloudslinker is a seamless process. Start by selecting the
OpenDrive icon within Cloudslinker's user interface. This action leads you to the setup page for
OpenDrive. Input your OpenDrive credentials here; rest assured, Cloudslinker uses state-of-the-art
encryption technology to protect your password and data. Once your login details are entered, simply
hit the Add button to finalize linking your OpenDrive account with Cloudslinker, paving
the way for efficient file management and transfer.

Step 3: Configuring Your Transfer in Cloudslinker
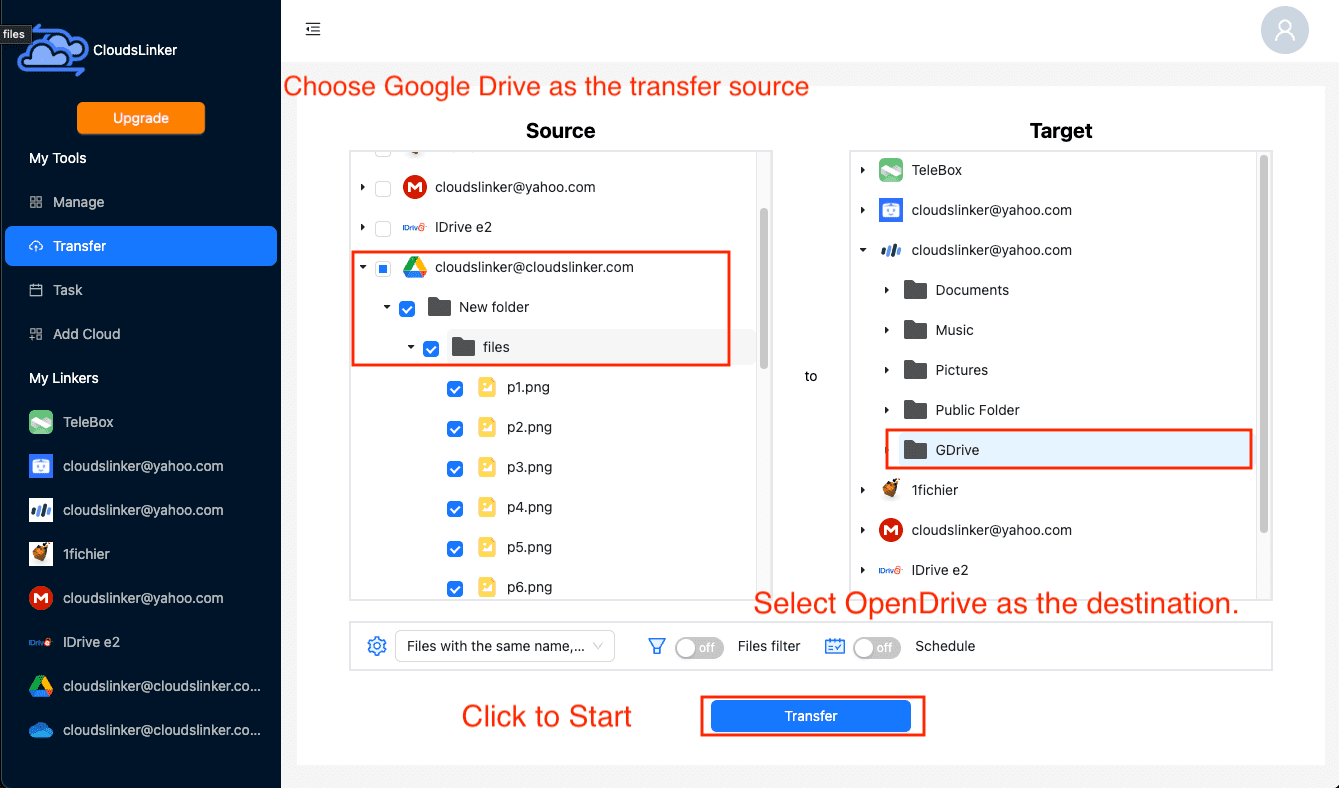
Navigate to the 'Transfer' section in Cloudslinker to set up your file transfer process. Here, designate Google Drive as your source and OpenDrive as your destination for the transfer. This selection initiates the file migration procedure.

Cloudslinker offers robust filtering capabilities, allowing you to exclude specific file types or sizes from your transfer. Detailed guidance on configuring these filters can be found in the Cloudslinker Filter Settings.
Additionally, Cloudslinker enables the scheduling of file transfers. You can customize the schedule to suit your needs, be it on a daily, weekly, or monthly basis, or even for one-time events. For more insights into scheduling your file transfers, visit our Cloudslinker Schedule Settings guide.
Step 4: Monitoring Your Transfer Activity
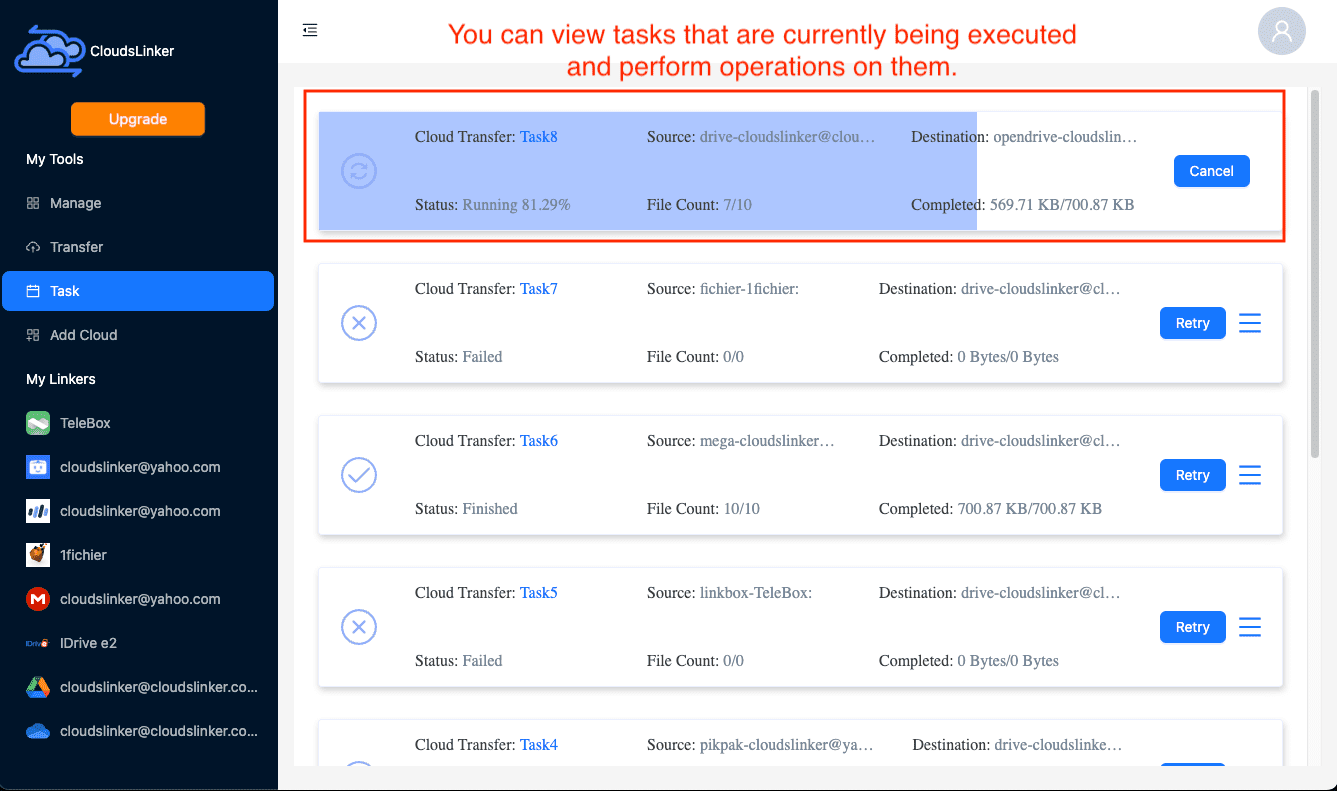
Monitor the progress of your file transfers by accessing the 'Task' area within Cloudslinker. This section provides a comprehensive overview, allowing you to manage or cancel transfer tasks as needed throughout the process.

Step 5: Confirming Transfer Completion
After the transfer process has concluded, it's crucial to confirm that your files have been accurately transferred from Google Drive to OpenDrive. We recommend conducting a thorough verification to ensure all necessary files are intact and correctly positioned in your OpenDrive account.

Watch Our Step-by-Step Video Tutorial
Want to see the file transfer process from Google Drive to OpenDrive in action? Watch our detailed video tutorial for an easy understanding of how to efficiently manage your cloud storage with Cloudslinker. This video provides you with a clear visual guide, helping you to smoothly execute the file migration.
Conclusion
Completing a file transfer from Google Drive to OpenDrive using Cloudslinker is an intuitive and straightforward process. The guide details each step, from initial setup to final verification, ensuring a user-friendly experience. Cloudslinker's features such as efficient file filtering and transfer scheduling make it an indispensable tool for managing files across different cloud platforms, demonstrating its effectiveness in simplifying cloud storage management.
Online Storage Services Supported by CloudsLinker
Transfer data between over 40 cloud services with CloudsLinker
Didn' t find your cloud service? Be free to contact: [email protected]
Further Reading
Effortless FTP connect to google drive: Transfer Files in 3 Easy Ways
Learn More >
Google Photos to OneDrive: 3 Innovative Transfer Strategies
Learn More >
Google Photos to Proton Drive: 3 Effective Transfer Techniques
Learn More >


