iCloud Drive to IceDrive: 4 Ways to Move Your Files
Switching from iCloud Drive to IceDrive is easier than you might think. This guide shares four different approaches—from quick manual uploads to automated cloud transfers—so you can migrate without wasting local bandwidth.
Introduction
Thinking of moving your files from iCloud Drive over to IceDrive? Maybe you want stronger privacy, a fresh interface, or the convenience of IceDrive’s virtual drive. Whatever the reason, you don’t need to be a tech expert to make the switch. In this guide, I’ll walk you through four different ways to get your data across—ranging from simple drag-and-drop moves to advanced cloud-to-cloud automation—so you can choose the path that works best for you.
iCloud Drive is Apple’s native cloud storage, integrated across macOS, iOS, and even Windows PCs. Every account starts with 5 GB free, and paid upgrades through iCloud+ can push that up to 12 TB.
- Unified sync: Your Desktop and Documents folders stay up to date across iPhone, iPad, Mac, and the web.
- Large file support: Upload items up to 50 GB—ideal for high-res photos, videos, and creative assets.
- Cross-platform: Access through Finder (Mac), Files app (iOS), File Explorer (Windows), or any browser.
- Sharing & collaboration: Share folders, set permissions, and edit in real-time with others.
- Privacy-first: End-to-end encryption and optional Advanced Data Protection keep files secure.
IceDrive is a modern cloud storage service known for its lightweight design, strong encryption, and the ability to mount your cloud as a local drive—especially on Windows. New users get 10 GB free storage, and paid plans offer larger capacities at competitive rates.
- Virtual Drive Mounting: Browse and manage your cloud files like a local disk—no heavy sync client needed (source).
- Zero-Knowledge Encryption: Twofish algorithm ensures your data is encrypted before leaving your device.
- Multi-platform Access: Available on web, desktop, and mobile apps, plus WebDAV support for third-party tools.
- Versioning & recovery: Restore older file versions or recover deleted items within retention limits.
- Cost-effective plans: Flexible monthly, yearly, and lifetime subscriptions (pricing details).
If you’re considering shifting your files from iCloud Drive to IceDrive, you’re in good company. Many users—especially those who value advanced encryption, lightweight apps, and the flexibility of a mounted virtual drive—find IceDrive a compelling alternative for both personal and professional file storage.
- True Cross-Platform Access: IceDrive works smoothly on Windows, macOS, Linux, iOS, and Android, plus a clean web interface—so your files are always within reach.
- Zero-Knowledge Encryption: Using the Twofish algorithm, IceDrive ensures your data is encrypted before it leaves your device, keeping even the provider out of your files (TechRadar review).
- Virtual Drive Mounting: Especially on Windows, IceDrive can appear as a local drive letter, letting you browse, edit, and save files as if they were stored on your computer.
- Selective Sync: Choose which folders are kept locally and which remain in the cloud, freeing up storage space without losing visibility.
- Data Security in Transit & at Rest: Files are protected with TLS/SSL during transfer and strong encryption while stored.
- Flexible Pricing Options: From a generous 10 GB free tier to affordable lifetime plans, IceDrive offers packages to fit individuals, families, and businesses. See pricing.
- Integration-Friendly: Access via WebDAV for compatibility with third-party tools like Cyberduck, Mountain Duck, and more.
Whether you’re leaving iCloud for stronger privacy, better desktop integration, or simply a change in workflow, IceDrive provides a lightweight, secure, and accessible home for your files—without locking you into a single ecosystem.
If you’re weighing up whether to move your files from iCloud Drive to IceDrive, it helps to understand how the two differ. While both provide dependable cloud storage, they take different approaches in terms of access, encryption, and how they fit into your daily workflow.
| Feature | iCloud Drive | IceDrive |
|---|---|---|
| Free Storage | 5 GB | 10 GB (free tier) |
| Platform Integration | Deeply tied to Apple ecosystem (macOS, iOS) | Works across macOS, Windows, Linux, iOS, Android, and Web |
| Unique Features | Automatic sync for Desktop & Documents on Apple devices | Virtual drive mounting on Windows for local-like file access (TechRadar review) |
| Collaboration | Best with Apple-native apps like Pages, Numbers, Keynote | File sharing via secure links, folder sharing, and WebDAV support for third-party tools |
| Security | End-to-end encryption; Advanced Data Protection option | Zero-knowledge encryption with Twofish algorithm, TLS/SSL in transit |
| File Versioning & Recovery | Basic versioning; varies by plan | Version history and deleted file recovery depending on storage plan |
| Third-Party Integration | Primarily within Apple services | Compatible with apps like Cyberduck, Mountain Duck via WebDAV |
iCloud Drive is ideal if you’re fully committed to Apple devices and want deep integration with its apps. IceDrive, on the other hand, offers greater platform flexibility, stronger encryption by default, and unique features like virtual drive mounting that make it stand out for users who work across multiple devices or operating systems.
Before you start shifting data from iCloud Drive to IceDrive, it’s worth taking a moment to review what’s in your cloud. Check your current storage usage, note the file types you’ll be moving, and make sure your target account has enough room. IceDrive’s free tier offers 10 GB, but if your data exceeds that, you may want to explore their paid or lifetime plans.
If you haven’t created an IceDrive account yet, head over to icedrive.net and sign up—it only takes a minute. Once your account is active, you can access it via web, mobile apps, or desktop software. Windows users can even mount IceDrive as a virtual drive, making the migration feel like a simple drag-and-drop between local folders.
It’s also smart to tidy up your iCloud Drive before the transfer. Group files into clearly named folders, delete anything you no longer need, and consider a folder structure you can mirror in IceDrive. This not only keeps things organized during upload but also helps if you plan to use IceDrive’s selective sync or WebDAV access across multiple devices.
Method 1: Move Files Using Web Browsers
Step 1: Download from iCloud Drive
Head over to the iCloud Drive web interface and log in with your Apple ID.
Browse through your folders and pick the files you want to move.
Hold down Command on a Mac or Ctrl on Windows to select multiple items at
once.
Click the download icon (a cloud with a downward arrow) in the top toolbar. If you download an entire folder, iCloud will package it into a ZIP archive—make sure to unzip it before the next step so your files are ready for upload.

Step 2: Upload to IceDrive
Open IceDrive in your browser and sign in. If you haven’t created an account yet, it only takes a minute—new users get 10 GB of free storage to start with.
Once you’re logged in, click the "Upload" button in the top right or drag your files and folders straight into the browser window. You can also create new folders on IceDrive to mirror your original iCloud structure, which makes it easier to keep things organized later—especially if you plan to use IceDrive’s virtual drive or selective sync.

This manual download-and-upload method is straightforward for small batches of files or quick one-off transfers. However, if you’re dealing with very large folders or a complex directory tree, the process can become time-consuming. In that case, you might prefer using a desktop sync client or a dedicated cloud-to-cloud transfer service to save time and skip local bandwidth usage.
Method 2: Transfer Using Your iPhone
Step 1: Open the IceDrive App and Start an Upload
On your iPhone, launch the IceDrive app and sign in with your account credentials. Once inside, tap the “+” (plus) button—typically located at the bottom or top-right corner of the interface—and choose “Upload”. This will bring up the standard iOS file picker so you can select items from your device or cloud sources.
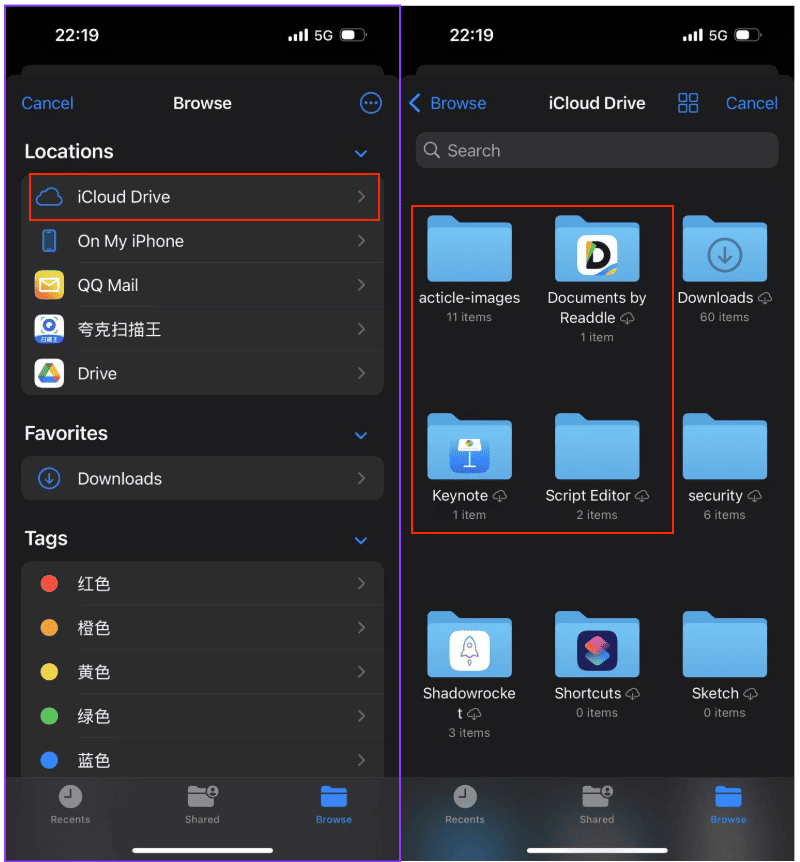
Step 2: Browse iCloud Drive and Pick Your Files
From the iOS file browser, tap “iCloud Drive” to access your stored documents, photos, or other files. Navigate through your folders and select everything you want to transfer. If a file hasn’t been downloaded to your iPhone yet, iOS will fetch it from iCloud before IceDrive can upload it. Larger media files or RAW images may take a moment to prepare.
This method is ideal when you’re on the go and need to move individual documents, PDFs, or images into IceDrive without turning on a computer. It works seamlessly with Apple’s native Files integration and IceDrive’s mobile upload feature. For bulk migrations or maintaining a complex folder structure, though, you might prefer using IceDrive’s desktop client or an automated cloud-to-cloud transfer service.
Method 3: Command-Line Transfer with Rclone
Step 1: Install Rclone and Configure iCloud Drive & IceDrive Remotes
If you’re comfortable with the command line and want full control over the migration process, Rclone is a versatile open-source tool that now supports iCloud Drive as a native remote as well as IceDrive via WebDAV.
Download the latest Rclone build from the
official downloads
page
and open your terminal. Run rclone config to begin setting up your remotes.
- iCloud Drive Remote: Select
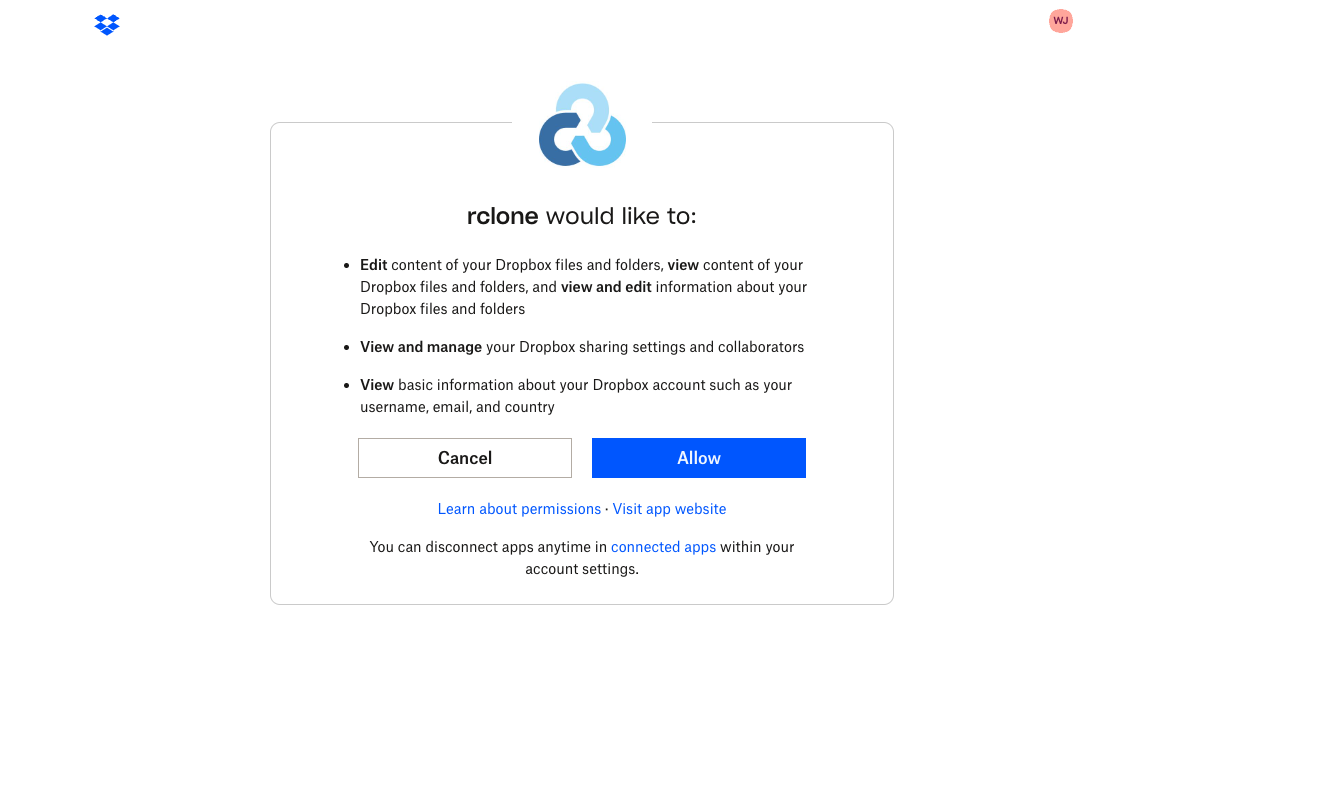
icloudas the storage type. You’ll be prompted for your Apple ID, password, and a two-factor authentication code. This allows Rclone to access your files directly from iCloud’s servers without relying on a locally synced folder. - IceDrive Remote via WebDAV: Choose
webdavduring setup. In your IceDrive account, go to Settings → WebDAV Access to generate a dedicated WebDAV password, which is separate from your account login. Use the provided WebDAV URL (https://webdav.icedrive.net) when Rclone asks for the endpoint.
Step 2: Run the Transfer Command
Once both remotes are configured, you can start transferring files. Here are two examples depending on whether you’re using iCloud as a remote or from a local sync folder:
rclone copy icloud:/Documents icedrive:iCloudBackup --progressrclone copy "~/Library/Mobile Documents/com~apple~CloudDocs" icedrive:iCloudBackup --progress
The above commands copy your iCloud Drive content into a folder called iCloudBackup on
IceDrive.
You can add --dry-run to preview the transfer without making changes, or use
--exclude to skip certain files or file types.
Rclone is particularly useful if you want to automate the migration or run it on a schedule. You can set bandwidth limits, enable checksum verification, or use cron/Task Scheduler to perform regular syncs. Just keep in mind that the iCloud remote setup involves entering your Apple ID and a time-sensitive verification code, while the IceDrive WebDAV connection requires generating a specific password in your account settings.
Method Four: Cloud-to-Cloud Transfer with Cloudslinker
Overview: iCloud Drive to IceDrive Without Local Downloads
Cloudslinker lets you transfer files directly between clouds — no manual downloading or re-uploading, and zero local bandwidth usage. It supports over 40 major cloud platforms, including iCloud Drive and IceDrive, with transfers running entirely in the cloud.
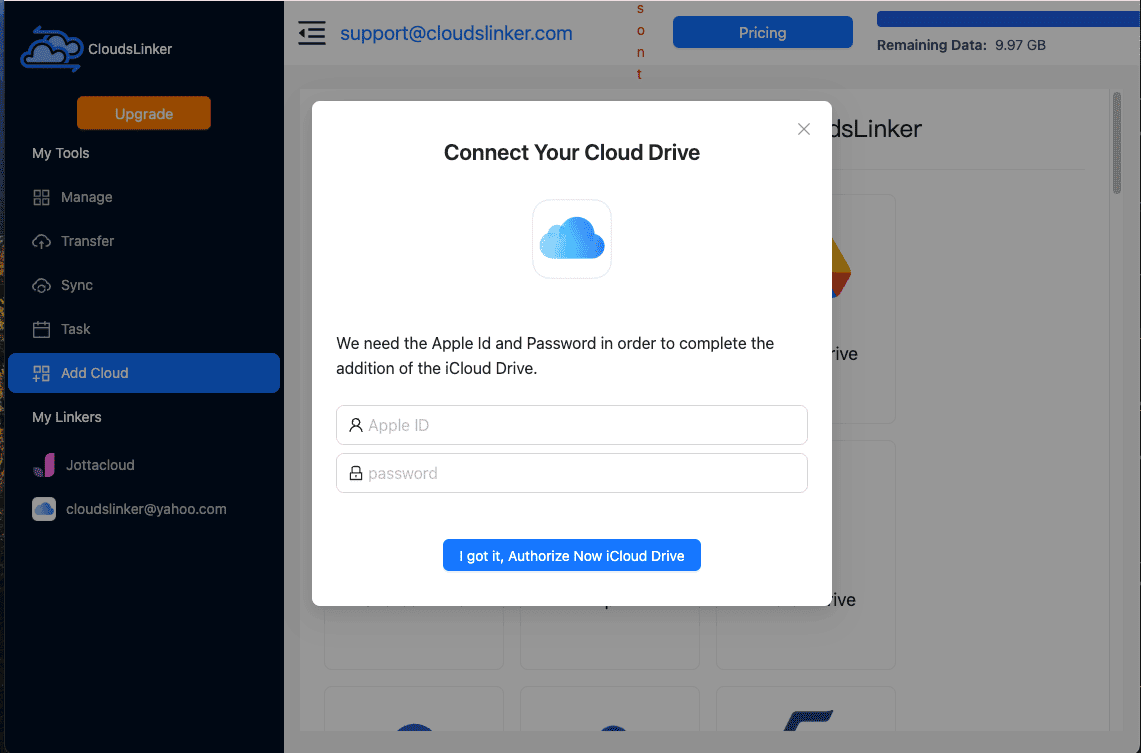
Step 1: Sign in to Cloudslinker
Go to app.cloudslinker.com and sign in (registration is free). On the dashboard, click "Add Cloud" and connect iCloud Drive first. Enter your Apple ID and password, then provide the two-factor authentication code sent to your Apple device.
Step 2: Add IceDrive
In Cloudslinker, click "Add Cloud" again, choose WebDAV, and use the following details:
- Username: Your IceDrive account email
- Password: The Access Key generated in “2FA & Access”

Step 3: Configure Your Transfer
Go to the Transfer tab, select iCloud Drive as the source and navigate to the files or folders you want to move. Then choose your IceDrive (WebDAV) connection as the destination. You can preview both folder structures before confirming the migration.

For precise control, use advanced filters to skip certain file types, exclude system files like
.DS_Store, or transfer only files updated within a specific date range.
Step 4: Monitor and Finalize
Once started, the transfer will appear in your Task List showing live progress, speed, and estimated completion time. You can pause, resume, or retry tasks as needed. Any failed files will be marked with detailed error messages.
Step 5: Review Completion Report
After completion, Cloudslinker provides a summary log of all files transferred, skipped, or failed. Your chosen files from iCloud Drive are now securely stored in IceDrive, ready to access from any device.
Tip
You can also connect IceDrive via WebDAV in Rclone using the same details:
https://webdav.icedrive.io as the URL, your email as the username, and the Access
Key from “2FA & Access” as the password.
Comparing the 4 Ways to Transfer from iCloud Drive to IceDrive
There’s no single “best” way to move files from iCloud Drive to IceDrive. The right choice depends on how much data you have, how comfortable you are with different tools, and whether you care more about speed or simplicity. Here’s a side-by-side look at the four approaches we covered so you can pick the one that fits your workflow:
| Method | Ease of Use | Speed | Best Suited For | Uses Local Bandwidth | Skill Level |
|---|---|---|---|---|---|
| Web Browser (Manual) | ★★★★★ | ★★★☆☆ | Small, one-off transfers | Yes | Beginner |
| iPhone Upload via IceDrive App | ★★★★★ | ★★★☆☆ | Mobile users moving a few files | Yes | Beginner |
| Rclone (Command-Line) | ★★☆☆☆ | ★★★★★ | Power users, automated transfers | Yes / No (if iCloud is added as remote) | Advanced |
| Cloudslinker (Cloud-to-Cloud) | ★★★★★ | ★★★★★ | Large data sets, recurring syncs | No | Beginner |
If you only need to move a few documents or photos, the web browser or the IceDrive mobile app will do the job quickly. More technical users might prefer Rclone for automation and scripting. But for bulk transfers or ongoing syncs, Cloudslinker is the easiest option — the entire process happens in the cloud, so it won’t use up your local internet bandwidth or require your device to stay online.
Moving files from iCloud Drive to IceDrive is usually straightforward, but there are a few things worth checking before you start — especially if you’re transferring a lot of data or using a manual method:
- Ensure Files Are Fully Downloaded: If you’re pulling files via Finder or a sync client, make sure they’re stored locally — iCloud placeholders won’t transfer until the actual files are downloaded.
- IceDrive Web Upload Limits: Browser uploads can be slower for very large files. For better performance, use the IceDrive desktop app or a server-side transfer tool like Cloudslinker.
- Avoid Network Bottlenecks: Manual transfers depend on your internet speed. If your connection is slow or unstable, consider a cloud-to-cloud service to bypass local bandwidth limits.
- Check Your IceDrive Storage Plan: IceDrive’s free plan offers 10 GB of storage. If you need more, review the pricing options and upgrade before starting the migration.
- Use Secure Authentication: When connecting IceDrive via WebDAV, use the Access Key generated in “2FA & Access” on the IceDrive web dashboard — not your account login password.
- Handling Large-Scale Transfers: If you’re moving hundreds of gigabytes or more, choose a service that supports background processing, scheduled syncs, and error recovery. Cloudslinker can resume failed transfers and run even if your device is offline.
A few minutes of prep can save hours of troubleshooting. Whether you’re migrating a handful of files or syncing entire directories, understanding IceDrive’s capabilities and the tools available will make your transfer faster and smoother.
Frequently Asked Questions
https://webdav.icedrive.io
with your email + the
Access Key), then run rclone copy without pulling everything through
your local network.
Watch Our Step-by-Step Video Tutorial
See the iCloud Drive → IceDrive migration in action. We demo browser uploads, iPhone transfers, Rclone, and cloud-to-cloud moves with Cloudslinker—plus tips to avoid common pitfalls.
Conclusion
Migrating from iCloud Drive to IceDrive doesn’t have to be complicated. If you’re only moving a few files, a quick manual download and upload is fine. For larger or ongoing transfers, cloud services like MultCloud or Cloudslinker can handle the heavy lifting without touching your internet speed. And once your files are in IceDrive, mounting it as a virtual drive makes it feel like part of your computer. Pick the method that matches your workflow, and you’ll be up and running in no time.
Online Storage Services Supported by CloudsLinker
Transfer data between over 48 cloud services with CloudsLinker

OneDrive

Google Drive

Google Photos

Shared Drive

OneDrive for Business

Dropbox

Box

Mega

pCloud

Yandex

ProtonDrive

AWS

GCS

iDrive

Storj

DigitalOcean

Wasabi

1fichier

PikPak

TeleBox

OpenDrive

Backblaze B2

Fastmail file

SharePoint

Nextcloud

ownCloud

Premiumize me

HiDrive

Put.io

Sugar Sync

Jottacloud

Seafile

Ftp

SFtp

NAS

WebDav

4shared

Icedrive

Cloudflare R2

Scaleway

Doi

iCloud Drive

iCloud Photos

FileLU

Zoho WorkDrive

Telia Cloud / Sky

Drime

Filen
Didn' t find your cloud service? Be free to contact: [email protected]
Further Reading
Effortless FTP connect to google drive: Transfer Files in 3 Easy Ways
Learn More >
Google Photos to OneDrive: 3 Innovative Transfer Strategies
Learn More >
Google Photos to Proton Drive: 3 Effective Transfer Techniques
Learn More >