Transferring Files from iCloud Drive to pCloud: 4 Reliable Methods You Can Count On
Shifting your data from iCloud Drive to pCloud doesn't have to be difficult. This guide introduces four practical transfer methods—from manual downloads to automated cloud services—so you can move your files securely and efficiently, without consuming your local internet bandwidth.
Introduction
Whether you're running low on iCloud storage, switching to a more flexible service, or simply want an extra layer of backup, transferring files from iCloud Drive to pCloud is a smart move. In this article, we’ll walk through four trusted methods: from traditional manual transfers using your browser or iPhone, to powerful automation tools like Rclone and fully cloud-based solutions like Cloudslinker. Each approach suits different user needs—whether you're migrating a few folders or managing a larger cloud library.
iCloud Drive is Apple’s integrated file storage platform, tightly embedded in macOS, iOS, and available on Windows too. Every Apple ID comes with 5 GB of free cloud space, with paid plans through iCloud+ offering up to 12 TB.
- Instant sync across devices: Files stored in iCloud Drive are automatically synced between your Mac, iPhone, and iPad—no manual steps needed.
- Large file support: Individual files up to 50 GB can be uploaded, making it suitable for creative professionals.
- Cross-platform access: Access files via Finder (macOS), Files app (iOS), or File Explorer (Windows).
- Collaborative sharing: Easily share documents and folders with others, managing edit or view-only rights.
- Enhanced privacy options: With features like Advanced Data Protection, Apple ensures your data is encrypted end-to-end—meaning even they can’t access it.
pCloud is a Swiss-based cloud storage service known for its strong privacy stance and intuitive design. It appeals to both personal and professional users looking for a flexible alternative to Big Tech clouds.
- 10 GB free storage on sign-up: Users get generous free space with the ability to unlock more via referrals or tasks.
- Zero-knowledge encryption available: For those seeking privacy, the optional pCloud Crypto add-on ensures no one—not even pCloud—can access your encrypted files.
- One-time lifetime plans: pCloud stands out with its lifetime purchase options, a rare offering in the subscription-heavy cloud world.
- Streamlined media access: Built-in media player lets you play music or videos directly from the cloud—no downloads needed.
- Web, desktop, and mobile apps: Whether you're on Windows, macOS, Linux, iOS, or Android, pCloud ensures seamless access from anywhere.
While iCloud Drive works well inside the Apple ecosystem, it may not be the best fit for users seeking more storage flexibility, lifetime plans, or greater data control. pCloud offers a compelling alternative—especially if you're looking for a cloud platform that puts ownership and privacy in your hands without monthly fees.
- Truly Cross-Platform Access: Whether you're on Windows, Linux, Android, or even an older Mac, pCloud ensures smooth accessibility via native apps and a fast, elegant web interface.
- Optional Zero-Knowledge Encryption: With pCloud Crypto, only you hold the key to your files—pCloud has zero access, even for encrypted content.
- One-Time Payment, Lifetime Use: Say goodbye to recurring subscriptions. pCloud offers lifetime storage plans—pay once and keep your cloud space forever.
- Built-In Media Streaming: Easily stream your music and videos directly from the cloud without needing to download them first. Great for creators and travelers alike.
- File Versioning & Recovery: Accidentally deleted a file or made a wrong change? pCloud allows you to restore previous versions and recover deleted items from your trash folder.
- Collaborate Without Limitations: Share folders with colleagues or friends, control access rights, and track file activity—ideal for both workspaces and households.
- Integrated Tools and Plugins: Use pCloud Drive as a virtual disk, integrate with apps like Zapier, or mount it locally to work as if it's a part of your file system.
For those who want more than just Apple-bound storage, pCloud delivers independence, security, and long-term value. Whether you're a freelancer, a business user, or just looking for a better way to organize your digital life, switching to pCloud could be one of the smartest cloud decisions you make.
Before you commit to migrating your files from iCloud Drive to pCloud, it’s worth taking a moment to compare how the two services stack up. While iCloud is seamless for Apple device users, pCloud provides more flexibility, stronger privacy options, and unique payment models that appeal to long-term planners and cross-platform users.
| Feature | iCloud Drive | pCloud |
|---|---|---|
| Free Storage | 5 GB | 10 GB (with bonus upgrades) |
| Device Compatibility | Optimized for macOS and iOS | Cross-platform: Windows, macOS, Linux, Android, iOS, Web |
| Collaboration & Sharing | File sharing and editing through Apple apps | Public and private links, shared folders, detailed access permissions |
| Encryption Options | Optional with Advanced Data Protection | Zero-knowledge encryption via pCloud Crypto (add-on) |
| File Versioning & Restore | Versioning available via iCloud+; duration varies | File history and restore options up to 30 days (or up to 1 year with extended versioning) |
| Storage Model | Monthly subscription via iCloud+ | Choice between subscription or lifetime plans |
| Media Handling | Files viewable in native apps | Built-in media player for audio/video streaming directly from the cloud |
If your workflow is locked into the Apple ecosystem, iCloud Drive might be more convenient. But for those looking for an affordable long-term cloud option that works anywhere and protects data with zero-knowledge encryption, pCloud offers a refreshingly user-centric alternative. It’s particularly ideal for people who work across multiple platforms or want to escape recurring subscription fees.
Before you begin transferring files from iCloud Drive to pCloud, it’s a good idea to review what’s currently stored in your cloud. Take inventory of total file size, identify folders with heavy media (videos, RAW photos, backups), and make sure you’ll have enough space in your pCloud account. While pCloud offers 10 GB of free storage by default, larger transfers may require upgrading to a paid or lifetime plan.
Don’t have a pCloud account yet? You can quickly create one at my.pcloud.com. Make sure your email is verified and that you’re logged in on the device(s) you’ll be using for the transfer. pCloud supports desktop sync apps, mobile apps, and browser-based uploads, so choose what works best for your setup.
Pre-sorting your files inside iCloud Drive can save you a headache later. Organize documents, photos, and videos into clearly labeled folders to keep things tidy during and after the migration. This is especially helpful if you plan to use the pCloud Drive desktop app, which lets you sync folders from your computer to the cloud in real time—no uploading required.
Method 1: Move Files Manually via Web Browsers
Step 1: Export Your Files from iCloud Drive
Start by signing into your account at
iCloud
Drive
using a desktop browser. Browse to the files or folders you wish to migrate. To select multiple
items, hold
Command (Mac) or Ctrl (Windows) while clicking.
Click the download icon (a cloud with a down arrow) to save files locally. Keep in mind that downloading folders will result in ZIP files, which you should unzip before uploading them elsewhere.

Step 2: Upload Files into pCloud via the Web
Visit the pCloud web interface and log in to your account. If you're new to pCloud, you can quickly create a free account and get up to 10 GB of cloud storage right away.
After logging in, use the "Upload" button to select individual files or entire folders, or drag and drop content directly into the browser window. For best results, upload the unzipped contents you exported from iCloud Drive.
If you want to maintain your original folder organization, manually create folders before uploading files into them. This is especially useful if you plan to sync your files later using the pCloud desktop app.

This browser-based method works great for one-off transfers and small batches of data. However, if you’re managing large libraries or want to automate the process, consider using CloudsLinker — a cloud-to-cloud transfer tool that doesn’t rely on your local bandwidth and supports scheduled migrations between services like iCloud and pCloud.
Method 2: Transfer Files Using Your iPhone and the pCloud App
Step 1: Launch the pCloud App and Begin Upload
First, download the pCloud app for iOS from the App Store if you haven’t already. Once installed, sign into your pCloud account. In the app, tap the “Upload” icon—typically represented by an upward arrow or plus symbol. Then choose “Import from Files” to open the iOS file browser.

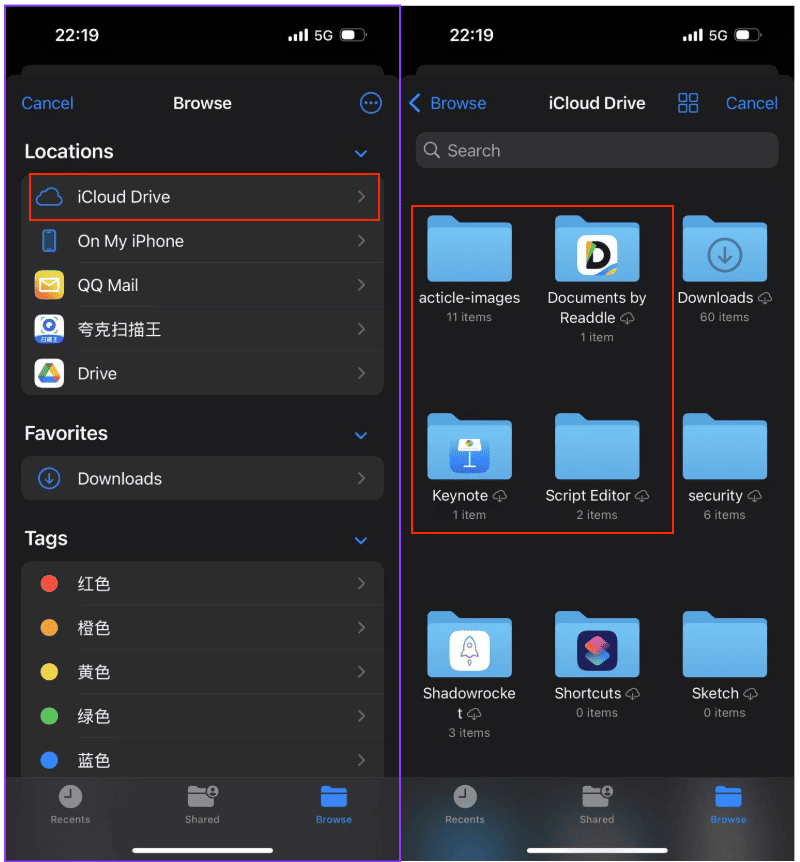
Step 2: Locate and Select Files from iCloud Drive
In the iOS file picker, select iCloud Drive under “Locations.” You’ll be able to browse your iCloud folder structure and choose the files you wish to upload. Note: If the files haven’t been downloaded to your iPhone yet, iOS may need a moment to fetch them before uploading can proceed.
This method is perfect when you need to quickly upload a photo, document, or project file without turning on your computer. The pCloud mobile app is fast, intuitive, and integrates smoothly with the Files app, making cloud transfers on iPhone surprisingly efficient. If you plan to move entire folders or media libraries, consider switching to the web or desktop upload method for better performance.
Method 3: Use Rclone to Transfer Files to pCloud via Command Line
Step 1: Install Rclone and Set Up Your Remotes
For users who prefer a terminal-based workflow or need to handle large, automated file transfers, Rclone is a powerful open-source tool that works well with pCloud and iCloud Drive.
Start by downloading the latest version of Rclone from the
official website.
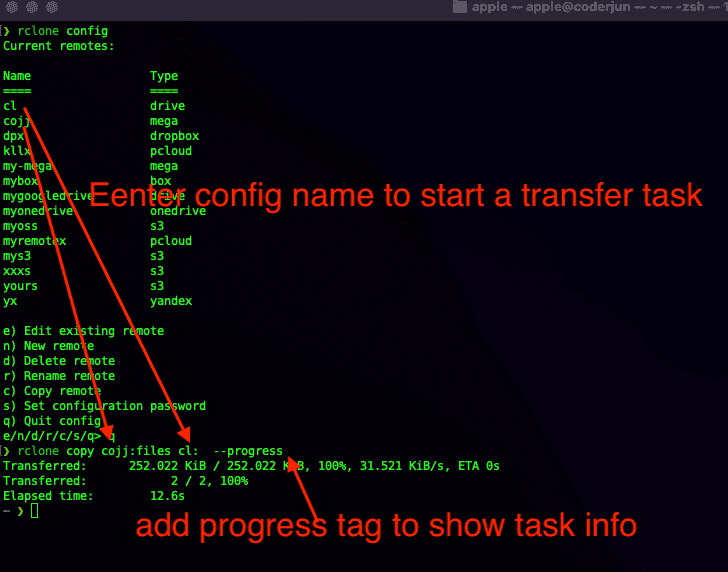
Then open your terminal and run:
rclone config to create remotes for your cloud services.
-
Accessing iCloud Files: On macOS, iCloud Drive files synced locally can be accessed
via
~/Library/Mobile Documents/com~apple~CloudDocs. You can treat this as a local source directory. -
Configuring pCloud: During
rclone config, selectpcloudas the remote type. You'll be asked to authorize via OAuth, and credentials will be securely stored. You can refer to the official pCloud setup guide for full instructions.
Step 2: Run Your Transfer Command
Once both your source and destination are ready, use a command like the one below to start copying files:
rclone copy "~/Library/Mobile Documents/com~apple~CloudDocs" pcloud:iCloudBackup --progress
This will move your local iCloud Drive files into a folder called iCloudBackup in your
pCloud account.
You can replace copy with sync if you want to mirror folders.
Use --dry-run to preview the transfer before executing it.
Rclone offers a high level of customization. You can enable detailed logging, throttle bandwidth usage, and schedule recurring syncs using cron jobs or system tasks. For advanced options such as encryption, chunk size, or mount functionality, refer to the pCloud backend documentation on Rclone’s official site.
Method 4: Transfer from iCloud Drive to pCloud Using CloudsLinker
Overview: Move Your Files Directly, Without Downloads
CloudsLinker is a lightweight, cloud-to-cloud transfer platform designed to simplify file migration between services like iCloud Drive and pCloud. It runs entirely in the cloud, meaning your device's bandwidth is never used and the transfer continues even when you're offline.
Step 1: Log in to CloudsLinker and Connect iCloud
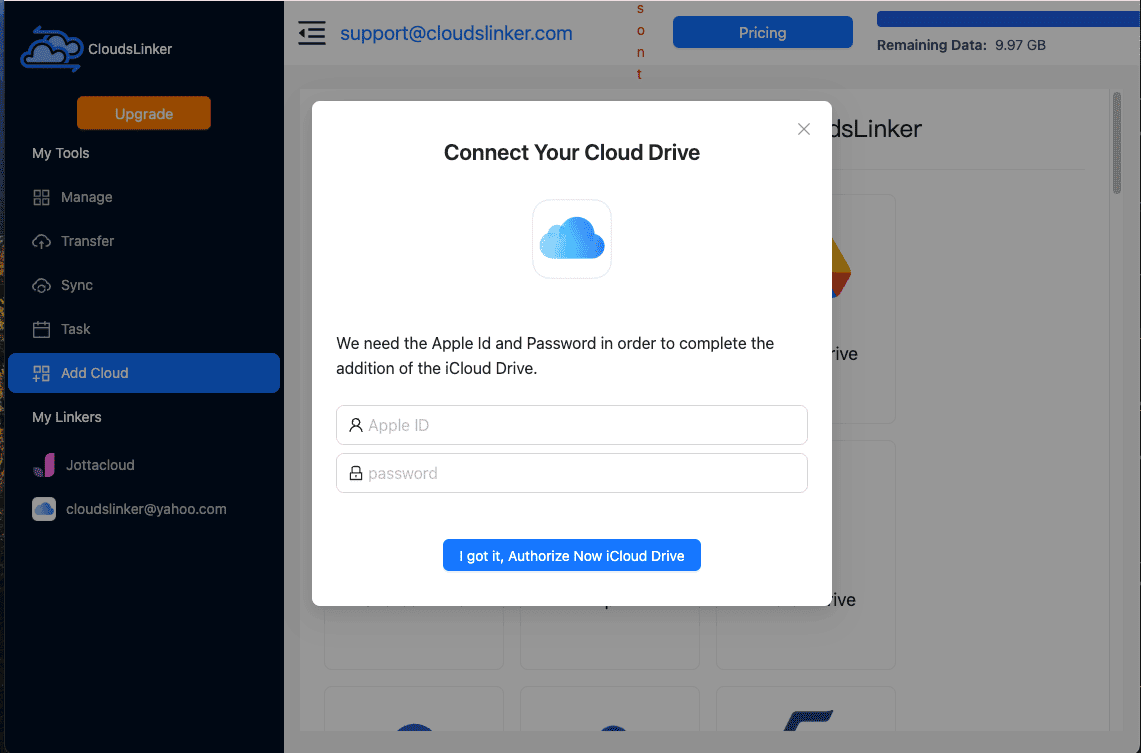
Head over to app.cloudslinker.com and either create an account or sign in. From the main dashboard, click "Add Cloud", then select iCloud Drive from the list. You'll be prompted to authenticate with your Apple ID. If you have two-factor authentication enabled, enter the verification code to complete the process.
Step 2: Link Your pCloud Account
Click "Add Cloud" again and choose pCloud this time. You’ll be asked to log in using your pCloud credentials. Once approved, CloudsLinker will securely connect to your pCloud storage and display it as an available destination. If you're new to pCloud, you can create an account here.

Step 3: Configure and Launch the Transfer
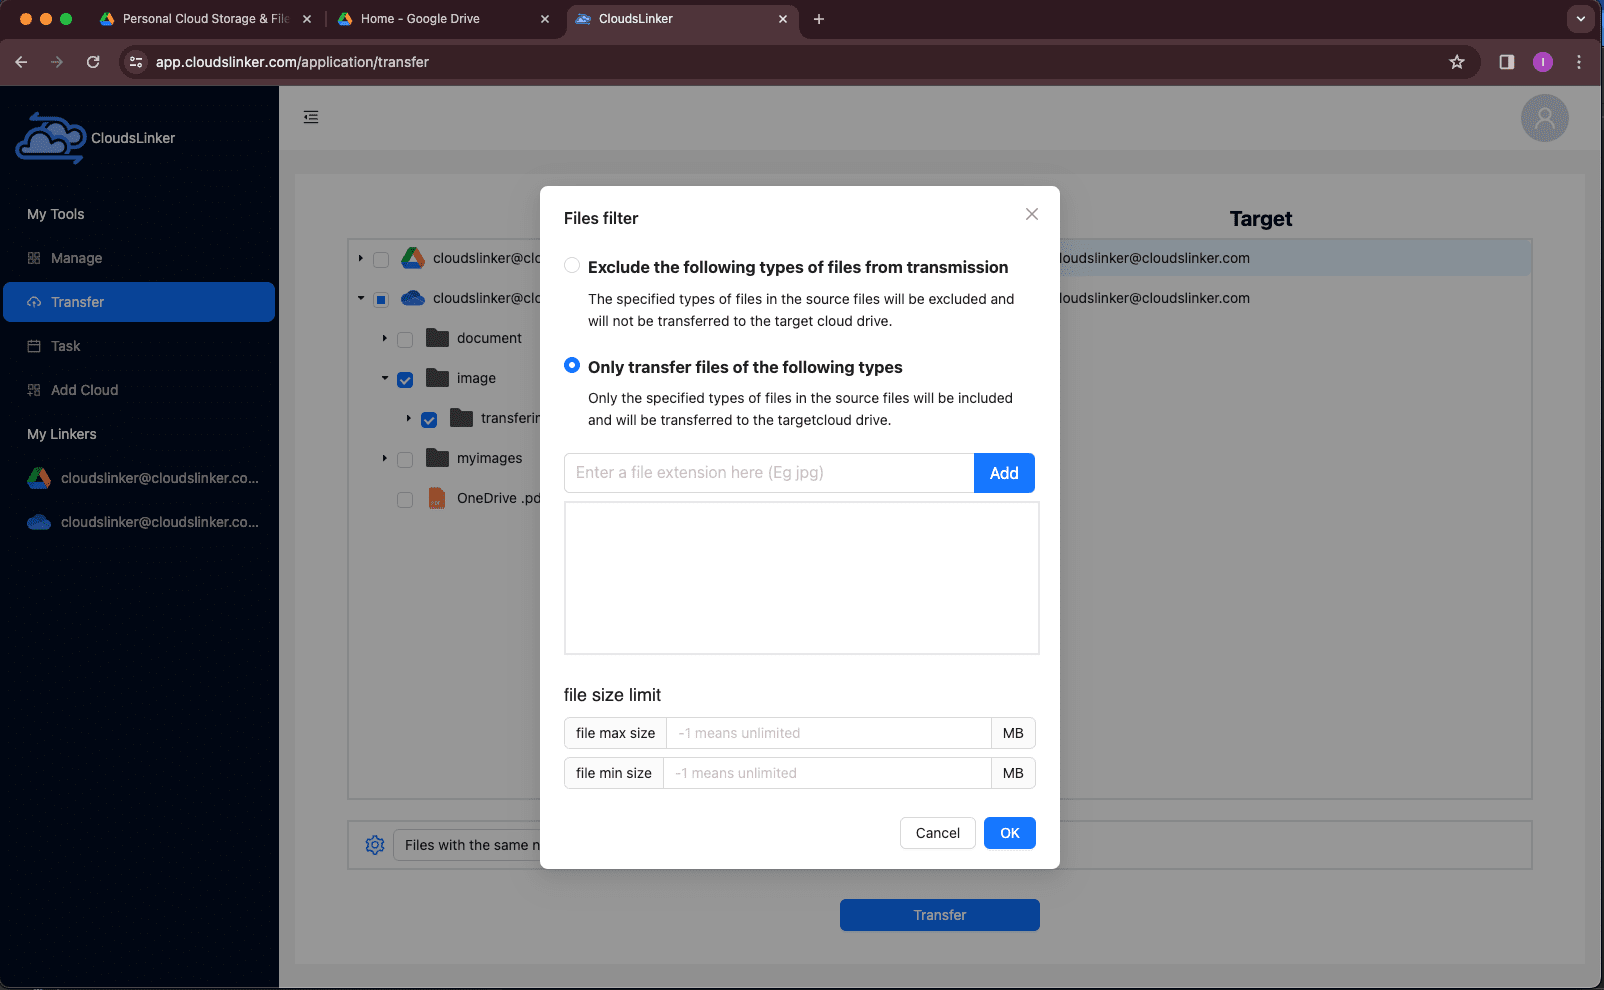
Navigate to the Transfer tab. Set iCloud Drive as the source and pCloud as the target. You can select specific files or entire folders depending on your needs. The interface allows you to preview your file structure before proceeding.

You can also apply filters to skip unwanted files—such as cache data or old media—or to only migrate files modified after a certain date. This makes your transfer smarter and saves space on your target cloud.
Step 4: Monitor Progress in Real Time
Once the task begins, you'll see it in your Task List. The dashboard allows you to pause, resume, or retry transfers as needed. Files that fail to copy due to access restrictions or unsupported formats will be clearly flagged.
Step 5: Review and Confirm
After the transfer completes, you’ll receive a detailed report showing what succeeded, what failed, and what was skipped. Your iCloud files are now stored safely in your pCloud account—organized and ready to access without ever having downloaded a single file.
Whether you’re moving personal backups or syncing business archives, CloudsLinker offers a reliable and efficient bridge between cloud services—with no software installs, no browser extensions, and no speed bottlenecks.
Looking to Move Files from Other Clouds Too?
CloudsLinker supports seamless transfers across dozens of cloud providers—from Google Drive and Dropbox to WebDAV and OneDrive. It’s built for flexibility, whether you're migrating one folder or an entire workspace.
Which iCloud to pCloud Transfer Method Is Right for You?
Whether you're migrating a few personal documents or moving entire project folders, the right method depends on your file size, device, and comfort level. Below is a side-by-side comparison of the four main approaches to help you pick the one that fits your needs best.
| Method | Ease of Use | Speed | Ideal For | Local Bandwidth Required | User Skill Level |
|---|---|---|---|---|---|
| Manual Transfer via Browser | ★★★★★ | ★★★☆☆ | Small batches of files or folders | Yes | Beginner |
| iPhone to pCloud App | ★★★★★ | ★★★☆☆ | On-the-go uploads of photos or PDFs | Yes | Beginner |
| Rclone Command Line | ★★☆☆☆ | ★★★★★ | Power users, scripting, large datasets | Yes / No (based on local or remote source) | Advanced |
| CloudsLinker (Cloud-to-Cloud) | ★★★★★ | ★★★★★ | Bulk transfers, remote migration, automation | No | Beginner |
For quick, lightweight transfers, the browser method or pCloud iOS app is often the simplest route. If you're managing a larger archive or want to automate backups, Rclone gives you more control—though it does require some technical know-how. And if you'd rather avoid downloads entirely, CloudsLinker handles everything for you in the cloud, without consuming your internet bandwidth.
Frequently Asked Questions
Watch Our Step-by-Step Video Tutorial
Learn how to transfer files from iCloud Drive to pCloud with our clear, visual walkthrough. This tutorial is perfect for anyone—whether you're new to cloud storage or looking for the simplest method. We’ll guide you through every step, from accessing your files in iCloud Drive to syncing them with pCloud using tools like Cloudslinker. Get expert tips, avoid common pitfalls, and make your cloud migration seamless. Watch now and move your files with ease and confidence!
Conclusion
Moving your files from iCloud Drive to pCloud is easier than it sounds—especially with the right tools. For smaller batches, browser-based downloads or iPhone transfers offer straightforward solutions. If you're handling large sets of data, Rclone’s speed and scripting options will serve you well. And for those who prefer to set it and forget it, Cloudslinker offers an entirely web-based, no-install option that doesn’t rely on your local bandwidth. No matter which method you choose, your files can arrive safely in pCloud, organized and accessible whenever you need them.
Online Storage Services Supported by CloudsLinker
Transfer data between over 48 cloud services with CloudsLinker

OneDrive

Google Drive

Google Photos

Shared Drive

OneDrive for Business

Dropbox

Box

Mega

pCloud

Yandex

ProtonDrive

AWS

GCS

iDrive

Storj

DigitalOcean

Wasabi

1fichier

PikPak

TeleBox

OpenDrive

Backblaze B2

Fastmail file

SharePoint

Nextcloud

ownCloud

Premiumize me

HiDrive

Put.io

Sugar Sync

Jottacloud

Seafile

Ftp

SFtp

NAS

WebDav

4shared

Icedrive

Cloudflare R2

Scaleway

Doi

iCloud Drive

iCloud Photos

FileLU

Zoho WorkDrive

Telia Cloud / Sky

Drime

Filen
Didn' t find your cloud service? Be free to contact: [email protected]
Further Reading
Effortless FTP connect to google drive: Transfer Files in 3 Easy Ways
Learn More >
Google Photos to OneDrive: 3 Innovative Transfer Strategies
Learn More >
Google Photos to Proton Drive: 3 Effective Transfer Techniques
Learn More >