How to Transfer Files from iCloud Drive to iDrive e2: 4 Practical Ways That Actually Work
Looking to move your data from iCloud Drive to iDrive e2? This article explores four proven strategies to help you migrate efficiently—whether you're handling a handful of documents or a massive backup.
Introduction
Maybe you're maxing out your iCloud storage, exploring iDrive e2's scalable S3-compatible storage, or just want more control over your data. Whatever the reason, moving files from iCloud Drive to iDrive e2 doesn’t need to be complicated. In this guide, we’ll unpack four effective methods—from browser-based downloads to CLI tools and cloud-based automations—that make the transition as smooth as possible, even if you're not a tech expert.
- Option 1: Export from iCloud Drive, Upload to iDrive e2 via Web Console
- Option 2: Use iOS Devices to Manually Migrate Files
- Option 3: Automate with Rclone and iDrive e2’s S3 Endpoint
- Option 4: Cloud-to-Cloud Transfer Using CloudsLinker
- Quick Overview: Which Method Suits You?
- Things to Check Before You Begin
- Frequently Asked Questions: iCloud to iDrive e2
iCloud Drive is Apple’s native cloud file system, designed to integrate seamlessly with your iPhone, iPad, and Mac. It’s also accessible via Windows through the iCloud app or web interface. While every Apple account starts with 5 GB of free storage, you can scale up with iCloud+ subscriptions.
- Device-to-device syncing: Any file saved to iCloud Drive appears across all Apple devices linked to your account.
- Support for large files: Uploads up to 50 GB per file are supported—great for photographers and video editors.
- Platform agnostic: Whether on macOS (Finder), iOS (Files app), or Windows (File Explorer), your files are always within reach.
- Built-in sharing tools: Share folders or files and assign view or edit permissions without extra software.
- End-to-end encryption: Apple offers Advanced Data Protection to secure your most sensitive files—even Apple can’t decrypt them.
iDrive e2 is an S3-compatible cloud object storage platform built for speed, scalability, and affordability. Whether you're backing up data, hosting media, or integrating with other services, it offers a flexible, developer-friendly alternative to AWS S3.
- Free 10GB to start: Try it out with no credit card required.
- Simple S3 API compatibility: Use familiar tools like Rclone, Cyberduck, or custom apps to connect.
- Cost-effective pricing: iDrive e2 offers aggressive rates without surprise bandwidth or egress fees.
- 12 global edge locations: Store and retrieve files with low latency thanks to multiple US and international data centers.
- Great for backups and media: Whether you’re syncing files, archiving data, or streaming large files, iDrive e2 scales with your needs.
While iCloud Drive works seamlessly inside the Apple environment, its tight ecosystem and limited free storage can be restrictive—especially if you're seeking scalability, API access, or more control over cloud infrastructure. iDrive e2 steps in as a powerful alternative, offering S3-compatible object storage that’s both affordable and developer-friendly.
- Truly Open Storage Architecture: Unlike Apple's closed system, iDrive e2 supports S3-compatible APIs, making it easier to connect with tools like Rclone, Cyberduck, or your own applications.
- Edge-Located Infrastructure: With multiple edge data centers across the U.S. and Europe, iDrive e2 optimizes data proximity—reducing latency and improving access speed for end users and backup systems.
- No Hidden Fees, Transparent Pricing: iDrive e2 has a straightforward pay-as-you-go pricing model with no surprise charges for bandwidth or egress.
- Ideal for Backups, Syncing & Hosting: Whether you're running media servers, automated backups, or syncing workflows, iDrive e2 gives you the flexibility iCloud lacks.
- Data Redundancy & Encryption: Files are stored with redundancy across multiple drives, and data is encrypted both in transit and at rest. For businesses, this can be a critical compliance checkbox.
- Developer-Ready Tools: Full CLI documentation, programmatic uploads, lifecycle policies, and easy integration into scripts and automation pipelines.
- Built for Scale: Whether you're migrating 5 GB or 50 TB, iDrive e2 adapts to your use case—offering storage that grows with your project, not against it.
If you're outgrowing iCloud Drive or simply want a more flexible, performance-oriented cloud solution, iDrive e2 delivers powerful infrastructure without locking you into an ecosystem. From media professionals to IT teams, anyone needing robust cloud storage can benefit from this upgrade.
Before you dive into transferring your data from iCloud Drive to iDrive e2, it helps to understand how these two platforms differ—not just in how they look, but in how they’re built and what they’re built for. While iCloud Drive shines inside Apple’s polished user experience, iDrive e2 is engineered for scale, flexibility, and independence from proprietary ecosystems.
| Feature | iCloud Drive | iDrive e2 |
|---|---|---|
| Free Storage | 5 GB | 10 GB (no credit card needed) |
| Platform Compatibility | Optimized for macOS/iOS | API-driven, OS-agnostic: works with Linux, Windows, macOS, Web apps |
| Collaboration & Sharing | Built-in through Apple ecosystem (Mail, Notes, etc.) | Supports external tools (e.g. Rclone, Cyberduck) and S3 access policies |
| Encryption & Security | End-to-end encryption via Advanced Data Protection | Data encrypted in transit and at rest; supports custom key management |
| Versioning & Recovery | Available with iCloud+; retention periods vary | Versioning configurable via S3-compatible lifecycle policies |
| Pricing Model | Tiered monthly subscription | Pay-as-you-go (per GB), no egress fees |
| Data Usage | Primarily file syncing and iOS backups | Designed for backups, media hosting, app storage, and static site delivery |
| Programmatic Access | Limited automation outside Apple ecosystem | Full S3-compatible API access with CLI and SDK integration |
iCloud Drive offers a familiar and convenient experience if you’re deeply invested in Apple’s ecosystem. However, if your priorities include cross-platform workflows, scalable storage, or API-level automation, iDrive e2 provides more control and flexibility at a fraction of the cost. It’s a smart pick for developers, remote teams, and anyone ready to take their storage beyond Apple’s walled garden.
Before initiating a file migration from iCloud Drive to iDrive e2, it’s worth spending a few minutes on preparation. Start by checking how much data you’ve got stored. If you’re dealing with large media libraries—think high-res images, video exports, or iOS backups—make sure your destination bucket has enough room. iDrive e2 offers 10 GB of free object storage to get started, but anything beyond that will need provisioning through their pay-as-you-go model.
If you haven’t already signed up for iDrive e2, you can create an account here: idrive.com/e2. After registration, generate your access key and secret key from the dashboard. These credentials are essential for connecting via tools like Rclone, Cyberduck, or any S3-compatible automation workflow.
It’s also a good idea to clean up your iCloud Drive beforehand. Remove duplicates, archive old files locally if needed, and group related files into folders. While iDrive e2 is highly scalable, having a well-organized directory structure makes syncing or scripting much easier—especially if you're managing this across multiple buckets or endpoints.
Lastly, decide how you plan to upload: via browser, third-party tools, or programmatic upload. iDrive e2 doesn’t offer a native GUI like iCloud Drive, but its CLI and API documentation are well-documented and friendly to both novice users and seasoned sysadmins. Choose what best matches your technical comfort zone.
Method 1: Transfer Files Manually Using Web Browsers
Step 1: Download Your Files from iCloud Drive
Begin by logging into your iCloud account at
iCloud
Drive using a desktop browser.
Browse to the files or folders you’d like to transfer. Hold Command (Mac) or
Ctrl (Windows) to select multiple files.
Click the download icon to save the selected items locally. If you download entire folders, they’ll be compressed as ZIP files—make sure to unzip them before uploading.

Step 2: Upload Files to iDrive e2 via the Web Console
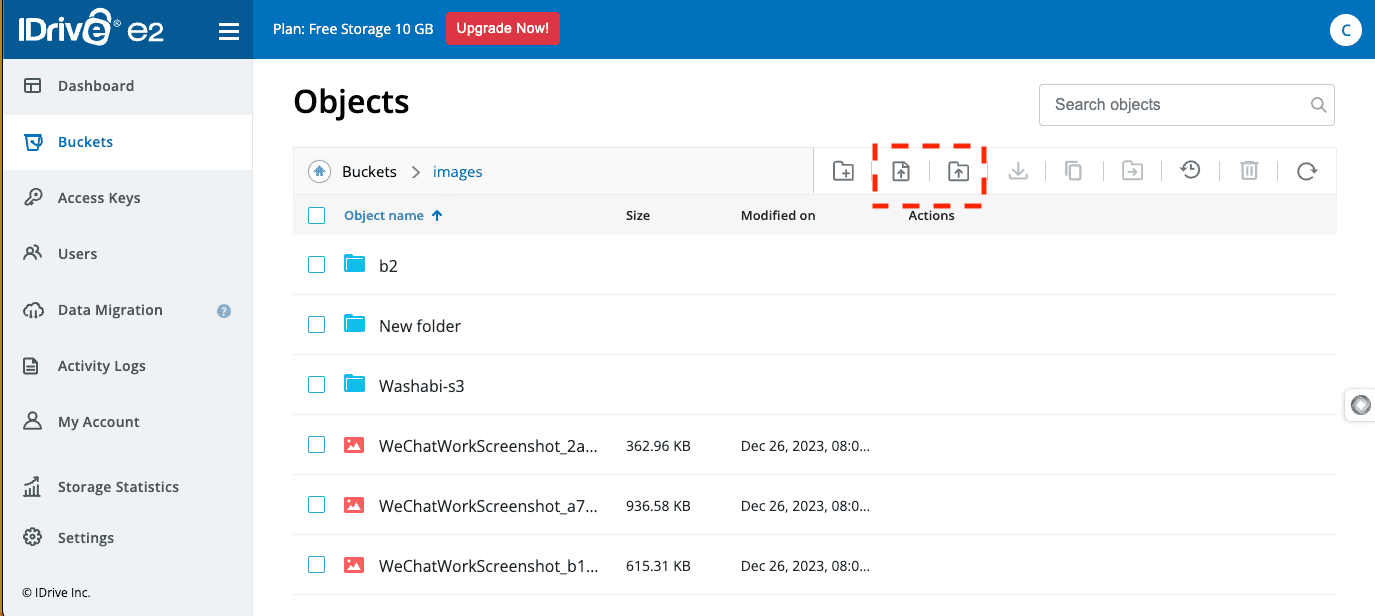
Now, open the iDrive e2 Console and sign into your account. From the dashboard, select the bucket you’d like to upload files into.
Once inside the bucket view, use the Upload button to choose files or folders from your local drive. The iDrive e2 web interface supports modern drag-and-drop uploads, as well as folder creation for better organization.
Make sure the folder structure matches your original iCloud Drive layout if you plan to maintain logical grouping—for example, keep your photos, documents, and backups in separate directories.
This approach works well for one-time transfers and small-to-medium batches of files. If you’re planning regular syncs, large data sets, or automation, you might want to explore options like Rclone or CloudsLinker, both of which support direct uploads to iDrive e2 without routing through your local bandwidth.
Method 2: Upload to iDrive e2 Using a Desktop Client like Cyberduck
Step 1: Prepare Files from iCloud Drive
Just like in Method 1, begin by signing into iCloud Drive using a desktop browser. Select the files or folders you want to migrate and download them to your local machine. If you're downloading folders, don't forget to extract the ZIP files afterward.
Step 2: Connect Cyberduck to iDrive e2
Cyberduck is a popular open-source client that supports S3-compatible services like iDrive e2. You can download it for free at cyberduck.io. After installation, follow these steps:
- Open Cyberduck and click “Open Connection”
- Choose S3 (Amazon Simple Storage Service) as the protocol
- In the Server field, enter your iDrive e2 endpoint (e.g.,
s3.us-west-1.idrivee2-25.com) - Enter your Access Key and Secret Key from your iDrive e2 dashboard
You can find your credentials under iDrive e2's Access Keys section once logged in.

Step 3: Upload Files to Your Bucket
Once connected, Cyberduck will list your buckets. Double-click the one you want to use, or create a new one directly from the app. You can now drag and drop files from your computer into the Cyberduck window, and they’ll be uploaded to your iDrive e2 storage.
If you’d prefer to mount your iDrive bucket as a drive and interact with it like a local folder, consider using Mountain Duck, a companion tool by the same developers. It allows you to use Finder or File Explorer to copy files as if iDrive e2 were just another hard drive.
Desktop clients like Cyberduck provide a comfortable middle ground between browser-based uploads and full-blown CLI automation. If you’re migrating a decent amount of data but don’t want to deal with command-line tools, this method offers a smooth, reliable experience with no technical complexity.
Method 3: Use Rclone to Transfer Files from iCloud Drive to iDrive e2
Step 1: Install Rclone and Set Up Remotes
If you’re looking for a scriptable, high-performance way to move data between iCloud Drive and iDrive e2, Rclone is an ideal tool. It supports S3-compatible storage and allows you to define both cloud and local sources as “remotes.”
Start by installing Rclone from the official site. Once installed, open your terminal and type:
rclone configThis will launch Rclone’s interactive configuration menu.
Step 2: Add iCloud Drive as a Local Remote
If you're using a Mac, your iCloud Drive files are typically synced to a local directory at:
~/Library/Mobile Documents/com~apple~CloudDocs
In the Rclone config menu, choose to add a new remote (e.g., icloud) with the
local backend:
- Remote name:
icloud - Storage type:
local - Path:
~/Library/Mobile Documents/com~apple~CloudDocs
This effectively treats your iCloud Drive sync folder as a remote source, letting you run cloud-to-cloud style transfers without downloading again.
Step 3: Add iDrive e2 as an S3-Compatible Remote
In the same config flow, add another remote for iDrive e2:
- Remote name:
idrivee2(or any name you like) - Storage type:
s3 - S3 provider:
Other - Endpoint: e.g.,
s3.us-west-1.idrivee2-25.com(depends on your bucket region) - Access Key & Secret: Found in your iDrive e2 dashboard
- Storage class:
STANDARD
Once both remotes are configured, you’re ready to transfer.
Step 4: Start the Transfer
Use this command to begin copying files from iCloud Drive to your iDrive e2 bucket:
rclone copy icloud: idrivee2:icloud-backup --progress
This copies everything from your local iCloud Drive sync folder to a folder named
icloud-backup in your iDrive e2 bucket.
You can swap copy for sync to maintain a mirror between the two.
To preview the action without making changes:
rclone copy icloud: idrivee2:icloud-backup --dry-run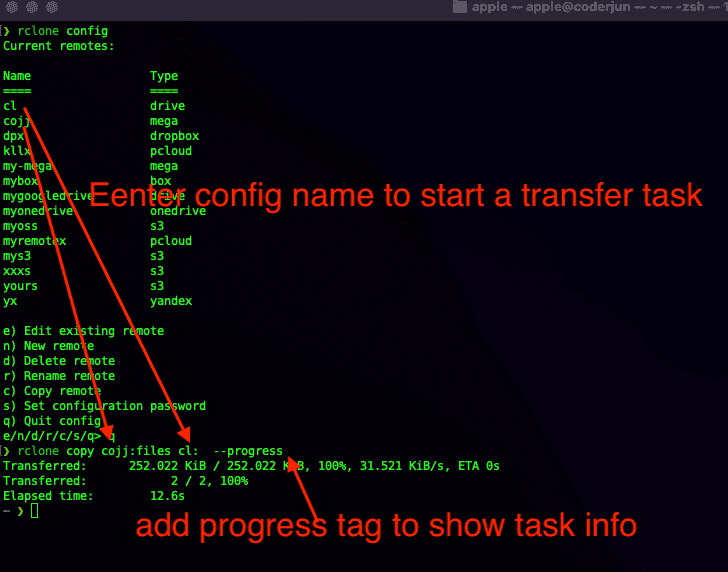
Optional: Use WebDAV for Cloud-to-Cloud (Advanced)
If you’ve mounted your iCloud Drive as a WebDAV server (via third-party bridge), Rclone also supports
this backend.
Simply add a webdav remote and point it to your iCloud URL:
- Storage type:
webdav - URL: your WebDAV endpoint exposing iCloud Drive
- User/Pass: if required
Then run the same command:
rclone copy icloud: idrivee2:icloud-backup --progressBonus: Schedule It
You can schedule Rclone jobs using cron on macOS/Linux or Task Scheduler on Windows.
Add logging and bandwidth limits as needed:
rclone sync icloud: idrivee2:icloud-backup --bwlimit 5M --log-file rclone.logWith Rclone, you get full control over what moves, when it moves, and how it moves—perfect for automation enthusiasts, developers, and anyone managing large cloud libraries. For full parameters and flags, explore the S3 backend docs and global Rclone documentation.
Method 4: Transfer from iCloud Drive to iDrive e2 Using CloudsLinker
Overview: Cloud-to-Cloud Transfer with No Downloads
CloudsLinker is a fully web-based migration service that lets you move files directly between cloud storage platforms—including iCloud Drive and iDrive e2—without downloading anything to your device. It's ideal for large transfers, low-bandwidth environments, or when you just want things to “work quietly in the background.”
Step 1: Connect Your iCloud Drive
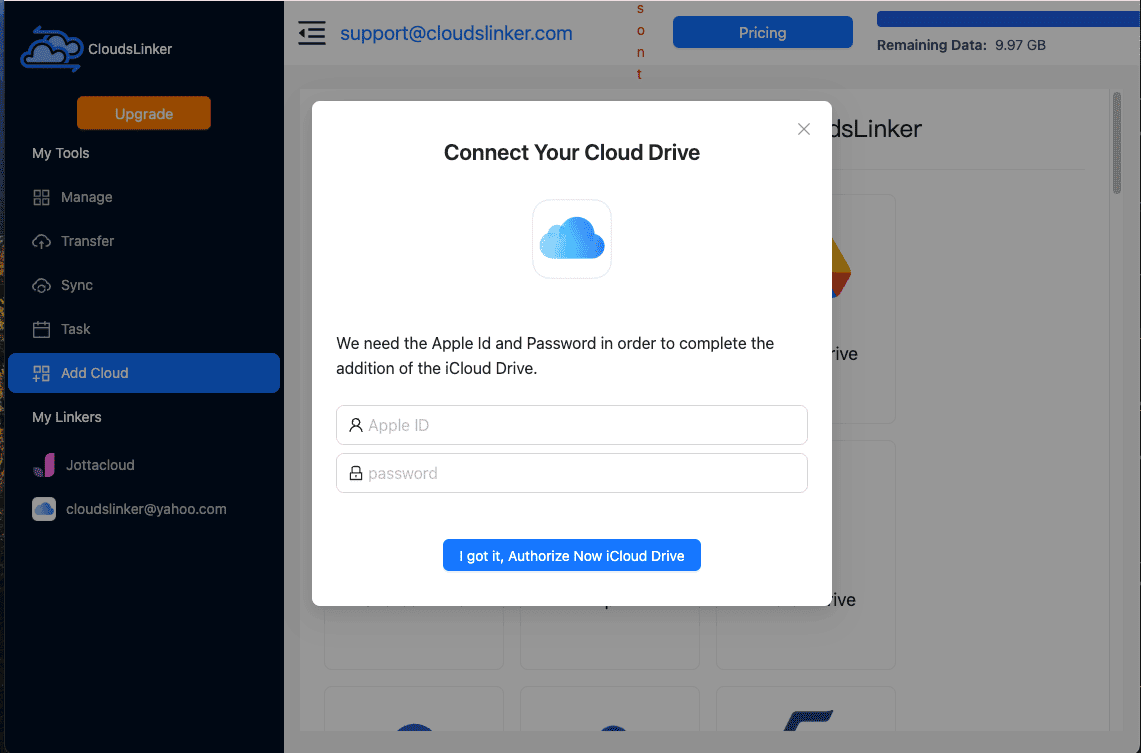
Go to app.cloudslinker.com and sign in or create an account. Once in the dashboard, click “Add Cloud” and choose iCloud Drive from the list. You'll be asked to log in with your Apple ID—just follow the prompts. If you have two-factor authentication enabled, enter the verification code to finish setup.
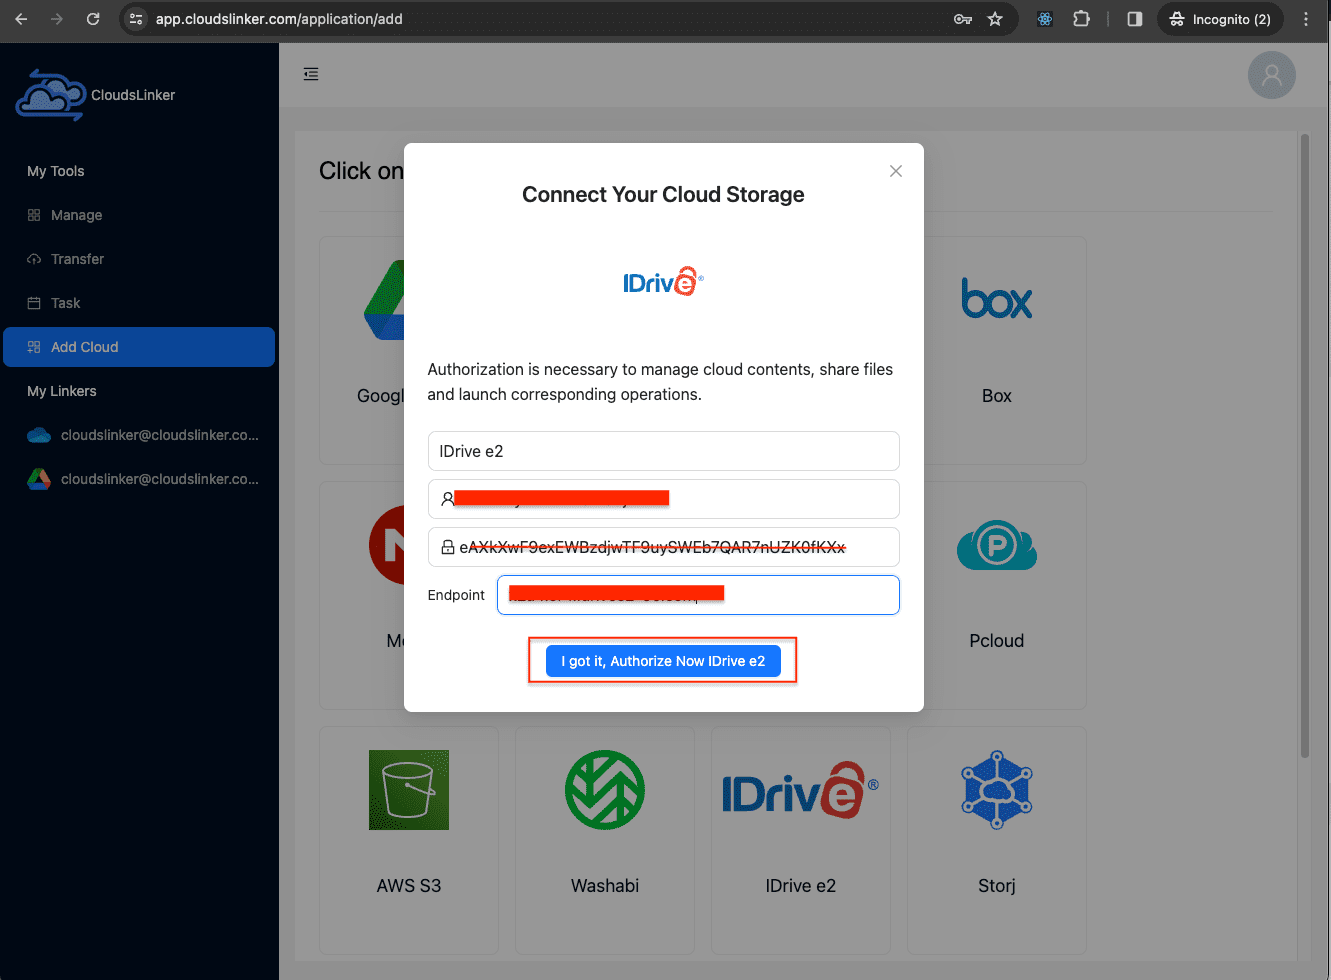
Step 2: Add Your iDrive e2 Bucket
Now, click “Add Cloud” again and select IDrive E2. You’ll need to enter three things:
access_key_idsecret_access_keyendpoint(based on your region)
You can find these in your iDrive E2 dashboard. Not sure which endpoint to use? Refer to iDrive’s endpoint documentation.
Step 3: Set Up Your Transfer
Go to the Transfer tab in CloudsLinker. Set iCloud Drive as your source and IDrive E2 as your target. You’ll be able to select specific folders or files, or choose the entire iCloud root directory.

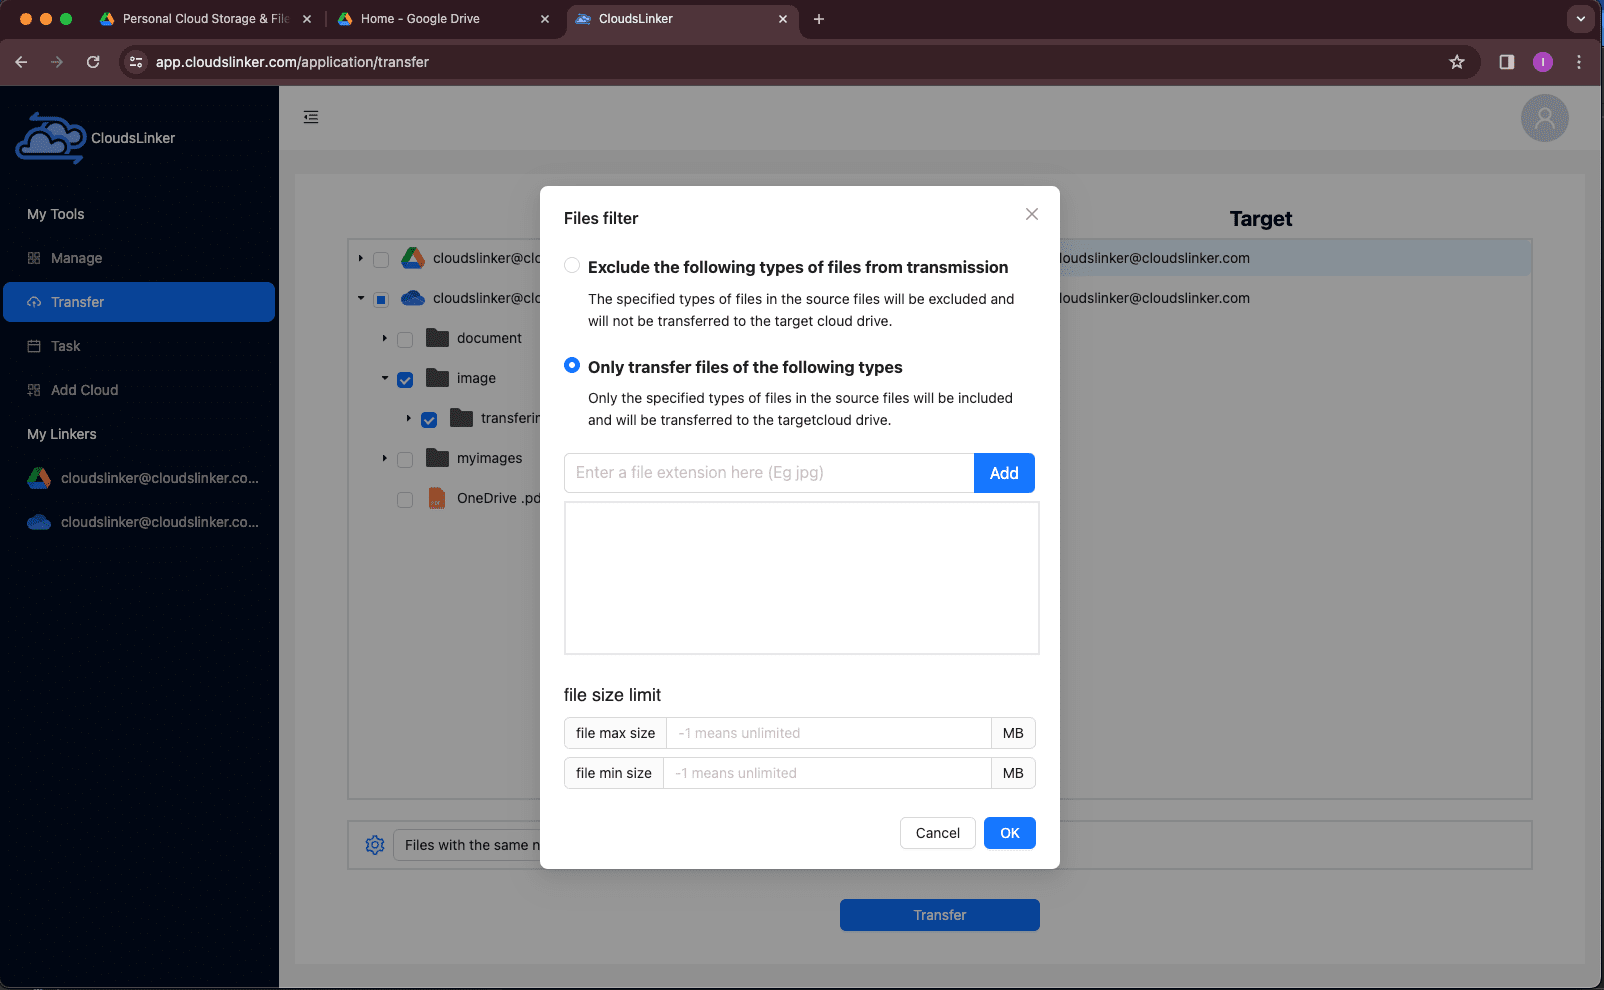
Want more control? CloudsLinker allows filters—like date ranges, file types, or excluding temporary folders—so you’re not migrating unnecessary junk.
Step 4: Monitor Progress and Manage Tasks
Once you start the transfer, you can track everything from the Task List. Pause, resume, or retry individual items as needed. Failures—whether due to access restrictions or format issues—are flagged clearly so nothing slips through unnoticed.
Step 5: Get the Transfer Report
When the job’s done, you’ll get a full report outlining what succeeded, what was skipped, and why. Your iCloud Drive content will now be safely stored in your iDrive e2 bucket, neatly organized and ready for further use.
This is the most hands-off way to handle cloud-to-cloud migration. Whether you're migrating personal archives or team documents, CloudsLinker helps you avoid slow downloads, browser crashes, or local storage headaches.
Need to Migrate from More than Just iCloud?
CloudsLinker also supports dozens of other platforms—including Google Drive, Dropbox, OneDrive, and WebDAV. It’s built for cloud professionals, casual users, and teams that need reliable, large-scale sync across providers.
Which iCloud to iDrive e2 Transfer Method Suits You Best?
Each migration method we’ve discussed serves a different type of user. Whether you’re just moving a handful of files or dealing with large directories and automation, here’s a side-by-side comparison to help you make the best choice based on your technical comfort level, available bandwidth, and project size.
| Method | Ease of Use | Transfer Speed | Best For | Uses Local Bandwidth | Skill Level |
|---|---|---|---|---|---|
| Manual Upload via iDrive e2 Web Console | ★★★★★ | ★★★☆☆ | One-time transfers, small batches | Yes | Beginner |
| Cyberduck / Mountain Duck | ★★★★☆ | ★★★★☆ | Users who prefer drag-and-drop but want full access to buckets | Yes | Intermediate |
| Rclone (Command Line) | ★★☆☆☆ | ★★★★★ | Advanced users, automation, scheduled syncs | Yes / No (depends on source backend) | Advanced |
| CloudsLinker (Cloud-to-Cloud) | ★★★★★ | ★★★★★ | Remote migrations, no downloads, large datasets | No | Beginner |
For casual users or those only transferring a few folders, using the iDrive e2 web console or a tool like Cyberduck will get the job done with minimal setup. If you’re working with thousands of files or need automation, Rclone offers unparalleled control and flexibility. But if you want to keep things simple and avoid local downloads entirely, CloudsLinker is by far the easiest and most bandwidth-efficient route.
Frequently Asked Questions
Access Key ID, Secret Access Key, and the correct
endpoint. You can find endpoint details for your region on iDrive’s endpoint documentation.
Step-by-Step Guide: Move Files from iCloud Drive to IDrive E2
Need to migrate your data from iCloud Drive to IDrive E2 but not sure where to start? This hands-on tutorial walks you through the entire process—from linking your Apple iCloud account to configuring your IDrive E2 bucket using CloudsLinker. Whether you're backing up personal media or archiving work files, this guide will help you avoid common snags and get your data moved quickly, securely, and without using local bandwidth.
Conclusion
Migrating from iCloud Drive to iDrive e2 is more straightforward than most people assume. For light users, manual downloads and uploads are simple and reliable. Tech-savvy users may appreciate the precision and control of tools like Rclone. And for anyone who values automation and speed, web-based platforms like Cloudslinker do the heavy lifting—without tying up your internet bandwidth. However you prefer to migrate, your files will find a secure and scalable new home on iDrive e2.
Online Storage Services Supported by CloudsLinker
Transfer data between over 48 cloud services with CloudsLinker

OneDrive

Google Drive

Google Photos

Shared Drive

OneDrive for Business

Dropbox

Box

Mega

pCloud

Yandex

ProtonDrive

AWS

GCS

iDrive

Storj

DigitalOcean

Wasabi

1fichier

PikPak

TeleBox

OpenDrive

Backblaze B2

Fastmail file

SharePoint

Nextcloud

ownCloud

Premiumize me

HiDrive

Put.io

Sugar Sync

Jottacloud

Seafile

Ftp

SFtp

NAS

WebDav

4shared

Icedrive

Cloudflare R2

Scaleway

Doi

iCloud Drive

iCloud Photos

FileLU

Zoho WorkDrive

Telia Cloud / Sky

Drime

Filen
Didn' t find your cloud service? Be free to contact: [email protected]
Further Reading
Effortless FTP connect to google drive: Transfer Files in 3 Easy Ways
Learn More >
Google Photos to OneDrive: 3 Innovative Transfer Strategies
Learn More >
Google Photos to Proton Drive: 3 Effective Transfer Techniques
Learn More >