Effortless Migration from MEGA to Cloudflare R2
Discover how to transfer your files from MEGA to Cloudflare R2. This guide provides a practical walkthrough for upgrading to scalable and cost-efficient object storage.
Introduction
As cloud storage demands continue to grow, many users are reassessing the tools they rely on. MEGA, well-known for its generous free plan and end-to-end encryption, has been a go-to choice for personal and small business storage. However, when scaling up, performance, pricing, and bandwidth limitations often push users to explore alternatives. Cloudflare R2 emerges as a strong option, offering low-cost, developer-friendly storage with no egress fees. This guide explains how to move your files from MEGA to Cloudflare R2 and why it might be the right move for you.
Quick Navigation
Understanding MEGA
MEGA is widely recognized for offering end-to-end encrypted storage and one of the most generous free tiers in the industry (20 GB with opportunities to expand through referrals and bonuses).
While it has a reputation for security and privacy, MEGA enforces transfer quotas and can become expensive at scale. Businesses or developers who need predictable pricing and larger data throughput often seek alternatives like Cloudflare R2.
Key Features of MEGA
- End-to-End Encryption: All files are encrypted client-side, giving users strong privacy protection.
- Cross-Platform Access: Available on desktop, mobile, and browser, MEGA syncs data across devices.
- Collaboration Tools: Supports shared folders, secure links, and real-time chat integration.
- Generous Free Tier: Starts with 20 GB of free storage, though bandwidth is capped.
Why People Choose MEGA
For privacy-focused users, MEGA offers peace of mind with encryption and ease of access across platforms. It remains attractive for small-scale storage, but heavy usage exposes its limits.
- Strong Security: Encryption ensures even MEGA itself cannot access your files.
- Free Storage: A good entry-level option for casual users.
- Ease of Sharing: Quickly create secure links to share files or folders.
What Cloudflare R2 Brings to the Table
Cloudflare R2 is built as an S3-compatible object storage solution, designed to eliminate egress fees and reduce long-term storage costs.
It integrates seamlessly with Cloudflare’s global edge network, which ensures faster delivery and lower latency for content-heavy projects, while offering flexible storage classes for cost optimization.
Highlights of Cloudflare R2
- Zero Egress Fees: Data downloads don’t incur additional charges, unlike most providers.
- S3 API Compatibility: Easily integrates into existing workflows and developer tools.
- Flexible Storage Tiers: Choose between standard storage or cheaper infrequent access classes.
- Secure by Design: Offers encryption, access control policies, and bucket-level management.
- Global Distribution: Backed by Cloudflare’s worldwide network for efficient delivery.
Why Switch to Cloudflare R2?
- Lower Costs: Especially beneficial for projects with high data transfer needs.
- Scalable Infrastructure: Handles everything from personal archives to enterprise-level workloads.
- Developer-Friendly: Works with existing tools and automates workflows with ease.
Why Move from MEGA to Cloudflare R2?
Migrating your data from MEGA to Cloudflare R2 allows you to bypass bandwidth limits, lower long-term costs, and gain more control over file management.
- No Bandwidth Quotas: Unlike MEGA, which restricts transfer capacity, Cloudflare R2 has no egress fees or strict transfer caps.
- Predictable Pricing: R2 charges based on storage and operations, making costs easier to anticipate than MEGA’s bandwidth-based restrictions.
- Improved Data Control: With S3 APIs and bucket-level access controls, R2 gives you far more granular management than MEGA.
- Enterprise-Level Scaling: Ideal for growing businesses, R2 scales effortlessly with your data needs.
Migrating to Cloudflare R2 from MEGA is a forward-looking choice for users who value flexibility, scalability, and transparent costs. It’s more than a migration—it’s a strategic upgrade.
Preparing Your MEGA Files for Migration
Before you move your files, some groundwork will ensure a smoother process:
- Check Your MEGA Account: Log in and verify that your data is accessible and your plan covers your current storage size.
- Set Up Cloudflare R2: Create your Cloudflare account, generate API keys, and configure a bucket for incoming files.
- Organize Your Files: Sort your folders in MEGA to streamline migration and reduce clutter.
With MEGA organized and Cloudflare R2 ready, the migration can proceed with fewer hiccups, ensuring all files are placed correctly in the new storage environment.
Comprehensive Tutorial: Moving Files from MEGA to Cloudflare R2
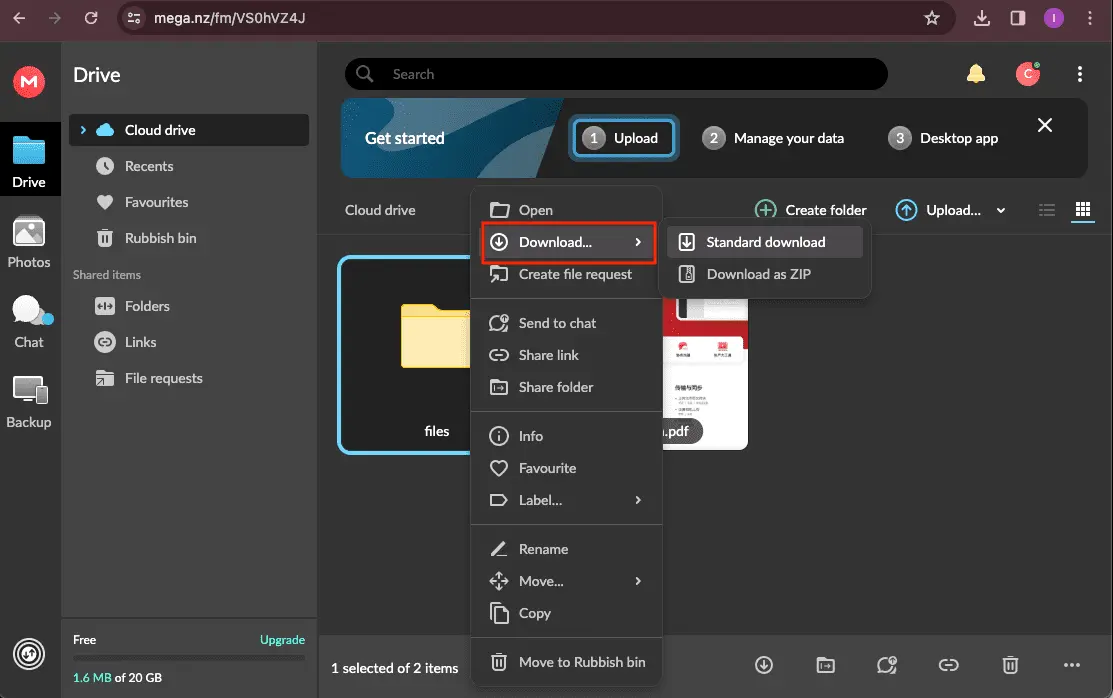
Step 1: Download Files from MEGA
Log in to your MEGA account at https://mega.io and open your cloud drive. Select the files or folders you want to move, then click **Download**. MEGA allows downloads either as individual files or compressed ZIP archives, depending on your selection.
Step 2: Log Into Cloudflare R2
Go to the Cloudflare dashboard and open the R2 storage section. Sign in with your account credentials. For better protection, enable two-factor authentication if it isn’t already active.
Step 3: Upload Files to Cloudflare R2
Inside your R2 bucket, click the **Upload** button and select the files you downloaded from MEGA. Cloudflare R2 supports bulk uploading, making the process faster for large sets of files.
This manual method is straightforward and works best for small to medium data sets. For larger migrations or recurring sync, using a cloud-to-cloud tool like CloudsLinker is recommended.

Optimizing Cloud Data Storage with Cloudflare R2 via CloudsLinker
Introducing CloudsLinker:
CloudsLinker is a versatile solution for cloud-to-cloud data migration, supporting transfers between MEGA, Cloudflare R2, and more than 30 other services. With its efficient transfer engine, CloudsLinker eliminates the need to download data locally, ensuring secure and bandwidth-friendly migrations. It’s built to handle large-scale transfers with strong encryption, intuitive scheduling, and reliable performance.
Step 1: Sign into CloudsLinker
Head over to https://app.cloudslinker.com/ and log into your account. If you don’t have one yet, create a free account to start managing your cloud transfers.
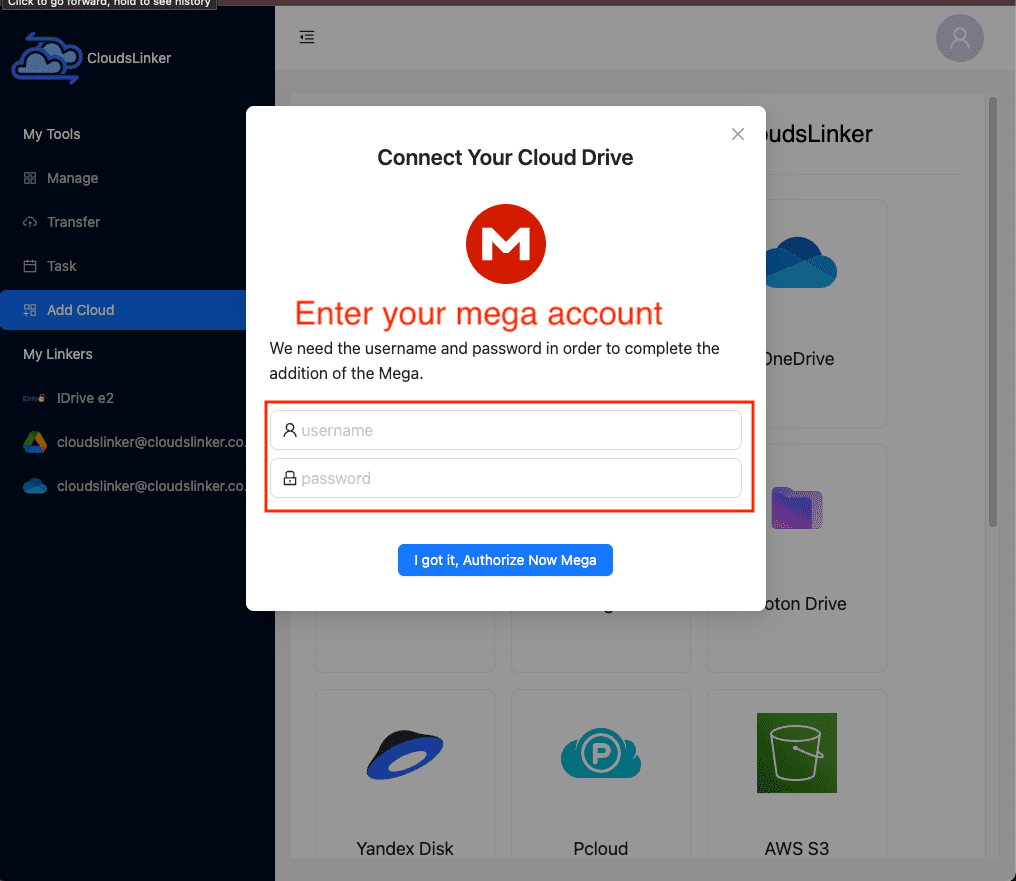
Step 2: Add MEGA as a Source
From the CloudsLinker dashboard, select **Add Cloud** and choose MEGA. Enter your MEGA account email and password to authorize access. Once connected, your MEGA files will be ready for selection.
Step 3: Configure Cloudflare R2 in CloudsLinker
Next, add Cloudflare R2 as your target storage. Log into your Cloudflare account and copy your Account ID. Navigate to 'Manage R2 API Tokens' to generate a new token with the required bucket permissions.
Step 4: Create and Save API Credentials
During the token setup, note down the Access Key ID, Secret Access Key, and endpoint URL. These credentials will be required by CloudsLinker to establish a secure link to your R2 bucket.

Step 5: Link Cloudflare R2 to CloudsLinker
Enter the Access Key ID, Secret Key, and endpoint into CloudsLinker. Once verified, Cloudflare R2 will appear as a connected destination for your transfers.

Step 6: Set Up the MEGA to R2 Transfer
Go to the 'Transfer' tab, select MEGA as the source and Cloudflare R2 as the destination. Define your transfer preferences, such as whether to copy or move files, apply filters, or schedule transfers.

Step 7: Start the Migration
Click **Transfer** to launch the migration. CloudsLinker will directly move the files from MEGA to Cloudflare R2, without consuming your local bandwidth.
Step 8: Confirm in Cloudflare R2
Once the migration completes, log into your Cloudflare R2 dashboard and verify that your files are present and accessible. Check that folder structures and permissions are intact.
Optimizing Cloudflare R2's Potential After File Transfer
Organize and Manage Data
After your migration, set up structured directories in R2 for easier access and retrieval:
- Create logical folder structures: Organize files by project, client, or type to streamline collaboration.
- Use advanced sharing options: Take advantage of Cloudflare R2’s bucket policies and access controls to securely share files.
- Enable versioning: Turn on object versioning to preserve historical changes and restore files if needed.
Reinforce Data Security
Ensure that your newly migrated files remain safe with Cloudflare’s security settings:
- Activate two-factor authentication: Protect your Cloudflare account from unauthorized access.
- Rotate access keys periodically: Regularly update API tokens and keys to minimize exposure risk.
- Audit sharing permissions: Review who has access to files and buckets, and tighten permissions when possible.
Boost Productivity with R2
Maximize the benefits of R2 by integrating it into your workflows:
- Use R2 with development tools: Leverage S3-compatible APIs to connect R2 to CI/CD pipelines or automation scripts.
- Combine with Cloudflare services: Integrate R2 with Workers or Pages for building scalable web applications.
- Monitor usage and costs: Use Cloudflare analytics to track storage and access trends to keep budgets under control.
Frequently Asked Questions: Migrating from MEGA to Cloudflare R2
Is transferring from MEGA to Cloudflare R2 secure with CloudsLinker?
How is Cloudflare R2 better than MEGA for large data sets?
Can I automate the MEGA to R2 migration?
What if my transfer fails midway?
Does this process cost extra?
Step-by-Step Guide: Migrating from MEGA to Cloudflare R2
Planning to move your files from MEGA to Cloudflare R2? Our detailed video tutorial walks you through the entire process. From connecting your MEGA account to setting up Cloudflare R2, this guide shows every step in a clear and practical way. Whether you’re just starting out or already familiar with cloud tools, the tutorial helps you complete your migration with confidence and without unnecessary complexity.
Conclusion
Migrating from MEGA to Cloudflare R2 not only resolves common pain points like limited transfer quotas and rising costs, but also provides a more flexible and scalable solution for long-term storage. With tools like CloudsLinker, the process is streamlined, secure, and designed for both individuals and enterprises looking to optimize their cloud setup.
Online Storage Services Supported by CloudsLinker
Transfer data between over 48 cloud services with CloudsLinker

OneDrive

Google Drive

Google Photos

Shared Drive

OneDrive for Business

Dropbox

Box

Mega

pCloud

Yandex

ProtonDrive

AWS

GCS

iDrive

Storj

DigitalOcean

Wasabi

1fichier

PikPak

TeleBox

OpenDrive

Backblaze B2

Fastmail file

SharePoint

Nextcloud

ownCloud

Premiumize me

HiDrive

Put.io

Sugar Sync

Jottacloud

Seafile

Ftp

SFtp

NAS

WebDav

4shared

Icedrive

Cloudflare R2

Scaleway

Doi

iCloud Drive

iCloud Photos

FileLU

Zoho WorkDrive

Telia Cloud / Sky

Drime

Filen
Didn' t find your cloud service? Be free to contact: [email protected]
Further Reading
Effortless FTP connect to google drive: Transfer Files in 3 Easy Ways
Learn More >
Google Photos to OneDrive: 3 Innovative Transfer Strategies
Learn More >
Google Photos to Proton Drive: 3 Effective Transfer Techniques
Learn More >