Moving Files from OneDrive to Drime: Practical Paths That Make Sense
Shifting files from OneDrive into Drime doesn’t have to involve repeated downloads or babysitting slow uploads. The right method depends largely on how much data you’re moving and how actively you want to manage the process. From simple, browser-based exports to fully automated cloud-to-cloud transfers, there are several reliable ways to get the job done without unnecessary friction.
Introduction
As more users rethink where their work files live, Drime has become an attractive option for those who want collaboration features without giving up control over their data. Moving content out of OneDrive and into Drime is rarely a one-click decision. Factors like file volume, folder structure, and whether the data is actively shared all influence which approach works best. Some users are simply relocating personal documents or inactive folders, while others are reorganizing ongoing projects or team libraries built up over years. Instead of assuming there’s a single ‘best’ method, it’s more useful to look at how different transfer options behave in real scenarios. In the sections ahead, we’ll outline several dependable ways to transfer files from OneDrive to Drime — from straightforward manual exports to background cloud-based workflows that minimize local involvement. Each method offers a different balance between speed, oversight, and long-term convenience, allowing you to choose based on how you actually work.
OneDrive is Microsoft’s primary cloud storage service and is tightly woven into the Microsoft 365 ecosystem. It’s commonly used for personal backups, business documents, and team collaboration through SharePoint-backed folders. Many users rely on it daily without realizing how deeply it integrates with Windows, Office apps, and enterprise identity systems.
- Native Windows integration: Built directly into Windows and File Explorer.
- Office-first workflows: Seamless use with Word, Excel, and PowerPoint.
- Flexible sharing: Supports external sharing and permission controls.
- Automatic background sync: Keeps selected folders updated across devices.
- Business-grade infrastructure: Often used in corporate and education environments.
Drime approaches cloud storage from a different angle. Instead of anchoring itself to a productivity suite, it focuses on secure file storage combined with modern collaboration features. Built in Europe, Drime appeals to users who care about data protection, controlled sharing, and keeping work spaces separate from large vendor ecosystems.
- End-to-end encryption: Files remain protected throughout their lifecycle.
- Privacy-first architecture: Designed with GDPR and data sovereignty in mind.
- Team collaboration tools: Comments, shared spaces, and file previews.
- Cross-platform availability: Accessible via web, desktop, and mobile apps.
- Independent ecosystem: Not tied to Office or Google-based workflows.
Although both platforms provide cloud-based file storage, they are built around different priorities. OneDrive is optimized for Microsoft-centric workflows, while Drime emphasizes privacy, encrypted storage, and independent collaboration. These differences often shape not only why users migrate, but how they choose to do it.
| Aspect | OneDrive | Drime |
|---|---|---|
| Core Strength | Microsoft 365 integration | Secure, privacy-oriented collaboration |
| Encryption Model | Server-side encryption | End-to-end encrypted storage |
| Ecosystem Dependency | Closely tied to Microsoft services | Independent workspace |
| Automation Options | Strong API and enterprise tooling | Selective sync and external automation |
| Typical Use Case | Office-centric teams and enterprises | Privacy-conscious teams and individuals |
For users looking to step away from tightly coupled productivity ecosystems, moving from OneDrive to Drime is often less about storage limits and more about control and data ownership.
Before initiating any transfer, take time to review what’s currently stored in your OneDrive. Old backups, duplicated folders, and legacy shared content often accumulate unnoticed. Cleaning these up in advance can significantly reduce transfer time and complexity.
On the Drime side, make sure your workspace structure is ready. Create test folders, upload a few files, and verify sharing permissions. This helps ensure that folder hierarchy and access controls behave as expected once larger volumes are moved.
Choosing a transfer approach early also matters. Some users manually download and upload smaller folders, while others prefer automated, browser-based solutions such as CloudsLinker, which enables direct cloud-to-cloud transfers without routing data through a local machine. A short trial run with a limited dataset can reveal potential bottlenecks before the full migration begins.
Method 1: Download from OneDrive and Upload to Drime Manually
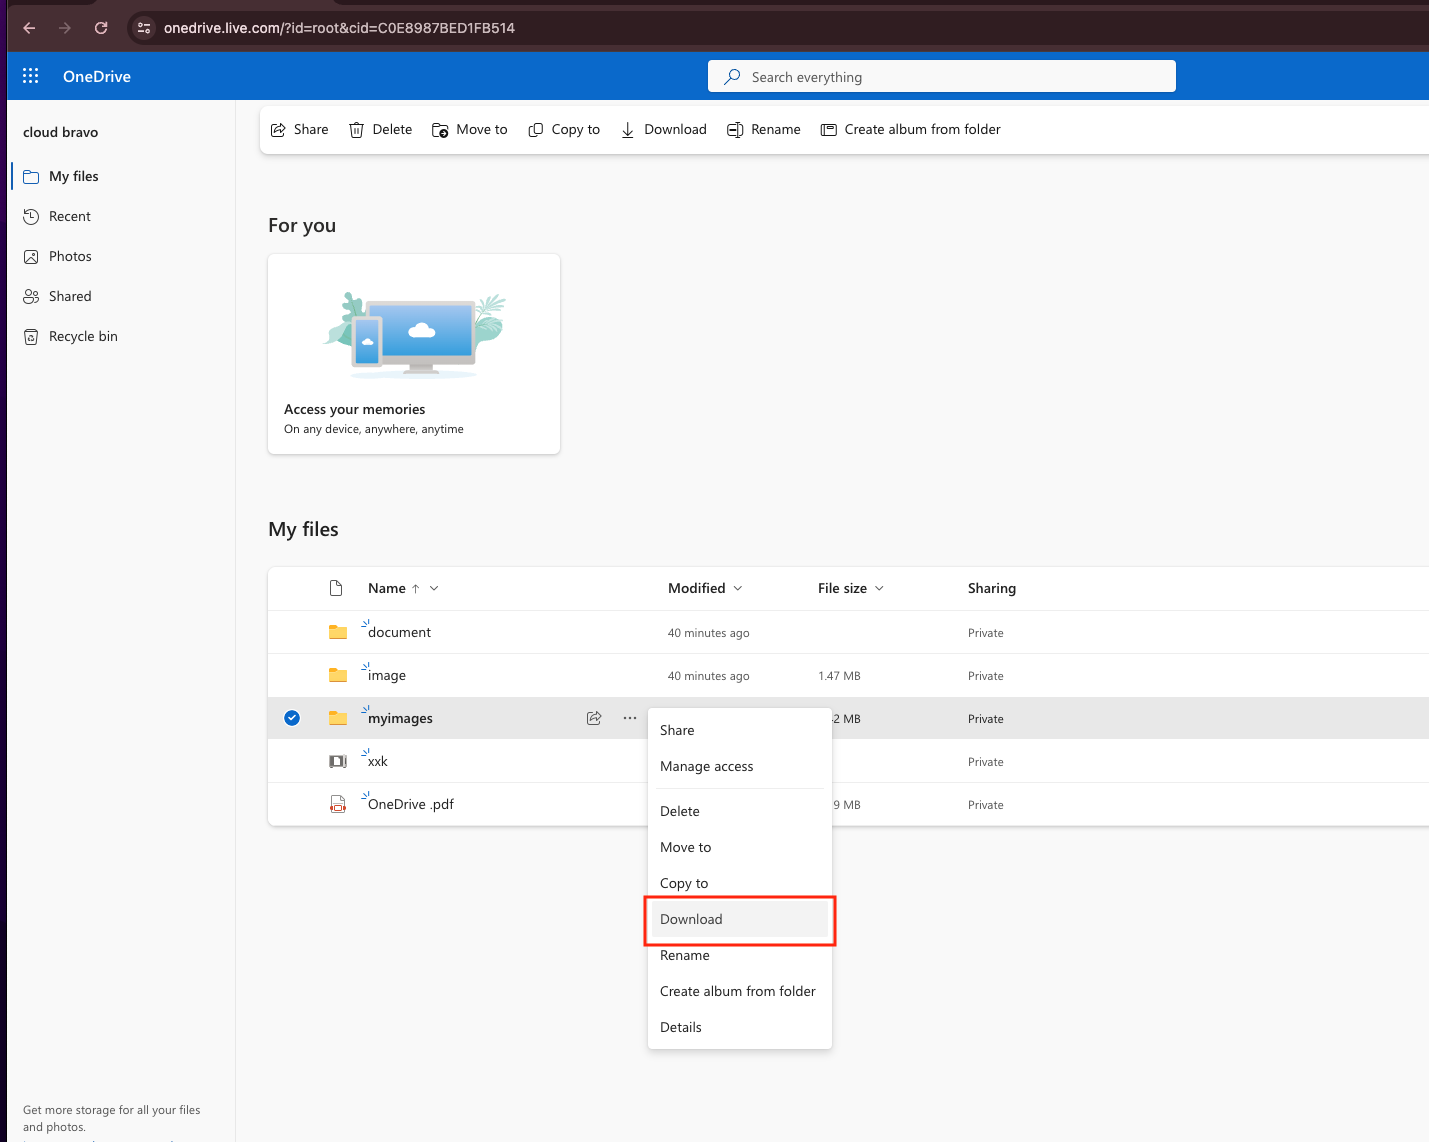
Step 1: Export Files from OneDrive Using a Browser
Begin by opening the
OneDrive web interface
and signing in to the account that holds the files you plan to move. Browse through your folders and
select
the items you want to transfer. If you need to select multiple files or directories, use
Ctrl on Windows or Command on macOS while clicking.
Once your selection is ready, right-click and choose Download. OneDrive will bundle folders into a ZIP archive before sending them to your computer. After the download finishes, extract the archive locally so the original folder structure remains intact for the next step.
Step 2: Upload the Files to Your Drime Workspace
After preparing the files locally, sign in to the Drime web dashboard. Navigate to the folder where you want the imported data to live, or create a dedicated directory to keep transferred files separate from existing content.
Uploading can be done by dragging the extracted folders directly into the browser window, or by using Drime’s upload controls to select files manually. The entire process runs through your browser, which makes it easy to follow but also means upload speed depends on your local connection.
This approach works well for small collections of files, one-time moves, or users who want to oversee each step personally. However, when dealing with large OneDrive libraries or frequent transfers, repeated downloads and uploads can become time-consuming. In those cases, automated or cloud-based transfer methods are usually better suited for handling larger volumes more efficiently.

Method 2: Automated OneDrive to Drime Transfer with CloudsLinker
Overview: Move Files from OneDrive to Drime Without Local Downloads
CloudsLinker is designed for direct cloud-to-cloud transfers, meaning files are moved between services without passing through your computer. Transfers run on remote servers, so tasks can continue in the background even if you close your browser or disconnect your device. This approach is especially useful for large OneDrive libraries or time-sensitive migrations into Drime.
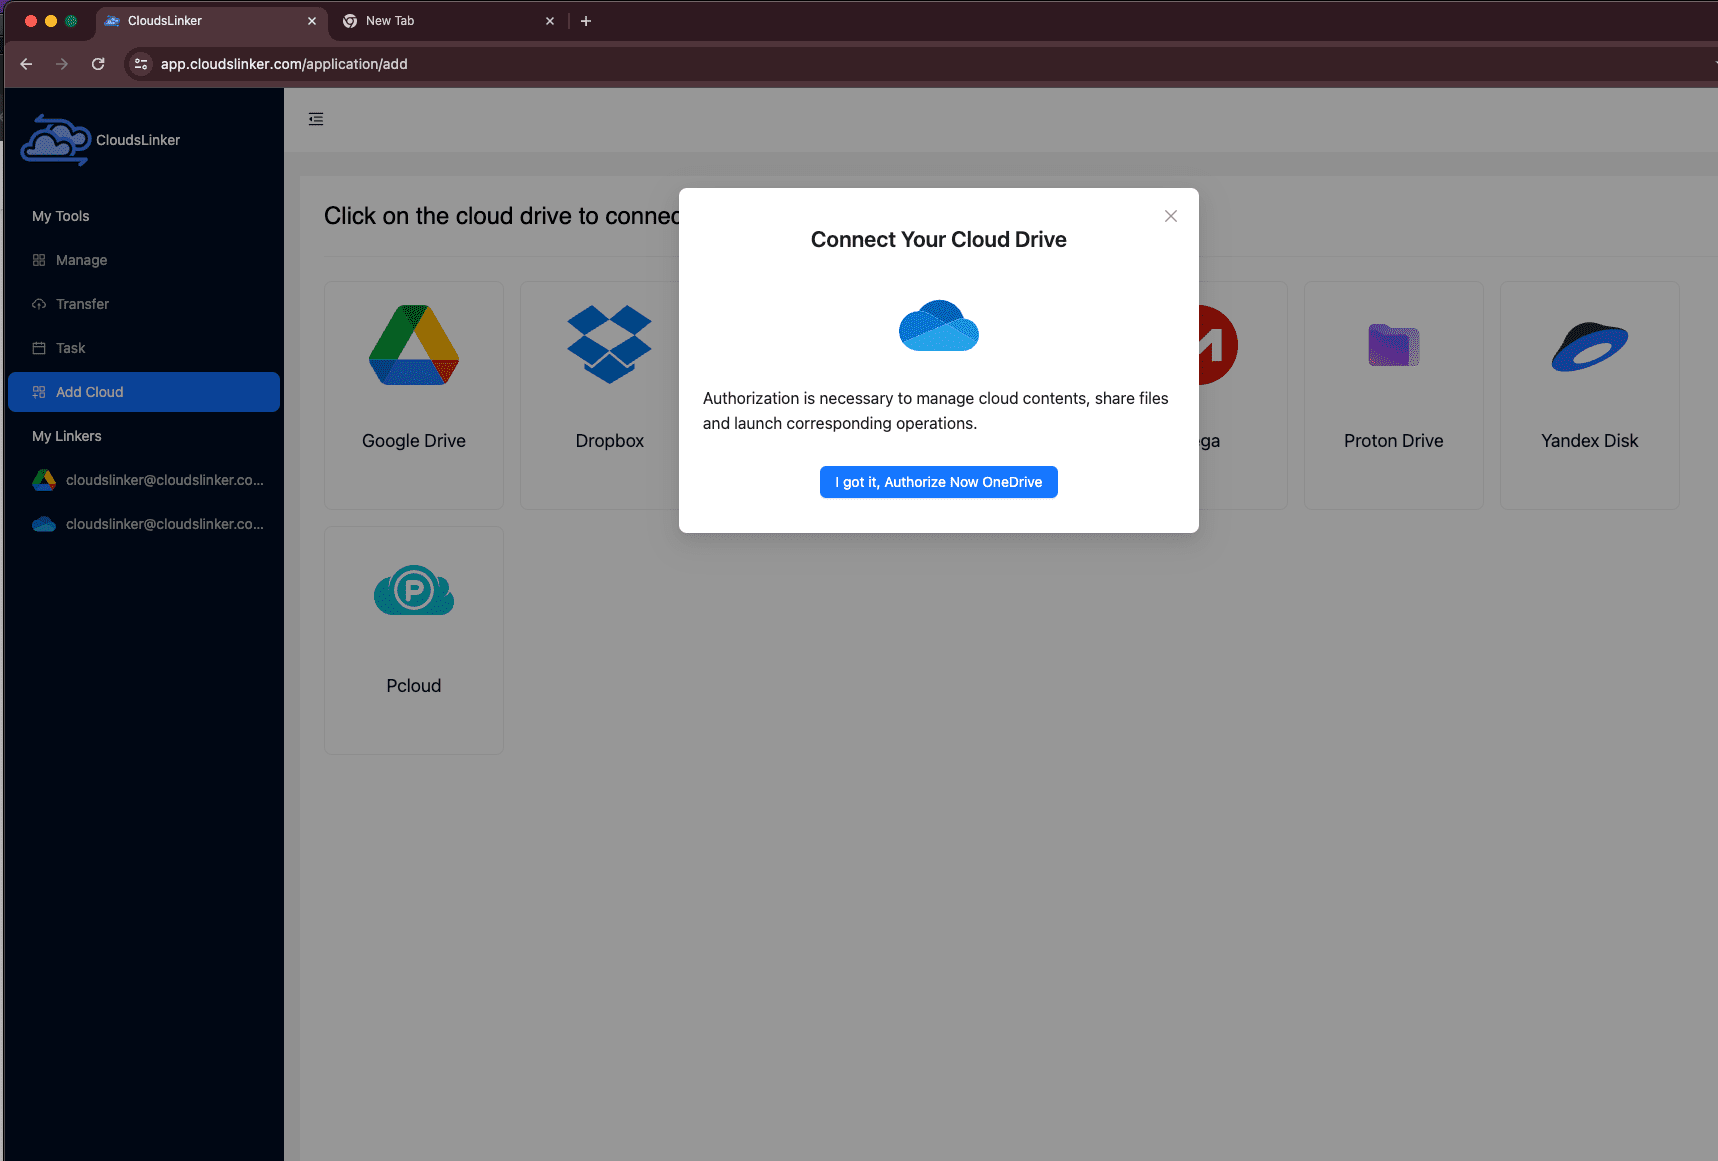
Step 1: Sign In and Add OneDrive as the Source
Start by visiting app.cloudslinker.com and logging into your account. If you’re new to the platform, registration takes only a short moment. From the main dashboard, click Add Cloud and select OneDrive from the list of supported services.
CloudsLinker will open Microsoft’s official authorization page in a new window. After you approve access, the system checks whether your Microsoft account contains multiple OneDrive-backed cloud spaces. If so, you’ll be prompted to choose which one to add. Once confirmed, the selected OneDrive appears in your cloud list and is ready to be used as a transfer source.
Step 2: Connect Drime as the Destination
To add Drime, you’ll need an authorization token generated from your Drime account. Log in to the Drime web interface, open Settings, and navigate to the Developer section. From there, create a new access token with the appropriate permissions.
Copy the token and return to CloudsLinker. Click Add Cloud, choose Drime, and paste the token into the authorization field. This token-based connection allows secure access without exposing your Drime login credentials.

Step 3: Set Up the Transfer Task
Open the Transfer section and select your connected OneDrive as the source. Browse through the directory tree and choose the files or folders you want to migrate. For the destination, select Drime and define the target folder where the data should be placed.

Optional filters let you fine-tune what gets transferred. You can exclude certain file types, limit transfers by modification date, or focus only on specific directories. This is particularly useful when you want to move active projects without copying archived or redundant data.
Step 4: Run the Transfer and Monitor Progress
Once the task is configured, start the transfer and track its status from the Task List. Progress indicators show completed files, current speed, and estimated time remaining. Because the transfer runs entirely on remote servers, it continues even if you close your browser or shut down your computer.
After the task finishes, a summary report highlights completed items and flags any files that may need review. Your data will now be available in Drime, organized according to the folder structure you selected during setup.
For users who prefer a hands-off migration — without relying on local bandwidth or managing long browser uploads — CloudsLinker provides a practical and scalable way to move files from OneDrive to Drime.
Need to Move Data Between Other Cloud Services?
In addition to OneDrive and Drime, CloudsLinker supports a wide range of cloud platforms, including Dropbox, MEGA, WebDAV, and S3-compatible storage. All transfers run cloud-to-cloud, making it possible to automate migrations without tying up local resources.
Comparing 2 Practical Ways to Move Files from OneDrive to Drime
Moving files from OneDrive to Drime is less about chasing a “perfect” method and more about matching the approach to how you actually work. Some users only need to relocate a small set of folders once, while others are migrating long-standing file libraries into a more privacy-focused environment. The two options below reflect the most common real-world scenarios.
| Approach | Setup Effort | Transfer Speed | Best Fit | Uses Local Bandwidth | Skill Level |
|---|---|---|---|---|---|
| Browser Download & Upload | ★★★★★ | ★★★☆☆ | Small moves, selective folders, one-time transfers | Yes | Beginner |
| CloudsLinker (Cloud-to-Cloud) | ★★★★★ | ★★★★★ | Large libraries, unattended jobs, repeat migrations | No | Beginner |
Manual browser uploads work well when the scope is limited and you want full visibility over each file. As soon as data volume increases — or when you don’t want transfers tied to your device or network — cloud-based solutions like CloudsLinker tend to be more predictable, especially for long-running jobs.
File transfers are usually straightforward, but a bit of preparation can help avoid failed uploads, incomplete folders, or unnecessary rework:
- Verify file availability: Make sure all OneDrive files are fully synced and not limited to online-only placeholders before exporting.
- Plan your folder layout: Deciding where files should live in Drime ahead of time helps prevent large-scale reorganization later.
- Prepare Drime access: If you plan to use cloud-to-cloud tools, generate and store your Drime access token securely before starting.
- Account for local limits: Browser uploads depend on connection stability and keeping your device online.
- Test with a small folder: A short trial run helps confirm filenames, structure, and permissions.
- Think about scale: Larger libraries benefit from resumable, unattended transfer methods.
Whether you’re migrating personal documents or years of accumulated project data, understanding how OneDrive exports files and how Drime processes uploads makes the transition far more predictable.
Frequently Asked Questions
Watch Our Step-by-Step Video Tutorial
Learn how to transfer files from OneDrive to Drime with our clear, visual walkthrough. This tutorial is perfect for anyone—whether you're new to cloud storage or just looking for the easiest method. We’ll guide you through every step, from accessing your files in OneDrive to migrating them to Drime using Cloudslinker for a direct cloud-to-cloud transfer. Get expert tips, avoid common mistakes, and simplify your cloud migration process. Watch now and move your files with confidence!
Conclusion
There’s no universal shortcut when moving files from OneDrive to Drime. Smaller, one-time transfers can often be completed manually with little setup. Desktop sync tools are a good fit if you want continuous access and hands-on control. Users who value automation may prefer scripted or command-line approaches, while larger migrations tend to benefit from browser-based, server-side transfers that continue running without tying up a local machine. Regardless of the path you choose, starting with a limited test transfer is a sensible way to catch issues early. A bit of planning before the full move can prevent interruptions later and help ensure a smoother transition into Drime’s workspace.
Online Storage Services Supported by CloudsLinker
Transfer data between over 48 cloud services with CloudsLinker

OneDrive

Google Drive

Google Photos

Shared Drive

OneDrive for Business

Dropbox

Box

Mega

pCloud

Yandex

ProtonDrive

AWS

GCS

iDrive

Storj

DigitalOcean

Wasabi

1fichier

PikPak

TeleBox

OpenDrive

Backblaze B2

Fastmail file

SharePoint

Nextcloud

ownCloud

Premiumize me

HiDrive

Put.io

Sugar Sync

Jottacloud

Seafile

Ftp

SFtp

NAS

WebDav

4shared

Icedrive

Cloudflare R2

Scaleway

Doi

iCloud Drive

iCloud Photos

FileLU

Zoho WorkDrive

Telia Cloud / Sky

Drime

Filen
Didn' t find your cloud service? Be free to contact: [email protected]
Further Reading
Effortless FTP connect to google drive: Transfer Files in 3 Easy Ways
Learn More >
Google Photos to OneDrive: 3 Innovative Transfer Strategies
Learn More >
Google Photos to Proton Drive: 3 Effective Transfer Techniques
Learn More >