How to Move Files from OneDrive to iCloud Drive: 4 Practical Methods (2025)
Thinking about leaving OneDrive for Apple’s iCloud Drive? This 2025 guide breaks down four different approaches—ranging from simple uploads to full cloud-to-cloud migration—so you can relocate your files smoothly without clogging your internet connection.
Introduction
More users are moving away from Microsoft’s OneDrive and leaning into Apple’s iCloud Drive, especially those who live inside the Apple ecosystem with iPhone, iPad, and Mac. The big question is: what’s the smartest way to get your files across? The answer depends on your situation—some prefer quick manual methods, while others need automation for thousands of files. Below we’ll walk through four strategies, including browser-based transfers, Apple’s own tools on iOS, the command-line utility Rclone(https://rclone.org/onedrive/), and cloud migration platforms like CloudsLinker(https://www.cloudslinker.com).
OneDrive is Microsoft’s cloud storage platform, tightly linked with Windows and Microsoft 365. Each account starts with 5 GB of free space, while paid subscriptions offer up to 6 TB of storage for families.
- Deep Office integration: Save and edit Word, Excel, and PowerPoint files directly in the cloud.
- Cross-platform support: Works on Windows, macOS, iOS, Android, and through any modern browser.
- Collaboration: Share files with colleagues and co-edit documents in real time.
- Backup features: Sync your Desktop, Documents, and Pictures folders on Windows automatically.
- Large file uploads: Supports uploads up to 250 GB per file.
iCloud Drive is Apple’s own file storage service, designed to keep your content synced across iPhone, iPad, Mac, and even Windows PCs. Every Apple ID includes 5 GB free storage, and you can expand this up to 12 TB with iCloud+.
- Seamless Apple integration: Desktop and Documents folders on Mac are instantly available on other Apple devices.
- File size support: Allows individual uploads up to 50 GB, suitable for media projects.
- Multi-device access: Use Finder (Mac), Files app (iOS/iPadOS), File Explorer (Windows), or the iCloud.com portal.
- Collaboration tools: Share folders and collaborate in real-time on Pages, Numbers, or Keynote files.
- Enhanced security: End-to-end encryption and Advanced Data Protection for sensitive content.
Many users begin their cloud journey with Microsoft OneDrive because it comes preloaded on Windows PCs and integrates neatly with Word, Excel, and other Office tools. However, if you’ve recently switched to Apple devices—or you want all your files to sync natively across iPhone, iPad, and Mac—migrating to iCloud Drive can remove extra steps and deliver a smoother daily experience.
- Built for Apple Devices: iCloud Drive is deeply woven into Finder on macOS, the Files app on iPhone/iPad, and syncs with native apps like Pages and Keynote.
- Mobile-First Convenience: Your files follow you automatically across iPhone, iPad, and Mac, without needing any add-ons or third-party sync tools.
- Stronger Privacy Controls: With end-to-end encryption and Apple’s Advanced Data Protection, your documents, photos, and backups stay locked down.
- Generous File Size Limits: Uploads of up to 50 GB per file are supported—useful for media projects, CAD files, or large archives.
- Easy Sharing & Collaboration: Share files and folders with fine-grained permissions and edit together in Apple’s productivity apps.
- Flexible Storage Options: Every Apple ID includes 5 GB free, and you can scale up to 12 TB with iCloud+, making it suitable for both casual users and professionals managing heavy workloads.
For anyone transitioning away from Microsoft’s cloud, iCloud Drive represents a natural landing spot. It trims down friction across Apple devices, keeps files organized, and ensures that your data works hand in hand with the rest of Apple’s ecosystem.
If you’re considering leaving OneDrive for iCloud Drive, it’s worth looking at how the two platforms differ. Both let you back up, sync, and share documents, but they shine in different areas—Microsoft’s strength lies in Office and Windows integration, while Apple prioritizes simplicity across its devices.
| Feature | OneDrive | iCloud Drive |
|---|---|---|
| Free Storage | 5 GB (expandable with Microsoft 365 plans) | 5 GB (expandable with iCloud+ plans) |
| Platform Integration | Best with Windows, Outlook, and Office apps | Native to iOS, iPadOS, and macOS |
| Collaboration | Co-authoring in Office Online | Real-time collaboration in Pages, Numbers, and Keynote |
| Third-Party Integration | Broad compatibility (Teams, Slack, Zoom, Adobe, etc.) | Limited outside Apple’s ecosystem |
| File Size Limit | Up to 250 GB per file | Up to 50 GB per file |
| Security | Encryption in transit & at rest, 2FA via Microsoft account | End-to-end encryption, plus Advanced Data Protection |
OneDrive is a natural fit for Windows users and those who work heavily in Office, while iCloud Drive feels effortless if you live inside the Apple ecosystem. If your daily workflow revolves around iPhone, iPad, and Mac, the move can make your setup feel more seamless and less fragmented.
Before moving your data, check your OneDrive storage usage. Compare it with the iCloud+ plan you plan to subscribe to. Since iCloud starts with only 5 GB free, most people will need an upgrade, especially if they’re moving large media folders or years of archives.
Make sure you’re signed in with your Apple ID and that iCloud Drive is already enabled on your devices. On iOS: Settings → [Your Name] → iCloud → iCloud Drive. On macOS: System Settings → Apple ID → iCloud. Ensuring these are active avoids hiccups during the transfer.
It’s also a good moment to tidy up: delete unnecessary files, rename or organize folders, and decide whether you’ll move everything manually, set up an automated sync with Rclone, or use a service like CloudsLinker to do the heavy lifting in the background. A bit of prep goes a long way to keeping your structure intact.
Method 1: Move Files Using Your Web Browser
Step 1: Save Files from OneDrive
Head over to the official
OneDrive website
and log in with your Microsoft account. Browse through the folders you want to transfer into iCloud.
To select more than one file at a time, hold Ctrl on Windows or Command on
macOS.
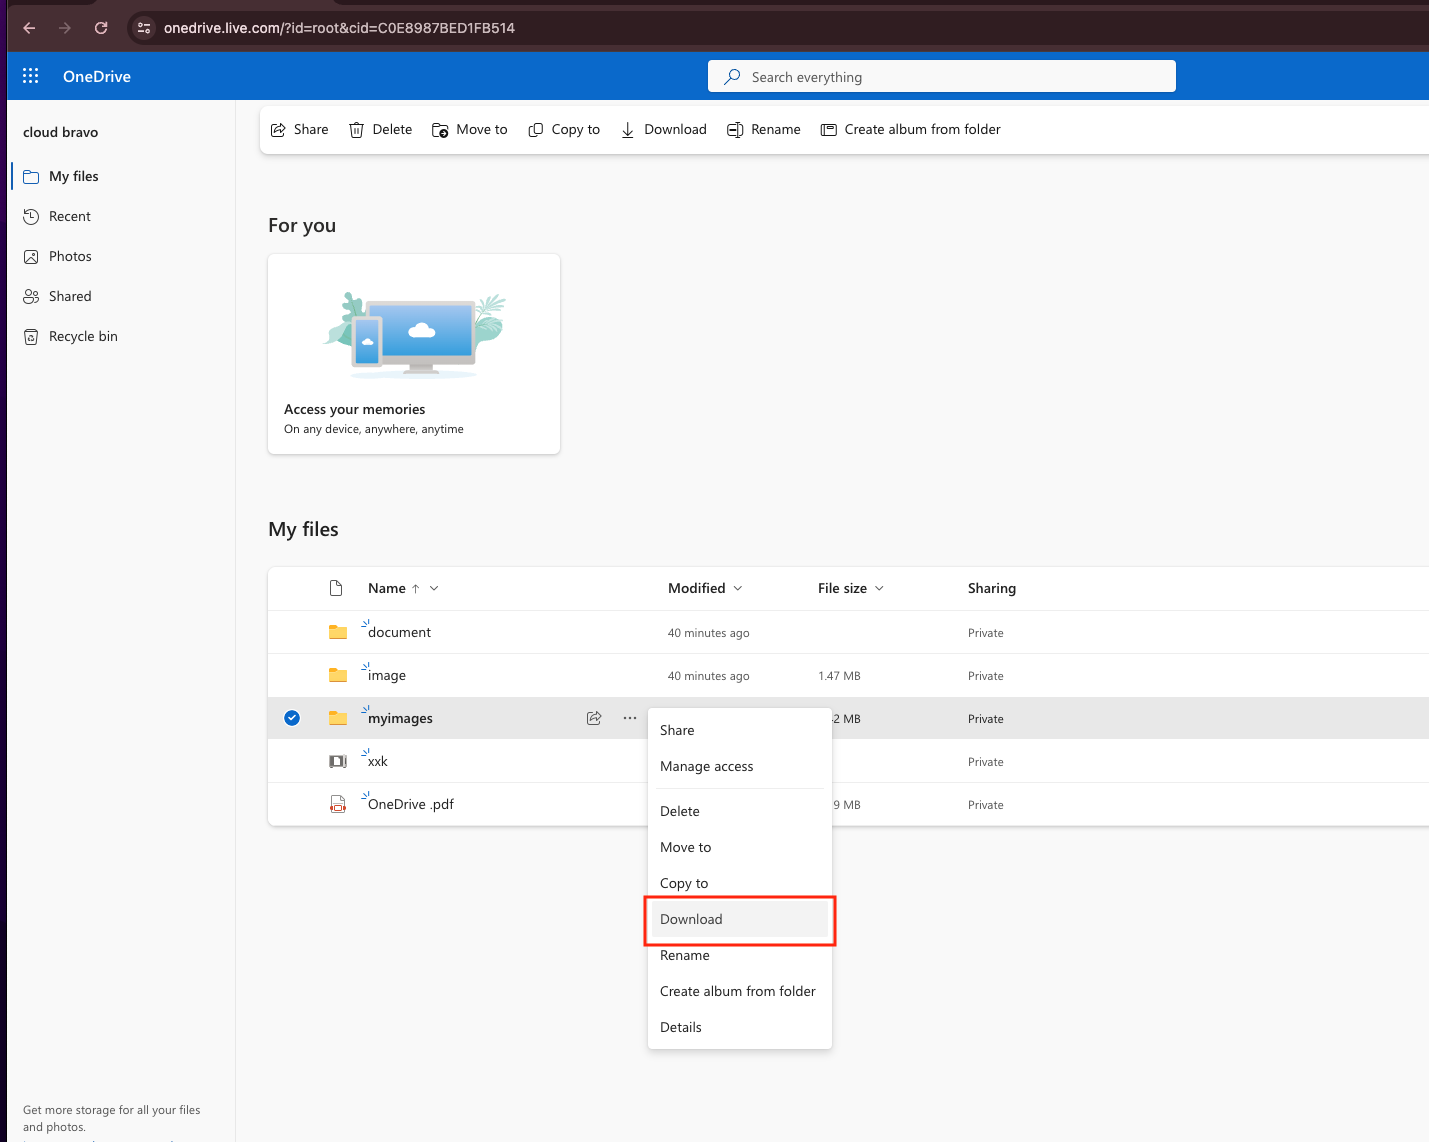
Once you’ve highlighted your items, click on Download from the top menu or right-click and choose the same option. OneDrive will automatically bundle multiple files or entire folders into a single ZIP file. When the download completes, unzip the package locally so the files are ready for upload.
Step 2: Upload Files to iCloud Drive
Next, visit iCloud.com and sign in with your Apple ID. If this is your first time, make sure iCloud Drive is switched on in your Apple ID settings. Inside the iCloud interface, click the Upload icon (the cloud with an arrow), or simply drag and drop the files straight into the browser window.
You can create new folders here or mirror the same folder structure you had on OneDrive. Keeping things organized at the start will make it easier to locate documents, photos, or projects across your Apple devices.
Using a browser is quick and doesn’t require extra apps—perfect for light transfers or when you just want to move a handful of files. For larger libraries or recurring syncs, though, a command-line tool like Rclone or a dedicated service such as CloudsLinker will save you time and minimize disruptions.
Method 2: Transfer with Your iPhone or iPad
Step 1: Access Files from the OneDrive App
On your iPhone or iPad, open the Microsoft OneDrive app and sign in with your Microsoft account. Browse through the files or folders you want to move. Tap the three-dot menu beside a file and choose “Share” or “Send a Copy”. This will allow you to either save a local version or forward it into Apple’s Files app.
Step 2: Move Items into iCloud Drive
Once the iOS share sheet appears, select “Save to Files”. From there, pick iCloud Drive as your destination. You can place the file directly in the main directory or choose a subfolder if you want to keep things tidy. After you confirm, the file is uploaded into iCloud Drive and will sync automatically across all Apple devices linked to your account.
This method works best for smaller tasks—like sending a handful of documents, PDFs, or photos while traveling. Because it relies on Apple’s built-in Files app, you don’t need to connect to a computer. That said, transferring large folders or entire libraries can be slow on mobile. For bigger migrations, consider using a desktop solution or a cloud-to-cloud tool such as CloudsLinker for efficiency and reliability.
Method 3: Use Rclone from the Command Line
Step 1: Install Rclone and Add Your Cloud Remotes
If you’re comfortable working in the terminal, Rclone is one of the most flexible ways to move files between services. It supports a long list of cloud providers, including Microsoft OneDrive and Apple iCloud Drive.
Download the latest version from the
official Rclone
site.
After installing, open a terminal (or Command Prompt on Windows) and run:
rclone config. This will launch the setup wizard.
- OneDrive Remote: Select
onedriveas the backend. You’ll be asked to log in with your Microsoft account in a browser. Once authenticated, Rclone creates a remote (for example,onedrive:) pointing to your files in OneDrive. - iCloud Remote: Pick
icloudwhen prompted. Rclone will walk you through generating an authentication token to access iCloud Drive directly. See the backend documentation for details. - Local macOS Option: On a Mac, you can also target the locally synced iCloud Drive
folder at
~/Library/Mobile Documents/com~apple~CloudDocsif iCloud is already active on your machine.
Step 2: Run Copy or Sync Commands
With both remotes configured, you can start transferring. Examples:
rclone copy onedrive:/WorkDocs icloud:/WorkBackup --progressrclone sync onedrive:/Photos icloud:/Photos --progress --exclude "*.tmp"
The first command copies everything from WorkDocs in OneDrive to a folder named
WorkBackup in iCloud Drive.
The second keeps your photo collections in sync, ignoring temporary files.
You can add --dry-run to preview changes without making them.
Rclone is a great choice for advanced users who want maximum control. You can throttle bandwidth, exclude file types, or schedule jobs with cron on Linux/macOS and Task Scheduler on Windows. The only tradeoff is that the initial configuration—especially with iCloud tokens—takes a bit of patience.
Method 4: Cloud-to-Cloud Migration with CloudsLinker
Overview: Move from OneDrive to iCloud Without Local Downloads
CloudsLinker allows you to transfer files directly between cloud services—no downloading to your computer, no re-uploads, and no need to free up local disk space. It already works with 40+ popular storage providers, including Microsoft OneDrive and Apple iCloud Drive. All transfers happen in the cloud, so your internet speed is never a bottleneck.
Step 1: Sign in to CloudsLinker
Go to app.cloudslinker.com and log in. If you don’t yet have an account, you can register for free. From your dashboard, click “Add Cloud”. Choose OneDrive from the list. You’ll be redirected to Microsoft’s OAuth page—similar to when you connect Google Drive or Dropbox—where you grant access securely.
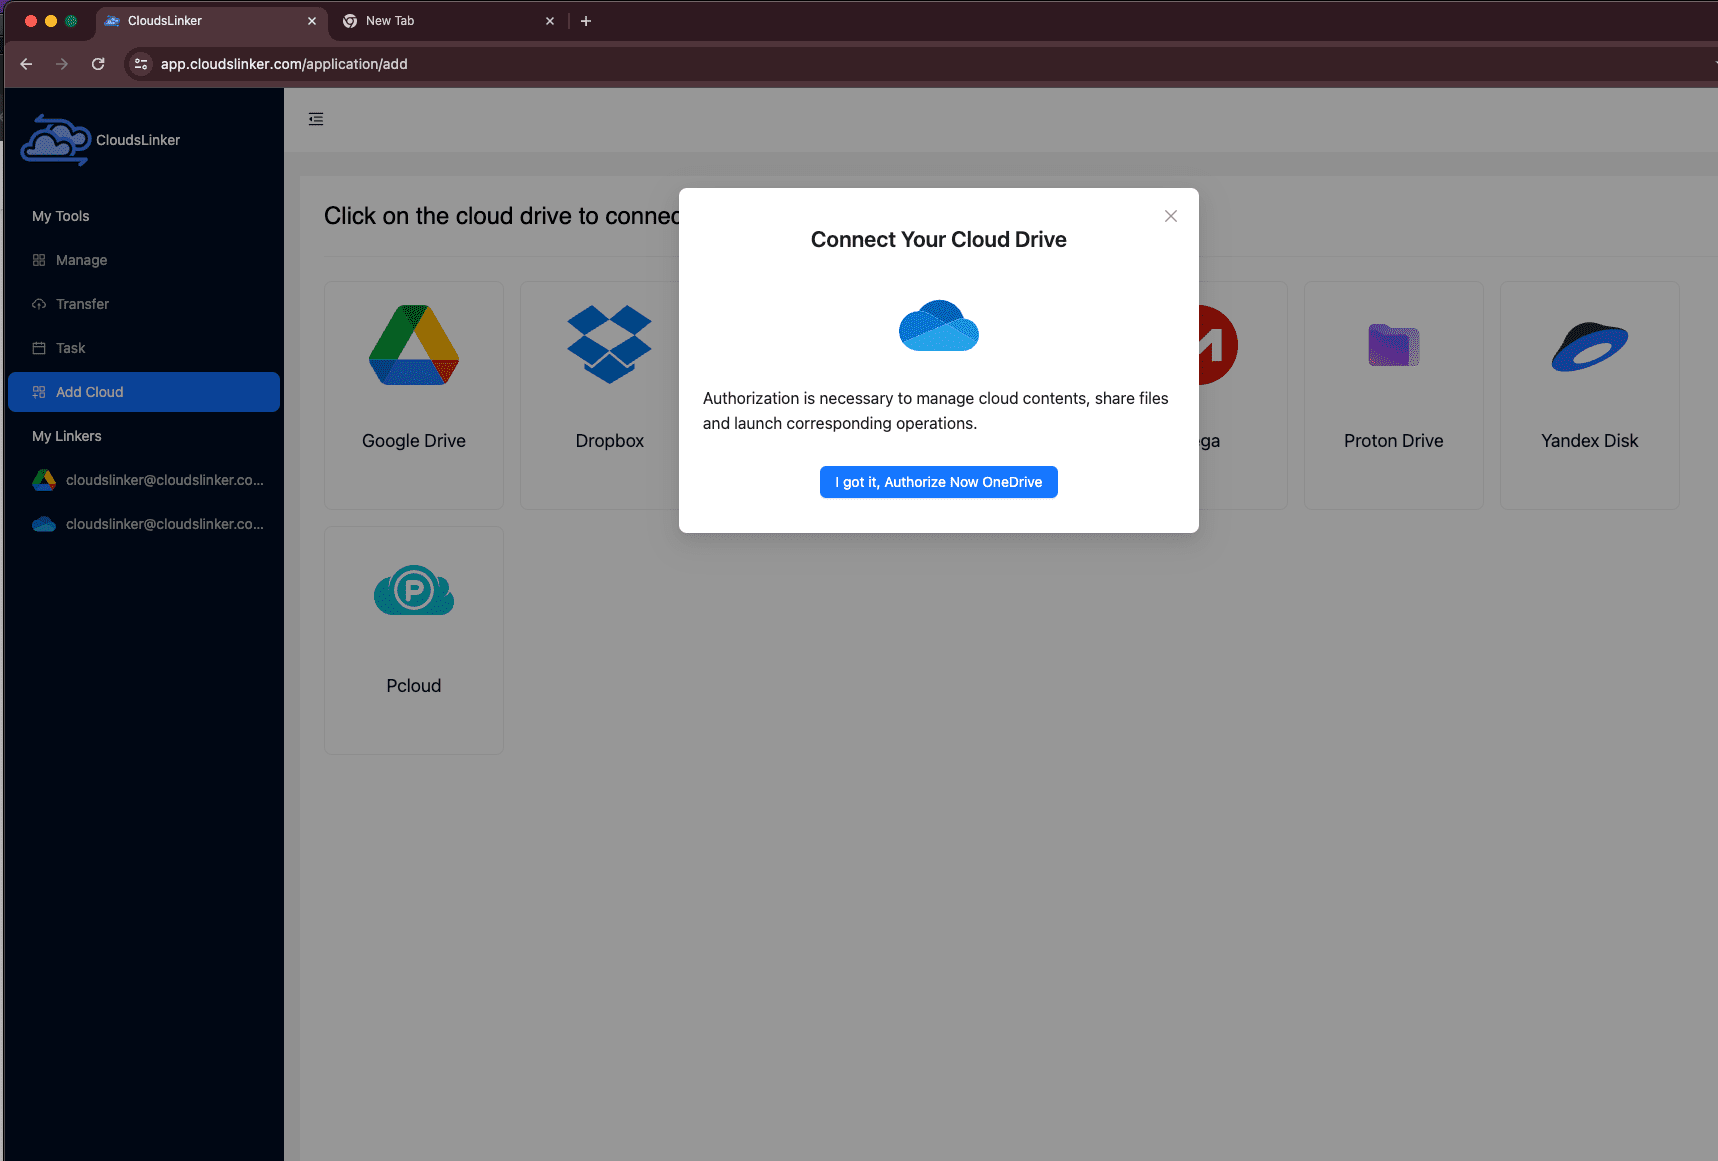
Once authorized, your OneDrive account will appear as a linked drive within CloudsLinker, ready for transfers.
Step 2: Connect iCloud Drive
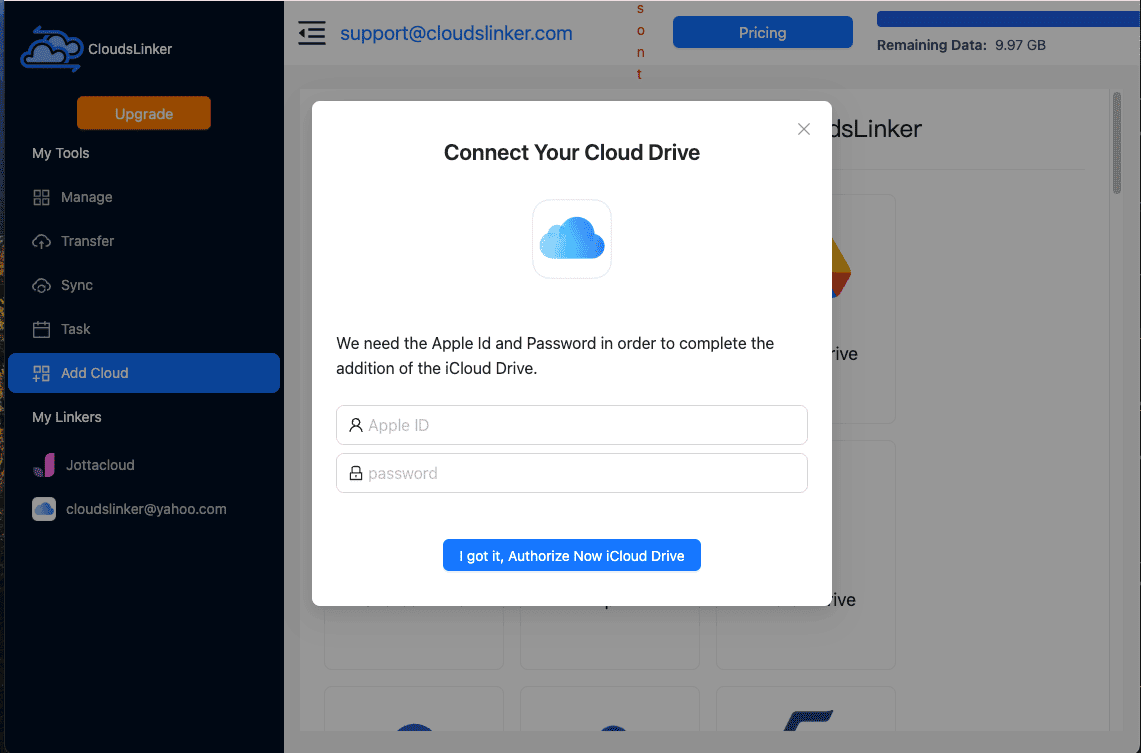
Next, add iCloud Drive. You’ll be prompted to enter your Apple ID. If you use two-factor authentication, simply type in the verification code sent to your Apple device. After successful authorization, iCloud Drive will be fully available in your CloudsLinker dashboard.
Step 3: Set Up the Transfer
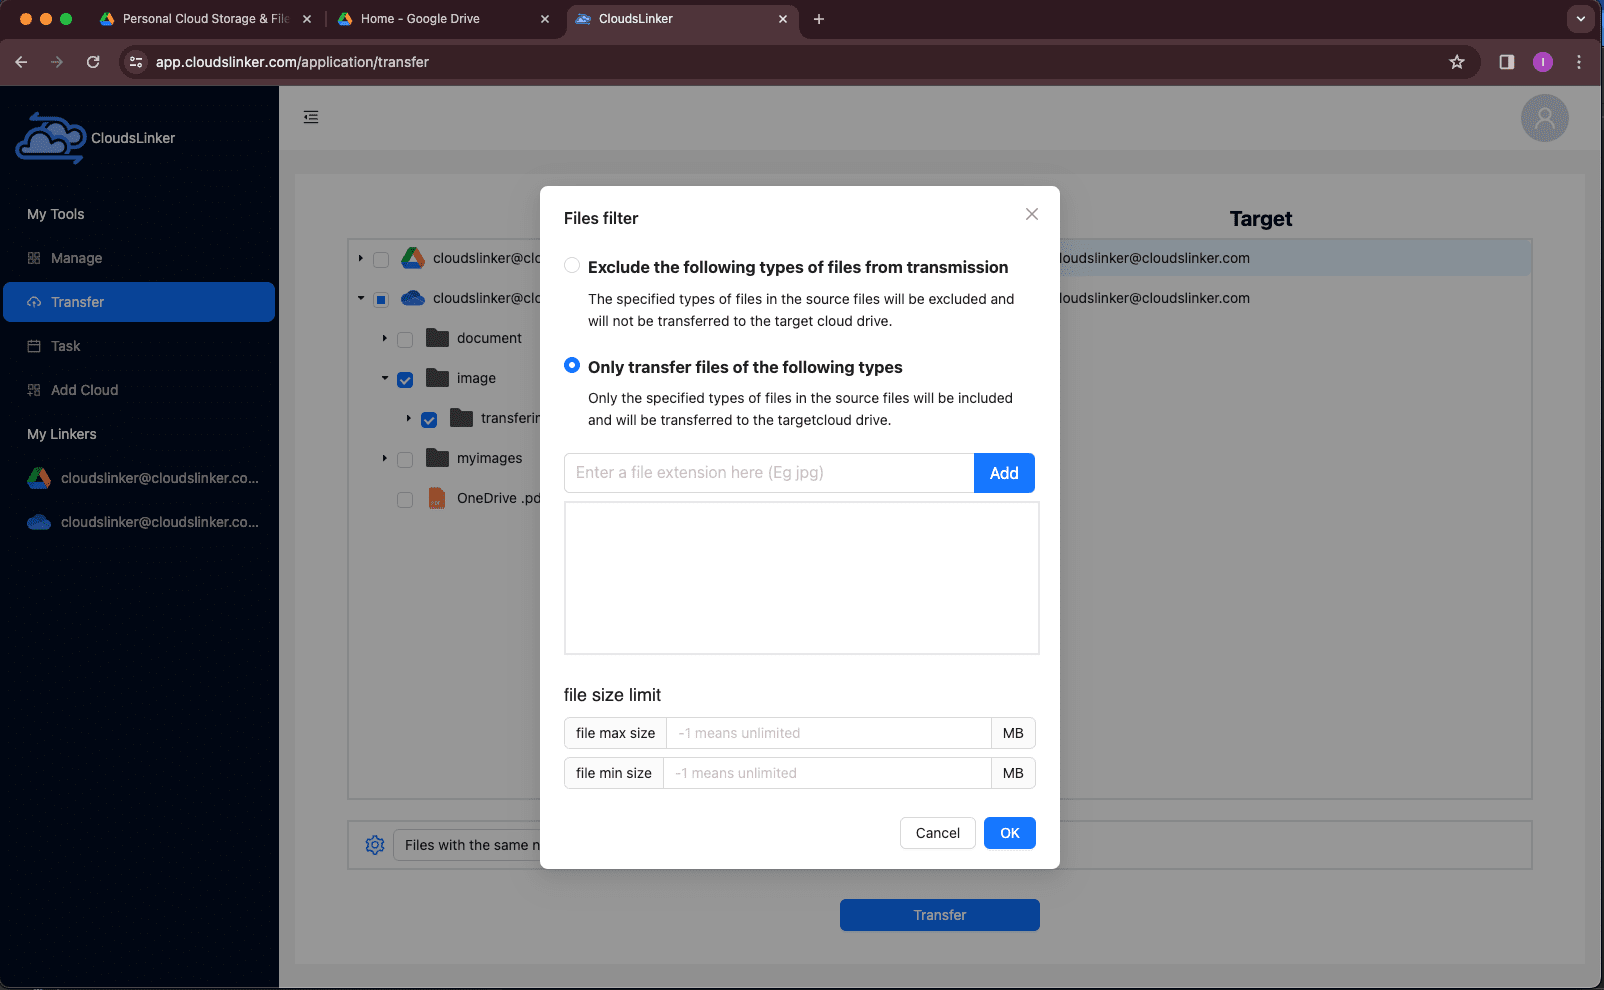
Open the Transfer tab. On the left side, select OneDrive as the source and pick the files or folders you’d like to migrate. On the right, choose iCloud Drive as the destination. You can preview both folder structures before confirming the migration.

Need more control? CloudsLinker lets you apply filters to skip unwanted file types (like
.tmp),
exclude very large videos, or transfer only recently updated files. This makes it easier to
customize the migration.
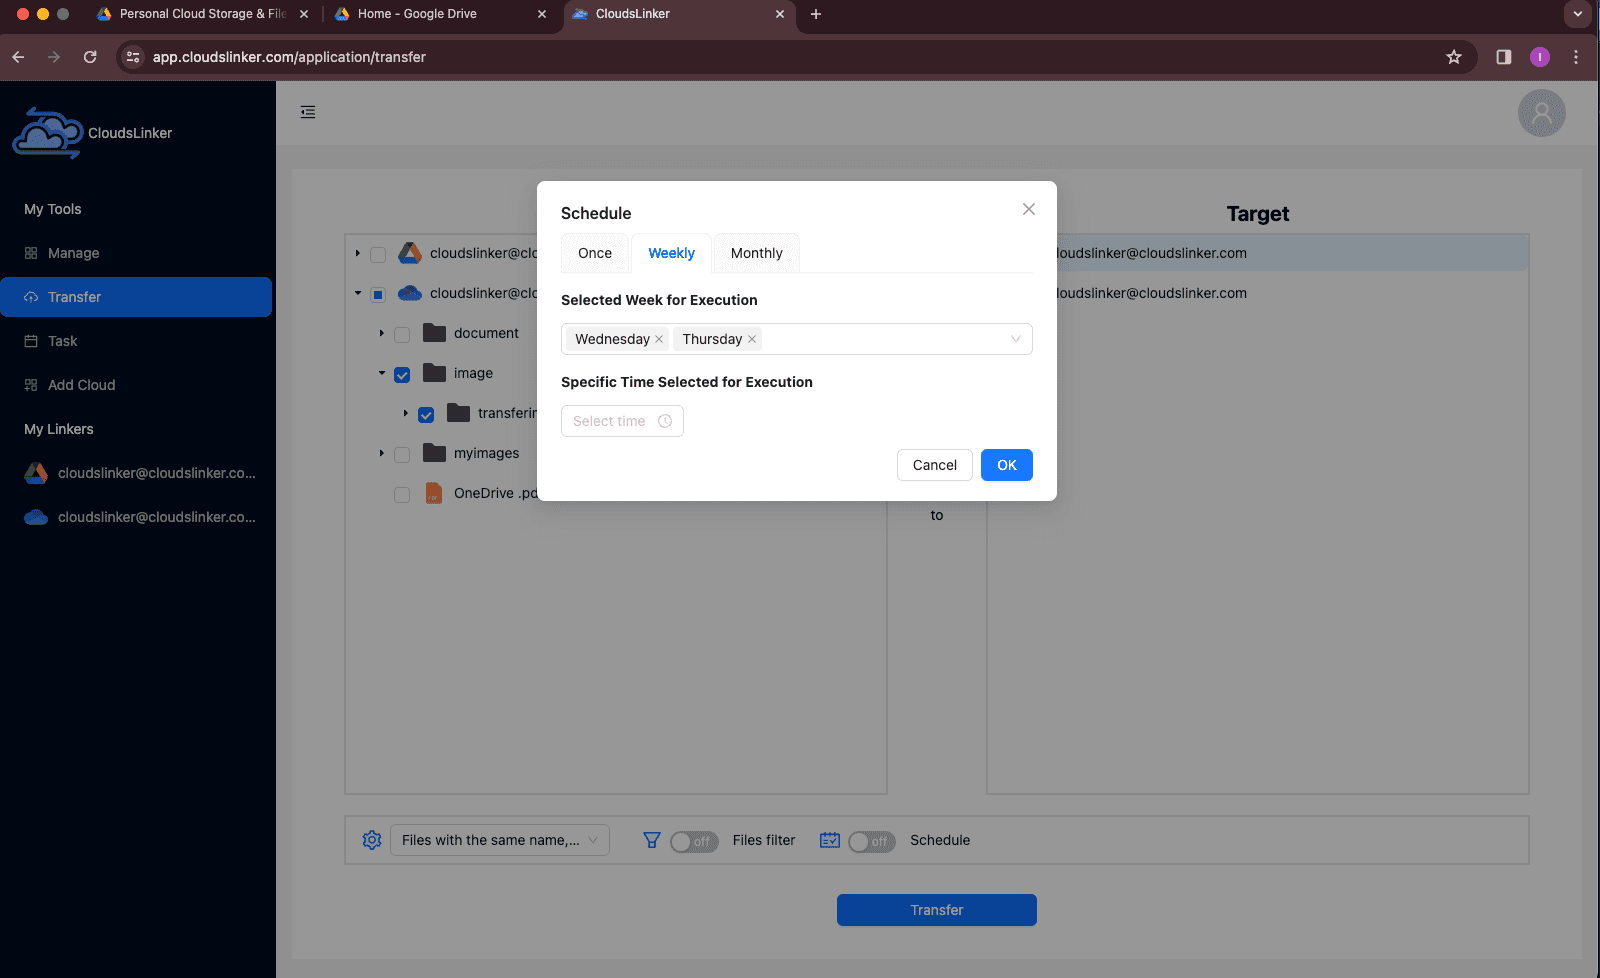
For ongoing sync, head to the Schedule tab. You can set up recurring transfers—daily, weekly, or at custom intervals—so your OneDrive and iCloud Drive stay aligned without manual effort. See our CloudsLinker scheduling guide for step-by-step instructions.
Step 4: Monitor Your Migration
Once you launch the task, it will show up in the Task List. You can monitor progress, see estimated finish times, or pause/resume as needed. Any errors (for example, unsupported files) will be flagged clearly for you to review.
Step 5: Review the Report
After completion, CloudsLinker generates a report summarizing which files were transferred successfully and highlighting any issues. At this point, your OneDrive files are safely stored in iCloud Drive.
For anyone who wants a quick, hands-off solution, CloudsLinker is a solid choice. It combines automation with flexibility, letting you set up the transfer once and let the service handle everything in the background.
Need to Move Files Between Other Clouds?
Whether you’re migrating from OneDrive, Box, MEGA, Dropbox, or WebDAV, CloudsLinker supports direct cloud-to-cloud transfers without consuming your bandwidth. Everything runs securely in your browser while CloudsLinker takes care of the transfer on its servers.
Comparing the 4 Ways to Transfer from OneDrive to iCloud Drive
There isn’t a single “perfect” method for moving files from OneDrive to iCloud Drive. The best option really depends on the size of your data, how often you’ll do this, and whether you value simplicity or fine-grained control. Below is a side-by-side look at the four approaches:
| Method | Ease of Use | Speed | Best For | Uses Local Bandwidth | Skill Level |
|---|---|---|---|---|---|
| Web Browser (Manual) | ★★★★★ | ★★★☆☆ | One-time or light transfers | Yes | Beginner |
| iPhone / iPad (Files App) | ★★★★★ | ★★★☆☆ | On-the-go users moving a few files | Yes | Beginner |
| Rclone (Command Line) | ★★☆☆☆ | ★★★★★ | Tech-savvy users, scripts, and bulk syncs | Yes / No (depends on backend configuration) | Advanced |
| CloudsLinker (Cloud-Based) | ★★★★★ | ★★★★★ | Heavy migrations, recurring jobs, minimal effort | No | Beginner |
If you just need to move a few documents or photos, the browser or Files app on iOS is quick and doesn’t require extra tools. For power users who want automation or scheduled syncs, Rclone offers unmatched flexibility—but expect some setup time. For most everyday users, especially if you’re handling a large photo library or business archive, CloudsLinker is the easiest path forward. Because transfers run in the cloud, your internet connection and computer don’t get tied up in the process.
Shifting files from OneDrive to iCloud Drive is usually simple, but taking a few precautions can save you from common issues. This is especially true if you’re moving a big library or relying on manual download-and-upload methods:
- Sync Before Export: If you’re using the browser or OneDrive desktop app, double-check that your files are fully synced to your device. Cloud placeholders (often marked as “online-only”) won’t transfer properly until they’ve finished downloading.
- Mind iCloud’s File Size Limit: iCloud Drive supports individual files up to 50 GB. For very large videos or compressed archives, split them into smaller parts or use a service like CloudsLinker to handle the move seamlessly.
- Watch Your Bandwidth: Manual uploads and downloads consume local internet speed. If your connection is slow or shared with others, cloud-to-cloud transfers can bypass the bottleneck and run in the background without tying up your network.
- Check Your iCloud Plan: Every Apple ID starts with 5 GB free, which is rarely enough for larger OneDrive libraries. Consider upgrading to an iCloud+ plan before starting, so you don’t run out of space mid-transfer.
- Always Use Secure Login: When connecting OneDrive and iCloud, make sure you’re using official OAuth logins. Services like CloudsLinker rely on token-based authentication and strong encryption (AES-256), keeping your credentials safe.
- Plan for Large Migrations: If you’re moving hundreds of gigabytes, features like scheduling, retry on error, and background processing are essential. CloudsLinker, for instance, can automatically resume a job if your session drops or your device disconnects.
A little planning makes the process much smoother. Whether you’re moving a handful of documents or your entire OneDrive archive, knowing the limits and preparing in advance will help ensure a stress-free migration to iCloud Drive.
Frequently Asked Questions
Watch Our Step-by-Step Video Guide
Want to see the process in action? In this tutorial, we’ll show you how to move files from OneDrive into iCloud Drive, using both simple manual methods and automated tools like CloudsLinker. Perfect for beginners and advanced users alike, the video walks through account setup, transfer options, and tips to avoid common issues. Follow along to make your migration smoother and more reliable.
Conclusion
There isn’t a single ‘best’ way to move from OneDrive to iCloud Drive—it comes down to how much data you have and how comfortable you are with the tools. Small batches of files are easily handled via the browser or iOS Files app. If you want more control, Rclone is excellent for scripted automation. And for those who want to set it and forget it, CloudsLinker takes care of the transfer entirely online. The important part is making sure your documents, photos, and folders land safely in iCloud, ready to sync across all your Apple devices.
Online Storage Services Supported by CloudsLinker
Transfer data between over 44 cloud services with CloudsLinker
Didn' t find your cloud service? Be free to contact: [email protected]
Further Reading
Effortless FTP connect to google drive: Transfer Files in 3 Easy Ways
Learn More >
Google Photos to OneDrive: 3 Innovative Transfer Strategies
Learn More >
Google Photos to Proton Drive: 3 Effective Transfer Techniques
Learn More >


