Moving Data from OpenDrive to Google Drive with Cloudslinker
Navigating the intricacies of file transfer between diverse cloud storage solutions can be daunting. However, Cloudslinker simplifies this process remarkably. This article explores the efficient methods available through Cloudslinker for relocating your digital assets from OpenDrive to Google Drive, thereby enhancing your online storage management.
Introduction
In today's digitally interconnected landscape, the task of managing files spread across multiple cloud storage services is increasingly common. For those needing to shift data from OpenDrive to Google Drive, Cloudslinker offers an efficient and streamlined approach. This tutorial provides a step-by-step guide on how Cloudslinker facilitates an easy transfer of your files, appealing to both professionals and individuals who desire a smooth cloud storage management journey.
The transition from OpenDrive to Google Drive offers a range of advantages, significantly improving the management and use of digital files:
- Enhanced Team Collaboration: Google Drive excels with its advanced collaborative features, such as real-time editing and seamless file sharing, making it more suitable for team projects compared to OpenDrive.
- Integration with Google Ecosystem: Google Drive's efficient integration with Google Workspace applications (like Docs, Sheets, and Slides) facilitates better productivity and a smoother workflow.
- Advanced Security Features: With its robust security measures such as SSL encryption and the option for two-factor authentication, Google Drive offers a more secure platform for storing sensitive data compared to OpenDrive.
- User-Friendly Interface: Google Drive provides an intuitive and easy-to-navigate interface, which is more user-friendly than OpenDrive, enhancing the overall file management experience.
While OpenDrive provides basic storage and backup features, it lacks in areas like collaborative functionality, integration with productivity tools, and user interface intuitiveness. These factors contribute to Google Drive being a more comprehensive and secure choice for managing digital files effectively.
Utilizing Cloudslinker for Efficient Cloud File Transfers
Cloudslinker offers a streamlined approach to transferring data between cloud storage platforms, enabling direct cloud-to-cloud transfers without requiring local data handling. It's notable for its capabilities in maintaining ongoing synchronization tasks, along with its advanced filtering options and an intuitive user interface. For detailed guidance, you can explore the Knowledge Base.
Step 1: Getting Started with Cloudslinker
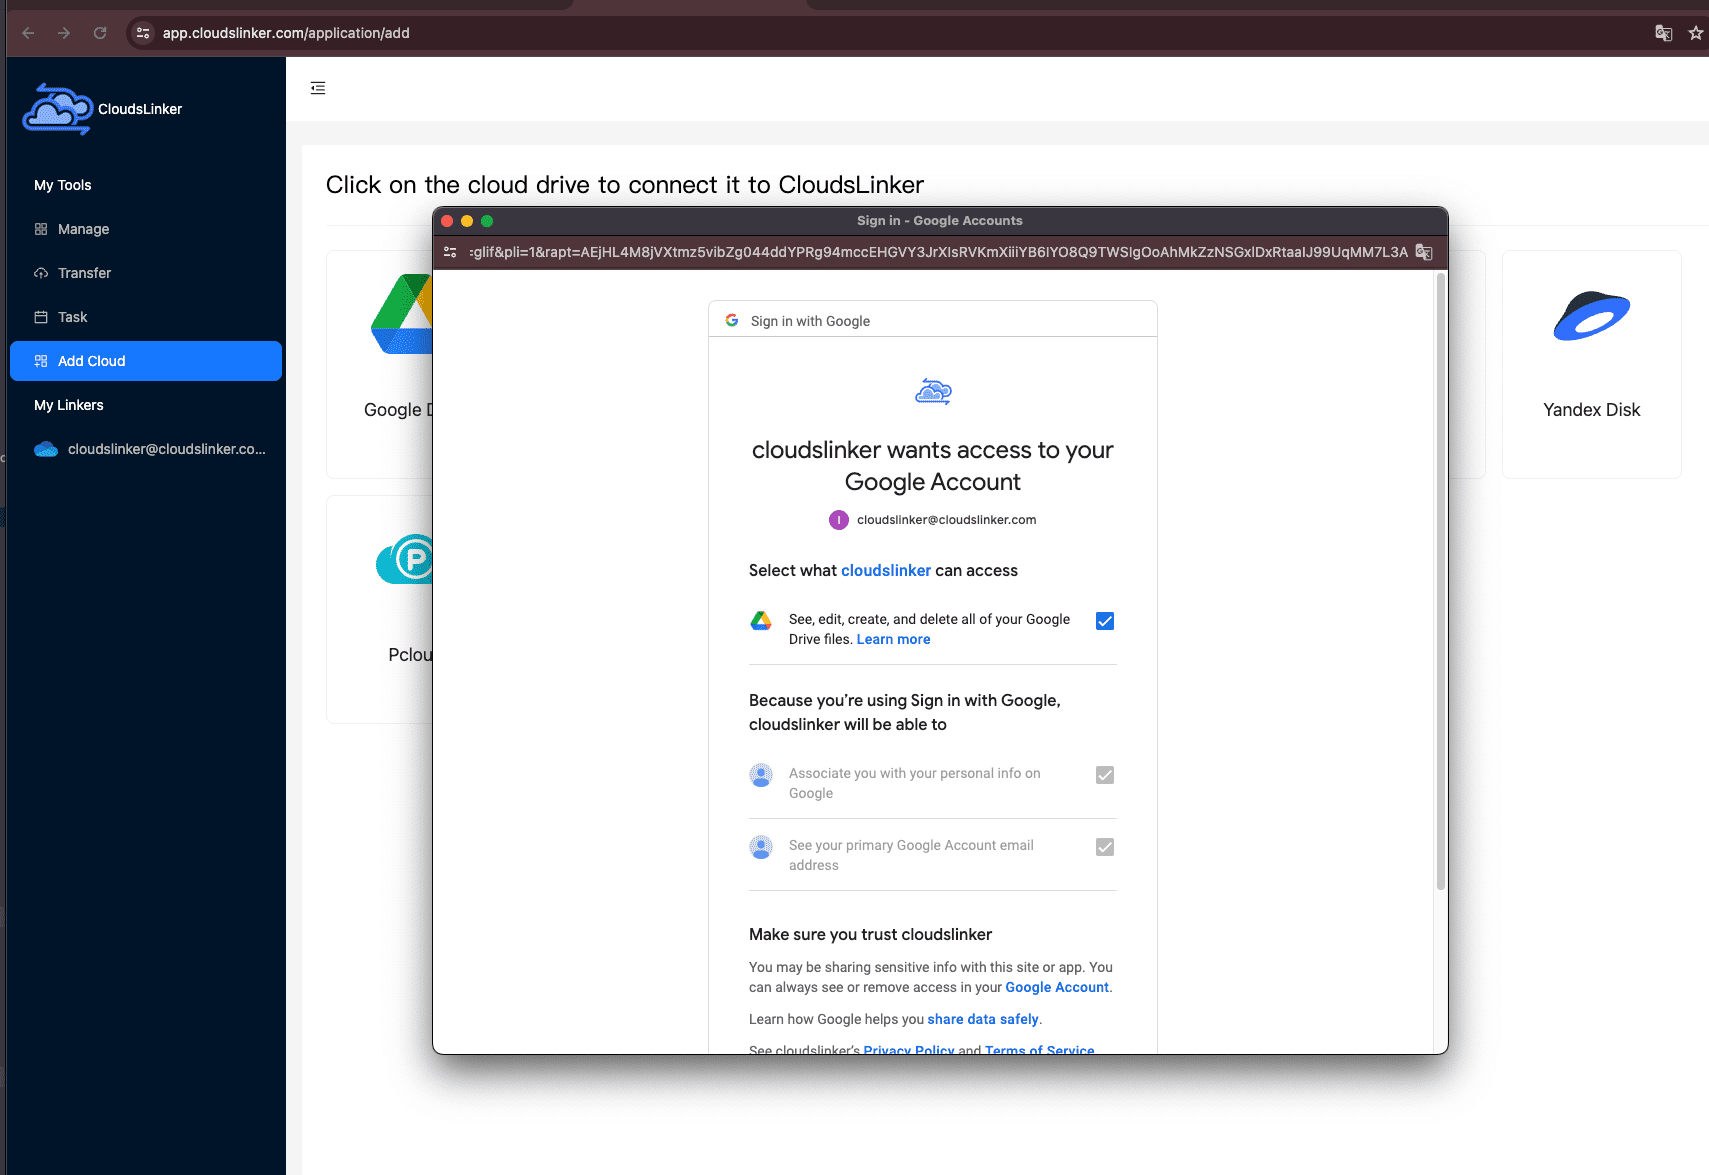
Your first step is to log into Cloudslinker. Here, you can integrate your cloud storage accounts. Begin by adding your Google Drive account, allowing Cloudslinker necessary access for management and transfer activities.

Step 2: Adding Your OpenDrive Account
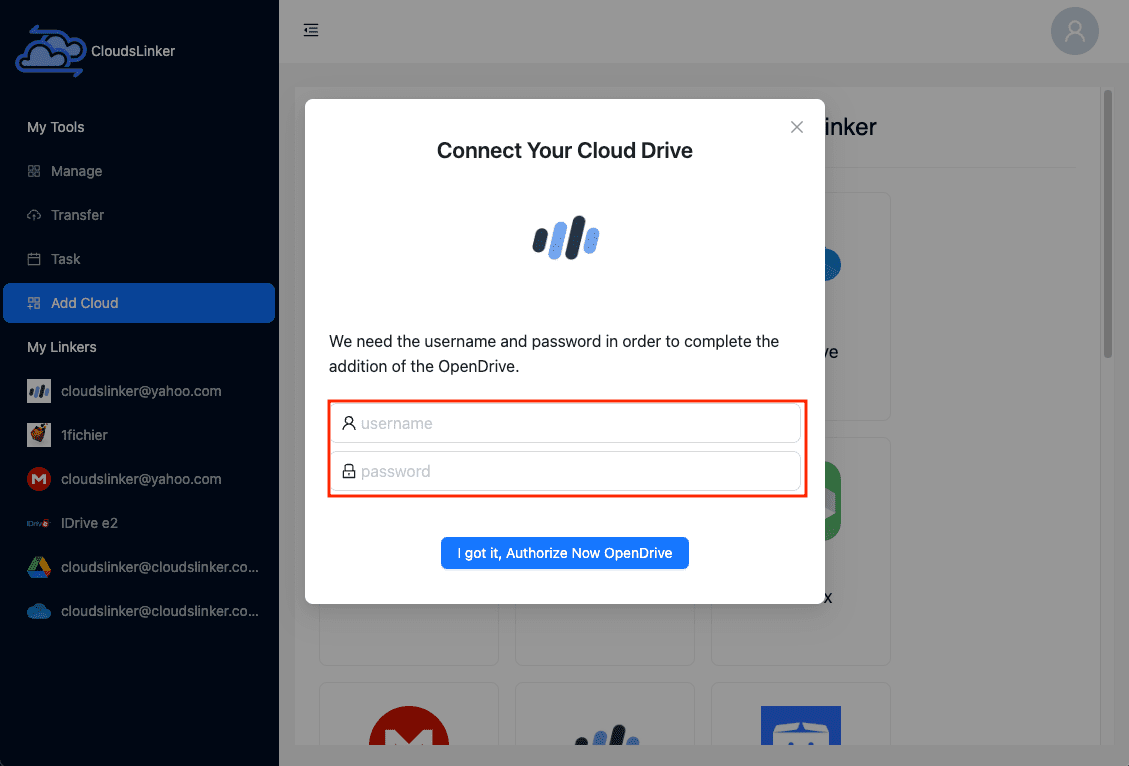
To integrate your OpenDrive account with Cloudslinker, begin by selecting the OpenDrive icon in the
Cloudslinker interface. This will take you to the OpenDrive addition page. Here, you will need to
enter your OpenDrive username and password. Cloudslinker employs advanced encryption algorithms to
ensure the security of your password. After entering your credentials, click on the
Add button to
complete the process of adding your OpenDrive account to Cloudslinker.

Step 3: Setting Up Your Transfer on Cloudslinker
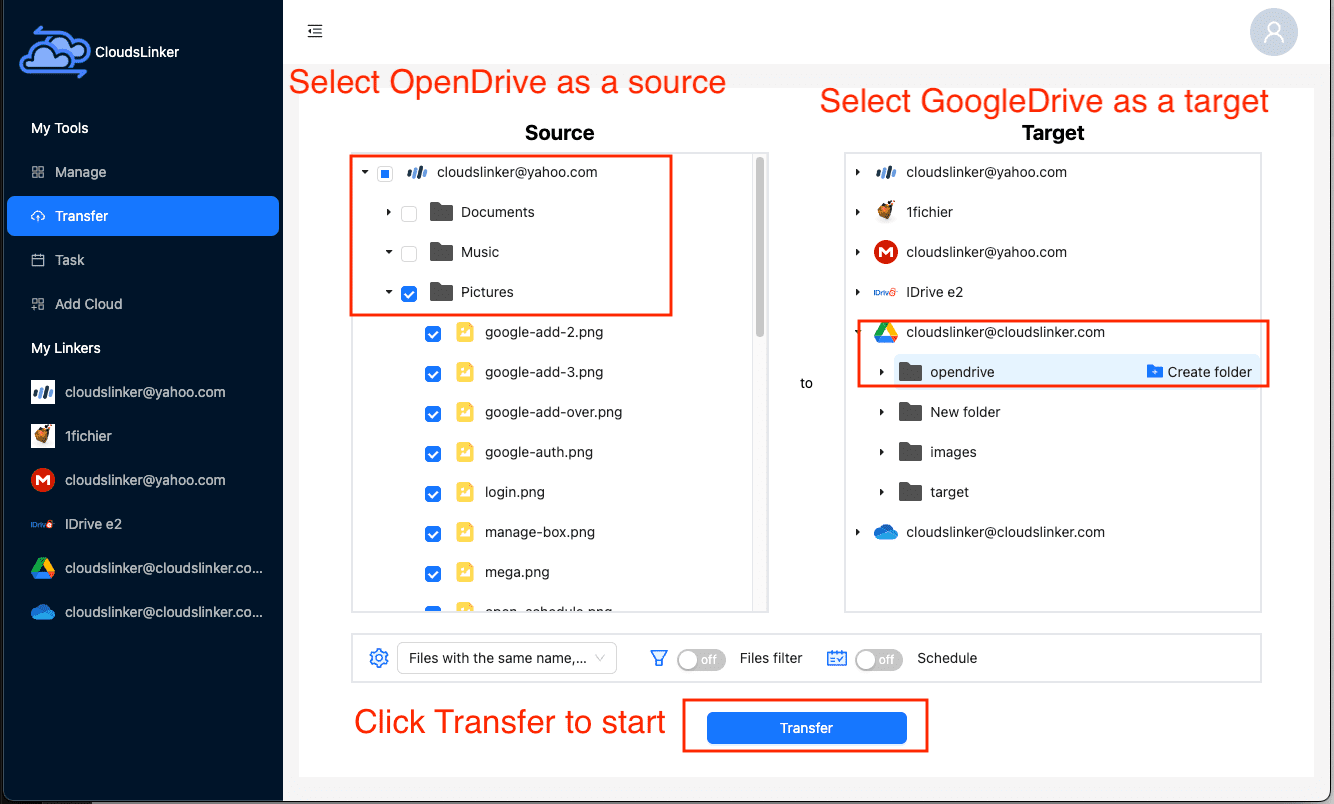
On the 'Transfer' page within Cloudslinker, you'll need to specify your source and destination accounts. For this process, select your OpenDrive account as the source and Google Drive as the target.

Utilize Cloudslinker’s filtering options to exclude certain file types or sizes from the transfer. For more detailed instructions on how to set this up, refer to: Cloudslinker Filter Settings.
Cloudslinker also allows you to schedule your transfers. You can set them to occur at your convenience, whether that's weekly, daily, on specific dates, or as a one-time event. Detailed information on scheduling transfers can be found in our guide: Cloudslinker Schedule Settings.
Step 4: Tracking Your Transfer Progress
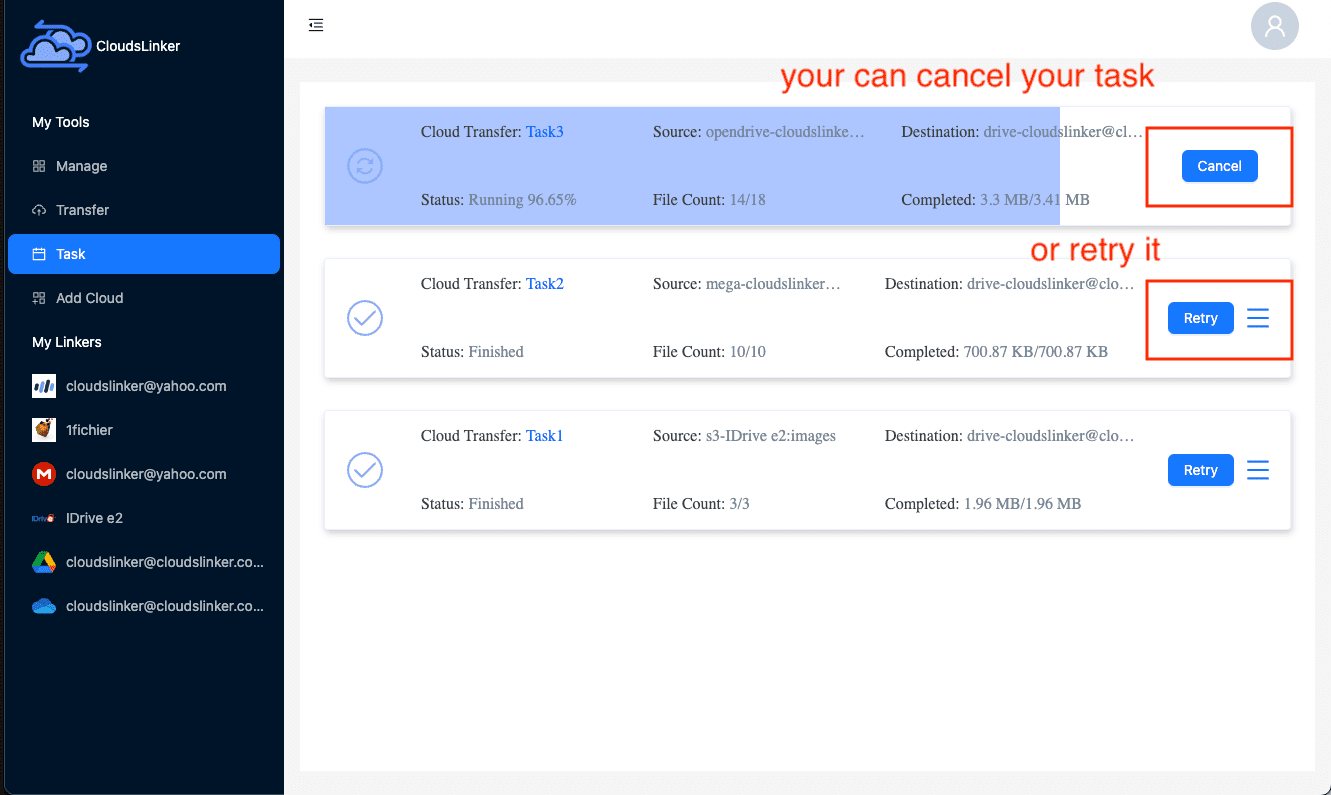
Keep an eye on the status of your transfer tasks by visiting the 'Task' section in Cloudslinker. This area allows you to effectively manage or remove tasks as required during the transfer process.

Step 5: Verifying the Completion of Your Transfer
Once the transfer is complete, you can verify that your files have been successfully moved from OpenDrive to Google Drive. It's recommended to check the file integrity and ensure all desired files are present in your Google Drive account.

Conclusion
The process of moving files from OpenDrive to Google Drive via Cloudslinker is both efficient and user-friendly. The procedure, which includes logging into Cloudslinker and verifying the completion of the transfer, is designed for ease of use. Features of Cloudslinker such as file sorting and the ability to schedule transfers enhance its utility, making it an ideal tool for anyone looking to effortlessly manage their files across various cloud services.
Online Storage Services Supported by CloudsLinker
Transfer data between over 40 cloud services with CloudsLinker
Didn' t find your cloud service? Be free to contact: [email protected]
Further Reading
Effortless FTP connect to google drive: Transfer Files in 3 Easy Ways
Learn More >
Google Photos to OneDrive: 3 Innovative Transfer Strategies
Learn More >
Google Photos to Proton Drive: 3 Effective Transfer Techniques
Learn More >


