How to Shift from pCloud to iCloud Drive: 4 Real-World Paths (2026)
Curious about moving your files from pCloud into Apple's iCloud Drive? In this 2026 walkthrough, we explore four distinct techniques—from manual copy to cloud-to-cloud syncing—so you can transit your data smoothly and safely.
Introduction
If you’re entrenched in the pCloud ecosystem but want to switch over to iCloud Drive—maybe because of iPhone, iPad, or Mac—you’re not alone. Migrating your data doesn’t have to be tedious. Whether you're moving just a few documents or managing terabytes, there’s a workflow that fits your speed, comfort, and bandwidth. Let’s dive into four methods—from local downloads to seamless cloud bridging.
pCloud is a Swiss-based cloud storage platform popular for its flexible lifetime plans and secure file management. Unlike many competitors, it offers both lifetime storage options and an optional pCloud Encryption add-on for zero-knowledge privacy.
- Virtual drive integration: The pCloud Drive app lets you work as if files were stored locally, but they live in the cloud.
- Cross-platform support: Works on macOS, Windows, Linux, iOS, Android, and through any browser.
- Generous media handling: Built-in audio and video players, plus backup for photos and social media content.
- Expandable storage: Plans range from 10 GB free to lifetime packages of up to 10 TB.
- Secure file sharing: Set expiry dates, download limits, and branding for shared links.
iCloud Drive is Apple’s cloud storage service that syncs documents, photos, and app data seamlessly across iPhone, iPad, and Mac. Every Apple ID comes with 5 GB free, while you can expand up to 12 TB with iCloud+.
- Native Apple integration: Desktop and Documents folders sync across all Apple devices instantly.
- Large file support: Uploads up to 50 GB, useful for professional media projects.
- Multi-device access: Browse files via Finder (Mac), Files app (iOS/iPadOS), Windows integration, or the iCloud.com portal.
- Collaboration tools: Share and co-edit documents in Pages, Numbers, or Keynote in real time.
- Advanced security: Features end-to-end encryption and Advanced Data Protection for sensitive content.
A lot of people start their cloud journey with pCloud, thanks to its lifetime storage plans and Swiss reputation for data privacy. It’s great if you want independence from the monthly subscription model, and its optional zero-knowledge encryption makes it one of the more secure options in the market. But if you’ve gradually shifted into Apple’s ecosystem—using iPhone, iPad, or Mac—you may find that migrating to iCloud Drive makes daily work more natural, as your files are instantly available across all devices without extra apps.
- Native for Apple Devices: iCloud Drive is built into Finder on macOS, the Files app on iOS/iPadOS, and integrates with Pages and Keynote.
- Automatic Sync: Your photos, documents, and app files update seamlessly across iPhone, iPad, and Mac without third-party tools.
- Privacy & Security: Apple provides end-to-end encryption and the option of Advanced Data Protection to keep sensitive files locked down.
- Big File Uploads: iCloud allows uploads of up to 50 GB per file, ideal for videos, design assets, or large archives.
- Collaboration Made Easy: Share folders with family or colleagues and co-edit Apple productivity documents in real time.
- Scalable Storage: Each Apple ID starts with 5 GB free, and iCloud+ plans expand up to 12 TB—enough for heavy media libraries or team projects.
For pCloud users who’ve made Apple devices their daily drivers, iCloud Drive offers a smoother, more tightly integrated alternative. It eliminates the extra steps of switching apps, organizes your files natively, and syncs everything across your Apple world.
If you’re debating whether to keep using pCloud or switch over to iCloud Drive, it’s worth breaking down how the two stack up. Both platforms handle backups, file sync, and sharing, but their strengths are different—pCloud emphasizes flexibility and lifetime pricing, while Apple focuses on effortless integration across its devices.
| Feature | pCloud | iCloud Drive |
|---|---|---|
| Free Storage | 10 GB free (expandable with referrals) | 5 GB free (expandable with iCloud+ plans) |
| Platform Integration | Works on macOS, Windows, Linux, iOS, Android, and via web | Best for iOS, iPadOS, and macOS; Windows support via iCloud for Windows |
| Collaboration | File and folder sharing with branding and expiry link options | Co-editing in Pages, Numbers, and Keynote |
| Unique Features | Zero-knowledge encryption, virtual drive, lifetime purchase plans | Seamless Apple ecosystem integration, Advanced Data Protection |
| File Size Limit | Up to 5 GB per file in free tier; larger sizes with paid plans | Up to 50 GB per file |
| Security | Encryption in transit & at rest; optional client-side encryption with pCloud Crypto | End-to-end encryption and Advanced Data Protection |
pCloud is compelling if you value lifetime plans and advanced sharing options, but iCloud Drive is the obvious choice for anyone locked into Apple’s ecosystem. If your daily workflow revolves around iPhone, iPad, or Mac, the switch can reduce friction and keep everything running in sync.
Before you begin the transfer, it’s worth checking how much space you currently use on pCloud. Compare that number with the iCloud+ plan you intend to activate. Since iCloud Drive only includes 5 GB free by default, most people upgrading from pCloud’s larger lifetime or premium accounts will need to bump up their plan, especially if photos and videos make up the bulk of the migration.
Next, make sure you’re already signed into your Apple ID and that iCloud Drive is enabled. On iPhone or iPad: Settings → [Your Name] → iCloud → iCloud Drive. On macOS: System Settings → Apple ID → iCloud. Enabling these settings ahead of time ensures that new files from pCloud will sync smoothly once they land in iCloud Drive.
This is also the right moment for some housekeeping: clean out old files you no longer need, adjust folder names, and decide on your transfer method. You can go the manual route by downloading and re-uploading, automate through Rclone, or rely on a cloud-to-cloud service like CloudsLinker to handle the migration directly online. A little preparation now will save you time and reduce the chance of headaches during the move.
Method 1: Transfer Files Through Your Web Browser
Step 1: Download from pCloud
Start by heading to the official
pCloud web portal
and sign in with your account. Navigate to the folders you want to move over to iCloud Drive.
You can select multiple files at once by holding Ctrl on Windows or
Command on macOS.
After selecting the items, click on Download. pCloud will bundle multiple files into a compressed ZIP archive if you choose entire folders. Once the download finishes, extract the archive locally so that your files are ready for the next step.

Step 2: Upload to iCloud Drive
Open iCloud.com and sign in with your Apple ID. If you’ve never used iCloud Drive before, make sure it’s enabled in your Apple ID settings. Once inside, click the Upload button (cloud icon with an arrow), or drag and drop the files directly into the browser.
You can also create new folders within iCloud Drive or recreate the same folder structure from pCloud. Organizing things up front will save you time when browsing across iPhone, iPad, or Mac.
Using the browser is the most straightforward option—no additional apps required—making it ideal for smaller transfers or quick one-off moves. But if you’re handling a larger photo library or want automation, a command-line tool such as Rclone for pCloud or a cloud-to-cloud migration service like MultCloud or CloudsLinker will give you more flexibility and save considerable time.
Method 2: Transfer with Your iPhone or iPad
Step 1: Open Files in the pCloud App
On your iPhone or iPad, launch the pCloud mobile app and log in with your account. Navigate to the files or folders you’d like to move. Tap the three-dot menu next to a file, then choose “Share” or “Export”. This will let you save a copy locally or send the file to another app.
Step 2: Save Items into iCloud Drive
When the iOS share sheet appears, select “Save to Files”. From there, pick iCloud Drive as your destination. You can drop it straight into the root folder or choose a specific subfolder if you want to keep your library organized. Once confirmed, the item is uploaded into iCloud Drive and will sync across all Apple devices connected to your Apple ID.
This method is especially handy when you just need to move a handful of documents, photos, or PDFs while on the go. Since it uses Apple’s built-in Files app, there’s no need for a computer in the middle. The downside is that moving large folders or entire collections can be slow over mobile networks. For bulk transfers, consider a desktop workflow or a cloud-to-cloud platform such as CloudsLinker which can handle the migration automatically in the background.
Method 3: Use Rclone from the Command Line
Step 1: Install Rclone and Configure Your Remotes
For those who don’t mind working in the terminal, Rclone is one of the most powerful ways to shuttle data between cloud platforms. It supports dozens of providers, including pCloud and Apple iCloud Drive.
Grab the latest release from the
official Rclone
downloads page.
After installation, open your terminal (or Command Prompt on Windows) and run:
rclone config. This starts the setup wizard that guides you through adding new cloud
remotes.
- pCloud Remote: Choose
pcloudas the backend. Rclone will prompt you to log in via a secure browser window. Once authenticated, you’ll see a new remote likepcloud:pointing to your storage. - iCloud Remote: Select
icloudwhen creating the second remote. You’ll need to generate an authentication token as described in the iCloud backend documentation. - macOS Local Option: If you already have iCloud Drive syncing on your Mac, you can
skip the
remote setup and point directly to
~/Library/Mobile Documents/com~apple~CloudDocs.
Step 2: Copy or Sync Your Data
With both remotes configured, you can start transferring files. For example:
rclone copy pcloud:/Projects icloud:/ProjectsBackup --progressrclone sync pcloud:/Photos icloud:/Photos --progress --exclude "*.tmp"
The first command copies everything from your Projects folder in pCloud into a
ProjectsBackup folder on iCloud Drive.
The second keeps your photo collection in sync while skipping unnecessary temporary files.
Add --dry-run first if you want to preview changes before executing them.
Rclone is a favorite among power users because of its flexibility. You can set bandwidth limits, exclude file types, or even schedule tasks using cron on macOS/Linux or Task Scheduler on Windows. The only catch is that configuring iCloud tokens the first time can take a little patience—but once it’s set up, the workflow is both fast and reliable.
Method 4: Cloud-to-Cloud Migration with CloudsLinker
Overview: Move from pCloud to iCloud Without Local Downloads
CloudsLinker makes it possible to move files directly from pCloud into iCloud Drive without downloading everything to your computer first. Transfers happen cloud-to-cloud, so your local bandwidth isn’t consumed, and your laptop can even be turned off while the process runs. It already supports 40+ popular storage services, including pCloud and Apple iCloud Drive.
Step 1: Sign in to CloudsLinker
Head over to www.cloudslinker.com and log in with your account (or create one for free if you’re new). From the dashboard, click “Add Cloud” and select pCloud. Here, you’ll first be asked to choose your pCloud account’s region—either US or EU data center—before proceeding. Once selected, CloudsLinker will redirect you to pCloud’s secure OAuth 2.0 page where you authorize the connection.

After completing the authorization, your pCloud account will show up in CloudsLinker’s dashboard, ready to be used as a source drive.
Step 2: Connect iCloud Drive
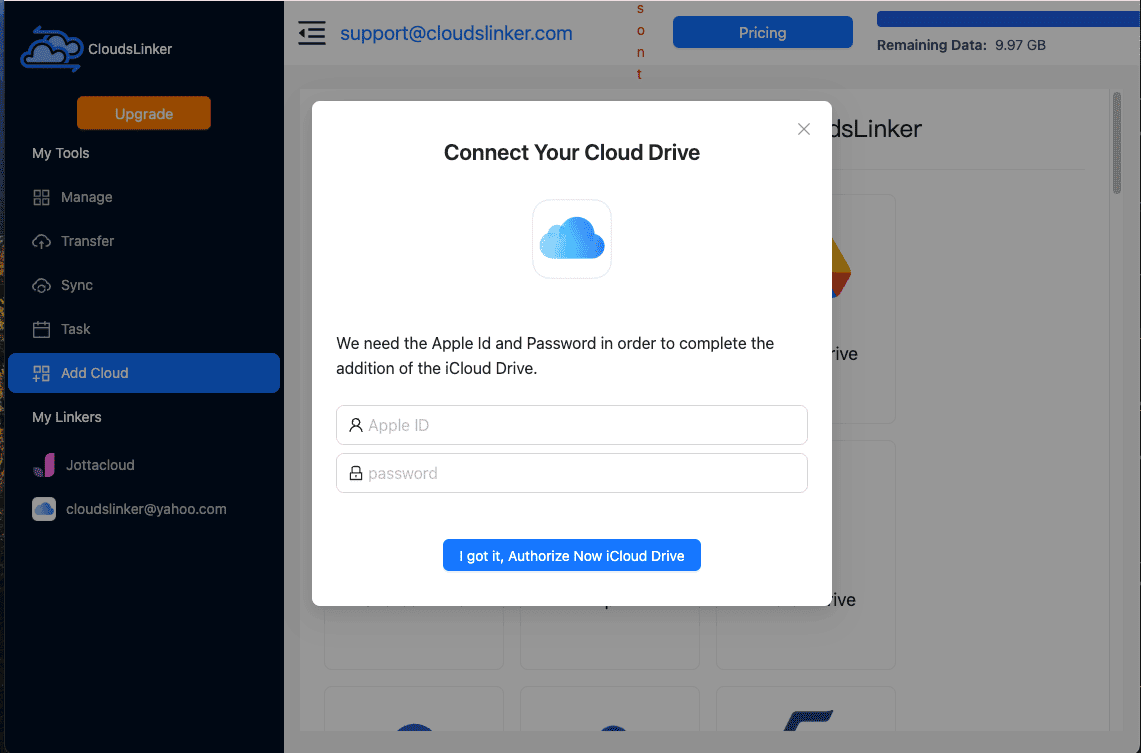
Next, add iCloud Drive from the same “Add Cloud” menu. Sign in with your Apple ID, and if you have two-factor authentication enabled, enter the verification code sent to your Apple device. Once this step is complete, iCloud Drive will appear in your CloudsLinker panel alongside pCloud.
Step 3: Set Up the Transfer
Go to the Transfer tab. On the left, select pCloud and choose the folders or files you want to migrate. On the right, pick iCloud Drive as the destination. You can preview the directory structure on both sides before hitting Start Transfer.

Advanced users can apply filters—for instance, exclude temporary files (.tmp), skip
very large video archives,
or only copy files modified in the last 30 days.
This helps tailor the migration to your needs.
Step 4: Schedule or Automate
If you want ongoing syncs, open the Schedule tab. You can automate transfers daily, weekly, or on a custom interval so pCloud and iCloud Drive remain in sync without manual effort. See the CloudsLinker scheduling guide for more details.
Step 5: Monitor and Review
Once the task starts, it appears in your Task List. You can monitor progress in real time, pause or resume, and check estimated finish times. When everything is complete, CloudsLinker generates a clear report showing what was transferred successfully and highlighting any skipped files. At this point, your pCloud content is now safely stored inside iCloud Drive.
Tip: Moving Between Other Clouds?
Whether you’re switching from Dropbox, MEGA, Box, or Google Drive, CloudsLinker can handle direct transfers between dozens of providers. Everything happens securely in the cloud, so your bandwidth is untouched and you don’t need to babysit the process.
Comparing the 4 Ways to Transfer from pCloud to iCloud Drive
There isn’t one universal “best” way to move files from pCloud into iCloud Drive. The right choice depends on how much data you have, whether you need this as a one-off or a recurring task, and how comfortable you are with different tools. Below is a comparison of the four main approaches:
| Method | Ease of Use | Speed | Best For | Uses Local Bandwidth | Skill Level |
|---|---|---|---|---|---|
| Web Browser (Manual) | ★★★★★ | ★★★☆☆ | Occasional or light transfers | Yes | Beginner |
| iPhone / iPad (Files App) | ★★★★★ | ★★★☆☆ | Quick sharing on the go | Yes | Beginner |
| Rclone (Command Line) | ★★☆☆☆ | ★★★★★ | Advanced users, scripts, large sync jobs | Yes / No (depends on configuration) | Advanced |
| CloudsLinker (Cloud-Based) | ★★★★★ | ★★★★★ | Mass migrations, recurring transfers, minimal effort | No | Beginner |
If you only need to move a few items, using your browser or the iOS Files app is straightforward and doesn’t require installing anything extra. For those who like full control and automation, Rclone’s pCloud backend is extremely powerful—though it requires some technical setup. For everyone else, especially if you’re moving entire libraries or business archives, CloudsLinker is by far the easiest solution. Since the transfers happen completely online, your internet connection and local computer won’t be tied up during the process.
Moving files from pCloud into iCloud Drive is usually straightforward, but taking a few precautions will help you avoid the most common hiccups. This is especially important if you’re migrating a large archive or relying on manual download–upload workflows:
- Sync Before Export: If you’re using the pCloud web app or the desktop client, double-check that your files are fully synced locally. Items that exist only as placeholders in the virtual drive won’t copy correctly until they are downloaded.
- Mind iCloud’s File Size Limit: iCloud Drive supports uploads up to 50 GB per file. If you need to move larger video projects or archives, consider splitting them first or using CloudsLinker to bypass size issues seamlessly.
- Watch Your Bandwidth: Manual download and upload eats into your home internet speed. If your connection is slow or shared, a direct cloud-to-cloud service is a better fit since it runs in the background without occupying your local network.
- Check Your iCloud Plan: An Apple ID comes with 5 GB free, which rarely covers a full pCloud library. Upgrade to an iCloud+ plan before starting so you don’t hit space limits mid-transfer.
- Always Use Secure Login: When linking pCloud and iCloud, make sure you use official OAuth login flows. Services like CloudsLinker rely on token-based authentication and AES-256 encryption, keeping your credentials safe.
- Plan for Large Migrations: If you’re moving hundreds of gigabytes, scheduling, retries, and background processing are essential. CloudsLinker, for instance, can automatically resume interrupted transfers if your session times out.
A bit of planning goes a long way. Whether you’re just moving a small folder or your entire pCloud account, knowing iCloud’s limits and preparing in advance will help you avoid unnecessary frustration.
Frequently Asked Questions
Watch Our Step-by-Step Video Guide
Prefer to learn visually? In this tutorial, we’ll walk you through moving files from pCloud into iCloud Drive. The video covers both quick manual methods and automated transfers using CloudsLinker. Whether you’re a beginner or a more advanced user, you’ll see how to set up accounts, choose transfer options, and avoid common pitfalls. Follow along to make your pCloud to iCloud migration smoother and worry-free.
Conclusion
There’s no one-size-fits-all when migrating from pCloud to iCloud Drive. A few wayward files are easily handled via drag-and-drop in Finder or iCloud.com. For more control, scripts via Rclone let you batch and automate. Want to skip local traffic altogether? Cloud transfer services like MultCloud take care of everything invisibly. Pick the tool that suits your volume and patience, and your files will be synced across your Apple ecosystem in no time.
Online Storage Services Supported by CloudsLinker
Transfer data between over 48 cloud services with CloudsLinker

OneDrive

Google Drive

Google Photos

Shared Drive

OneDrive for Business

Dropbox

Box

Mega

pCloud

Yandex

ProtonDrive

AWS

GCS

iDrive

Storj

DigitalOcean

Wasabi

1fichier

PikPak

TeleBox

OpenDrive

Backblaze B2

Fastmail file

SharePoint

Nextcloud

ownCloud

Premiumize me

HiDrive

Put.io

Sugar Sync

Jottacloud

Seafile

Ftp

SFtp

NAS

WebDav

4shared

Icedrive

Cloudflare R2

Scaleway

Doi

iCloud Drive

iCloud Photos

FileLU

Zoho WorkDrive

Telia Cloud / Sky

Drime

Filen
Didn' t find your cloud service? Be free to contact: [email protected]
Further Reading
Effortless FTP connect to google drive: Transfer Files in 3 Easy Ways
Learn More >
Google Photos to OneDrive: 3 Innovative Transfer Strategies
Learn More >
Google Photos to Proton Drive: 3 Effective Transfer Techniques
Learn More >