iCloud Drive to NAS: Move Off Apple's Storage Ceiling Onto Hardware You Own
Move files from iCloud Drive to a NAS over SMB using four methods — Finder, the iOS Files app, Rclone, and CloudsLinker.
Introduction
A NAS turns a recurring iCloud+ bill into a one-time hardware purchase, with local gigabit access and no per-file ceiling beyond what the drive's file system allows. Someone paying $29.99 or $59.99 a month for a 6 TB or 12 TB iCloud+ plan, mostly to hold years of documents and archives that are rarely opened again, is paying every month for storage that a NAS covers once. iCloud Drive also caps individual files at roughly 50 GB, and uploading new files through the iCloud.com website drops that to 10 GB, a ceiling a NAS's underlying file system does not share — NTFS alone supports files up to 16 TB. Moving a static archive off iCloud Drive removes both the monthly cost and that file-size ceiling. The methods below cover the move.
iCloud Drive is Apple's personal cloud storage, priced from 5 GB free up to 12 TB at $59.99/month. Individual files are capped at roughly 50 GB, or 10 GB when uploaded through the iCloud.com website.
- Subscription pricing: Capacity tied to a recurring monthly iCloud+ fee.
- Optimized storage: Keeps only recently used files fully downloaded locally.
- Single-account model: Storage tied to one Apple ID.
- Finder and Files integration: Native access on macOS, iOS, and iPadOS.
- File-size ceiling: ~50 GB per file, 10 GB via web upload.
A NAS is a device with its own drives that shares files over your network, commonly through the SMB protocol. Brands include Synology, QNAP, Asustor, and TrueNAS.
- One-time hardware cost: No recurring subscription once purchased.
- Local network speed: Gigabit access when on the same network.
- High file-size ceiling: NTFS supports up to 16 TB per file; ZFS-based systems go higher.
- Full ownership: Data stays on hardware you control.
- Expandable: Add or replace drives as storage needs grow.
iCloud Drive and a NAS solve storage differently: one is a metered subscription with Apple-managed limits, the other a fixed hardware cost bound mainly by the file system and drives you install.
| Feature | iCloud Drive | NAS (SMB) |
|---|---|---|
| Cost Model | Recurring monthly subscription, up to $59.99/month for 12 TB | One-time hardware plus drives |
| Max File Size | ~50 GB (10 GB via iCloud.com web upload) | Up to 16 TB (NTFS) or higher on ZFS-based systems |
| Access Speed | Limited by internet connection | Local gigabit on the LAN |
| Remote Access | Built in via Apple ID | Requires setup (VPN, port forwarding) |
| Data Location | Apple's servers | Your premises |
| Best Fit | Active Apple-ecosystem sync | Long-term archives, self-hosting |
Sources: iCloud+ plans and pricing, SMB protocol limits
The move typically makes sense once an iCloud+ plan is being paid mainly to hold static, rarely accessed data. Common reasons:
- Replace a growing subscription with a fixed cost: A NAS trades a monthly fee that scales with data size for hardware you buy once.
- No file-size ceiling from Apple: The NAS's own file system, not an Apple-imposed cap, governs how large a single file can be.
- Data stays on hardware you own: Archives live on your premises instead of Apple's servers.
- Local network speed: Working with large files over gigabit beats waiting on an internet download.
- Expandable capacity: Add drives as needed instead of upgrading to the next iCloud+ tier.
Once a NAS fits the use case, the transfer method depends on which Apple devices hold the files and whether the NAS is reachable beyond the local network.
Confirm how the NAS is reachable. A device on the local network works with Finder's native SMB connection and the iOS Files app. A cloud-based transfer with CloudsLinker can only reach it if you have set up a public IP, port forwarding, or a VPN, so decide that before choosing a method.
Create a destination shared folder on the NAS and an account with write permission to it. Note the NAS host IP address and confirm SMB is enabled in its network settings.
On the iCloud Drive side, check which files are marked as optimized or not-yet-downloaded, since Finder and the Files app both need the actual file present before copying. Rclone and CloudsLinker read files directly through Apple's API, so this matters less for those two methods.
Method 1: Connect to the NAS in Finder
Step 1: Ensure the iCloud Drive Files Are Downloaded
Open Finder and select iCloud Drive from the sidebar. Files showing a cloud icon are not yet local; right-click and choose Download Now so the actual data is present before copying.
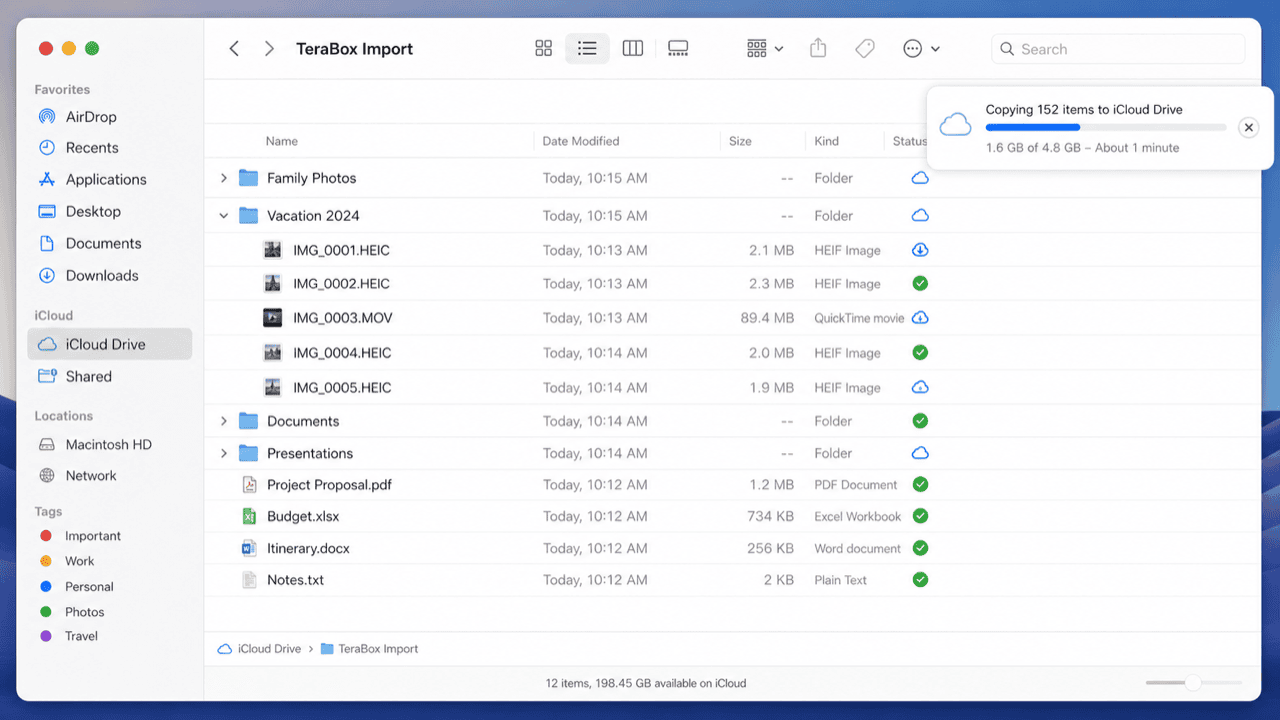
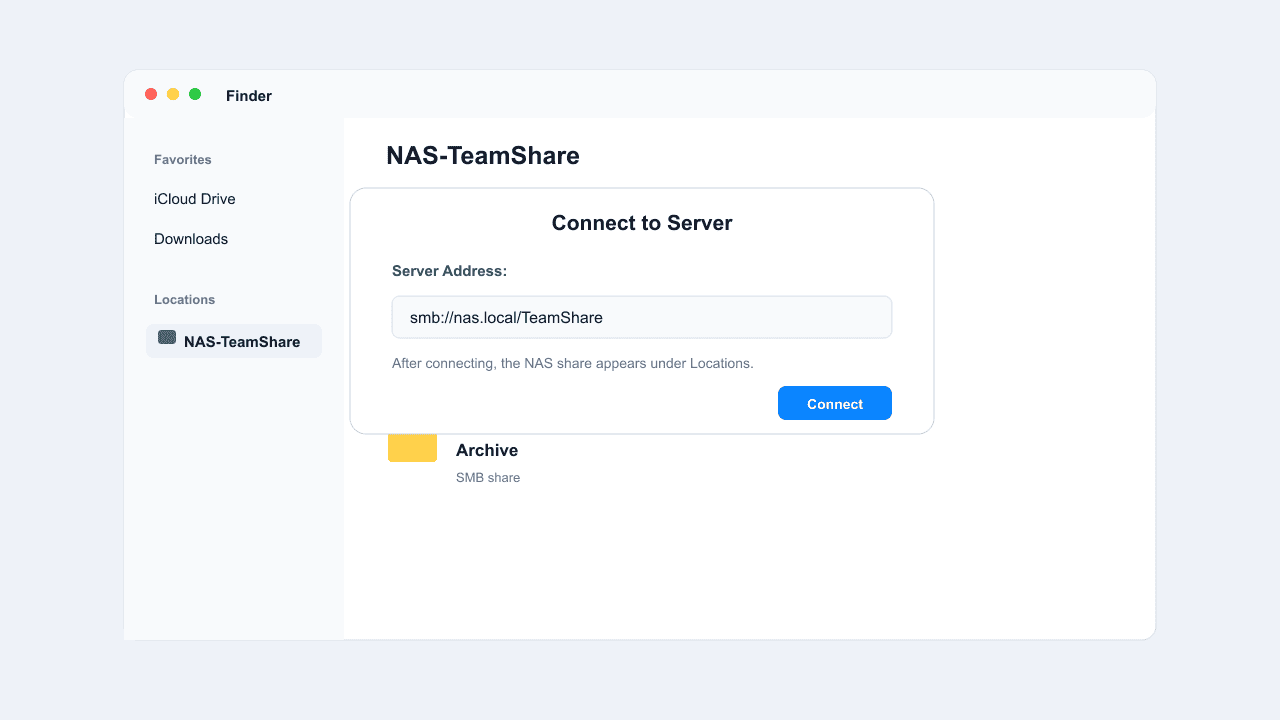
Step 2: Connect to the NAS and Copy the Files
In Finder, press Cmd+K, enter smb://NAS-IP-address, and sign in with the NAS account credentials. The shared folder appears in Finder's sidebar under Locations; drag the downloaded iCloud Drive files directly into it.
This is the most direct method when working on a Mac. Both the download from iCloud and the copy to the NAS route through local bandwidth, so a large archive takes time.
Method 2: Connect to the NAS in the iOS Files App
Step 1: Add the NAS as a Server in the Files App
Open the built-in Files app, tap Browse, then the ... menu and choose Connect to Server. Enter smb://NAS-IP-address and sign in with the NAS account.
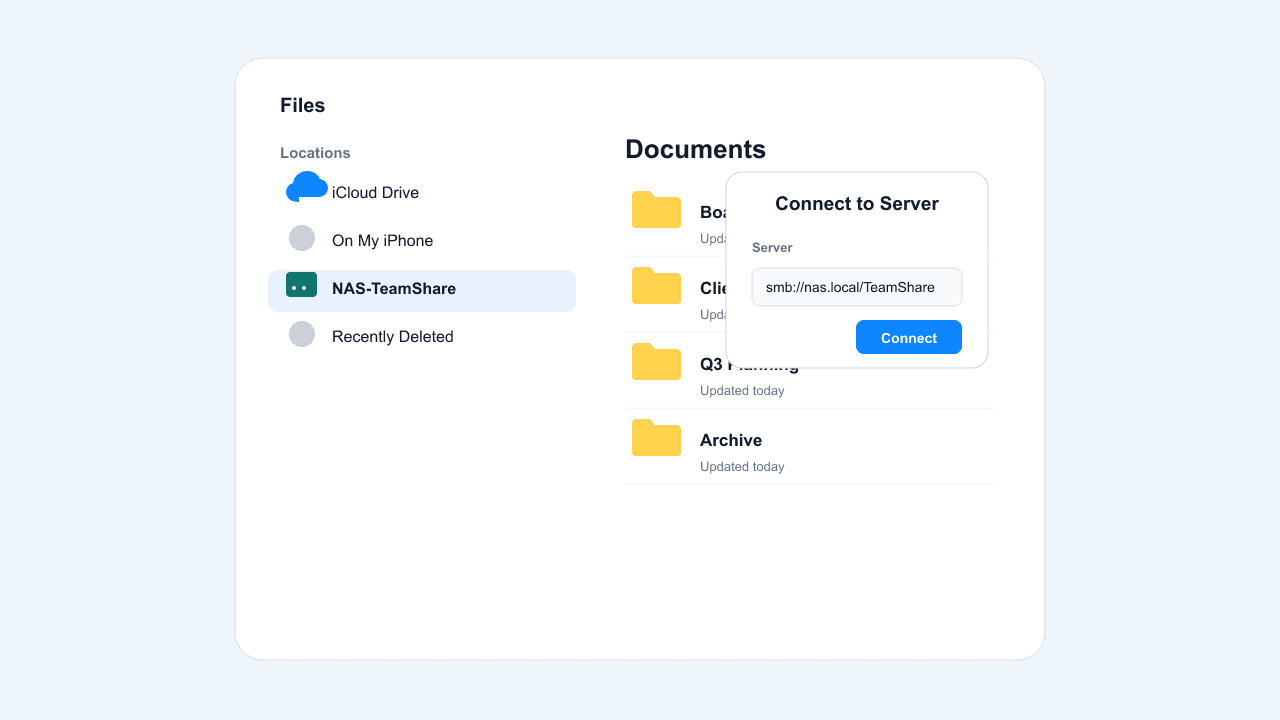
Step 2: Copy Files from iCloud Drive to the NAS
With both iCloud Drive and the NAS listed under Locations, select files in iCloud Drive, tap Copy, navigate to the NAS share, and tap Paste. On iPad, split view lets you drag files between the two directly.
This method suits files that exist only on an iPhone or iPad. It works best for a moderate number of files rather than a full archive, since mobile file management is slower for bulk transfers.
Method 3: Command-Line Transfer with Rclone
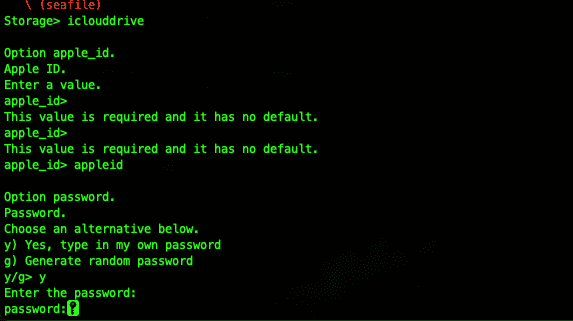
Step 1: Configure an iCloud Drive Remote
Rclone supports iCloud Drive directly. Run rclone config, add an iclouddrive remote, and sign in with your Apple ID and an app-specific password.
Step 2: Copy to the NAS
Copy directly to a local NAS mount, or to an SMB remote if Rclone runs on another machine:
rclone copy iclouddrive:/Documents /volume1/archive --progressrclone copy iclouddrive:/Photos nas-smb:/Photos --progress
The first command copies into a locally mounted NAS volume; the second writes to an SMB remote configured in Rclone. Add --dry-run to preview the result first.
This method handles a large or recurring migration well and does not depend on which Apple device produced the files. Apple's API can rate-limit heavy usage, so large transfers may need to run in smaller batches.
Method 4: Cloud-to-Cloud Transfer with CloudsLinker
Transfer Without a Mac or PC in the Middle
CloudsLinker reads files from iCloud Drive through Apple ID authentication and writes them to the NAS over SMB, so no device needs to stay on during the transfer. This method requires the NAS to be reachable over the internet — a public IP, port forwarding, or a VPN.
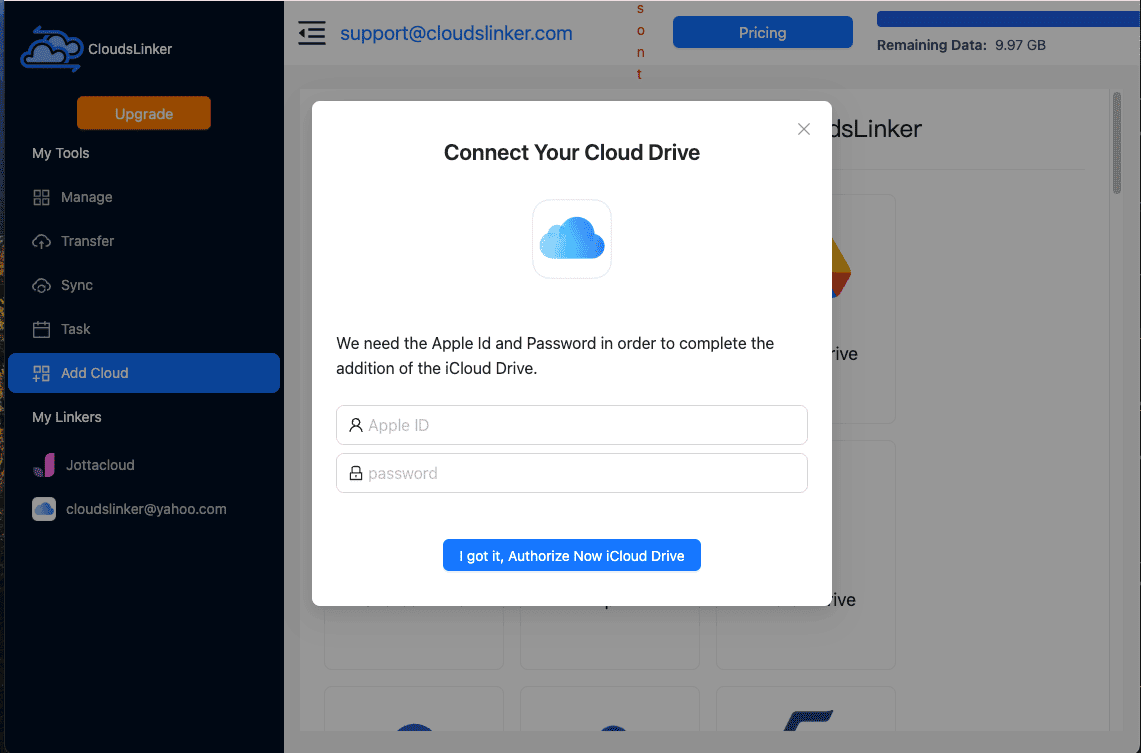
Step 1: Connect iCloud Drive
Sign in at app.cloudslinker.com, click Add Cloud, and select iCloud Drive. Enter your Apple ID and password, then the 6-digit verification code from a trusted device.
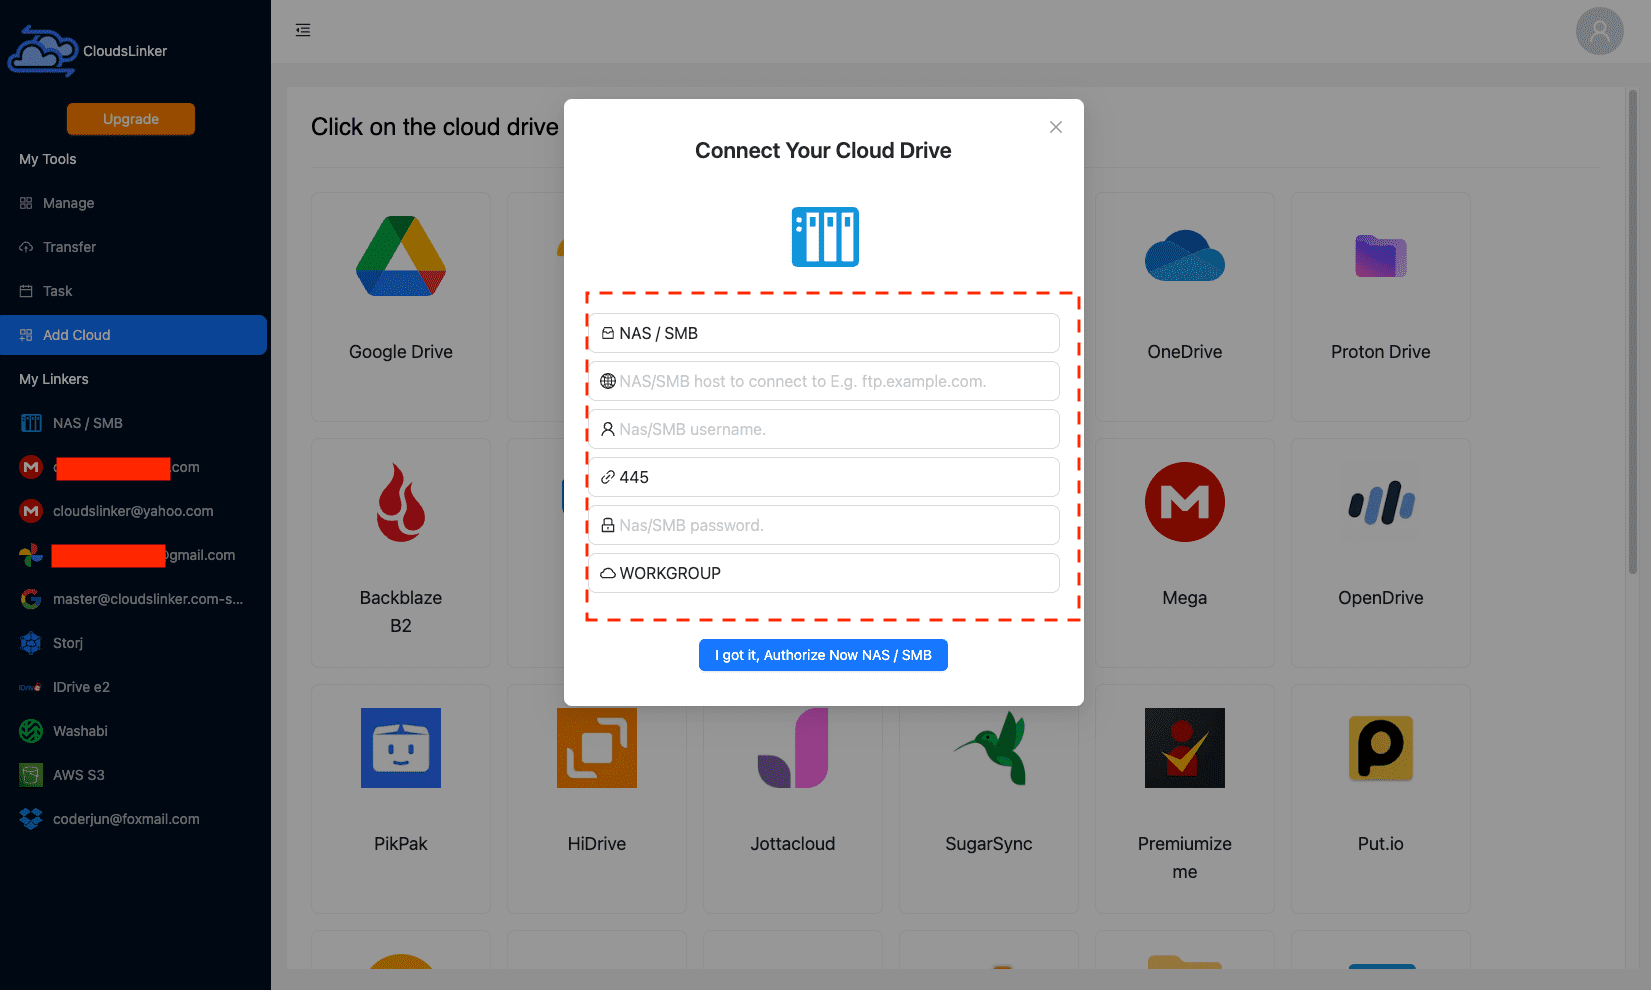
Step 2: Connect the NAS over SMB
Click Add Cloud again and select NAS / SMB. Enter a display name, the NAS host IP address, a username and password with write access, and port 445.
Step 3: Configure the Transfer
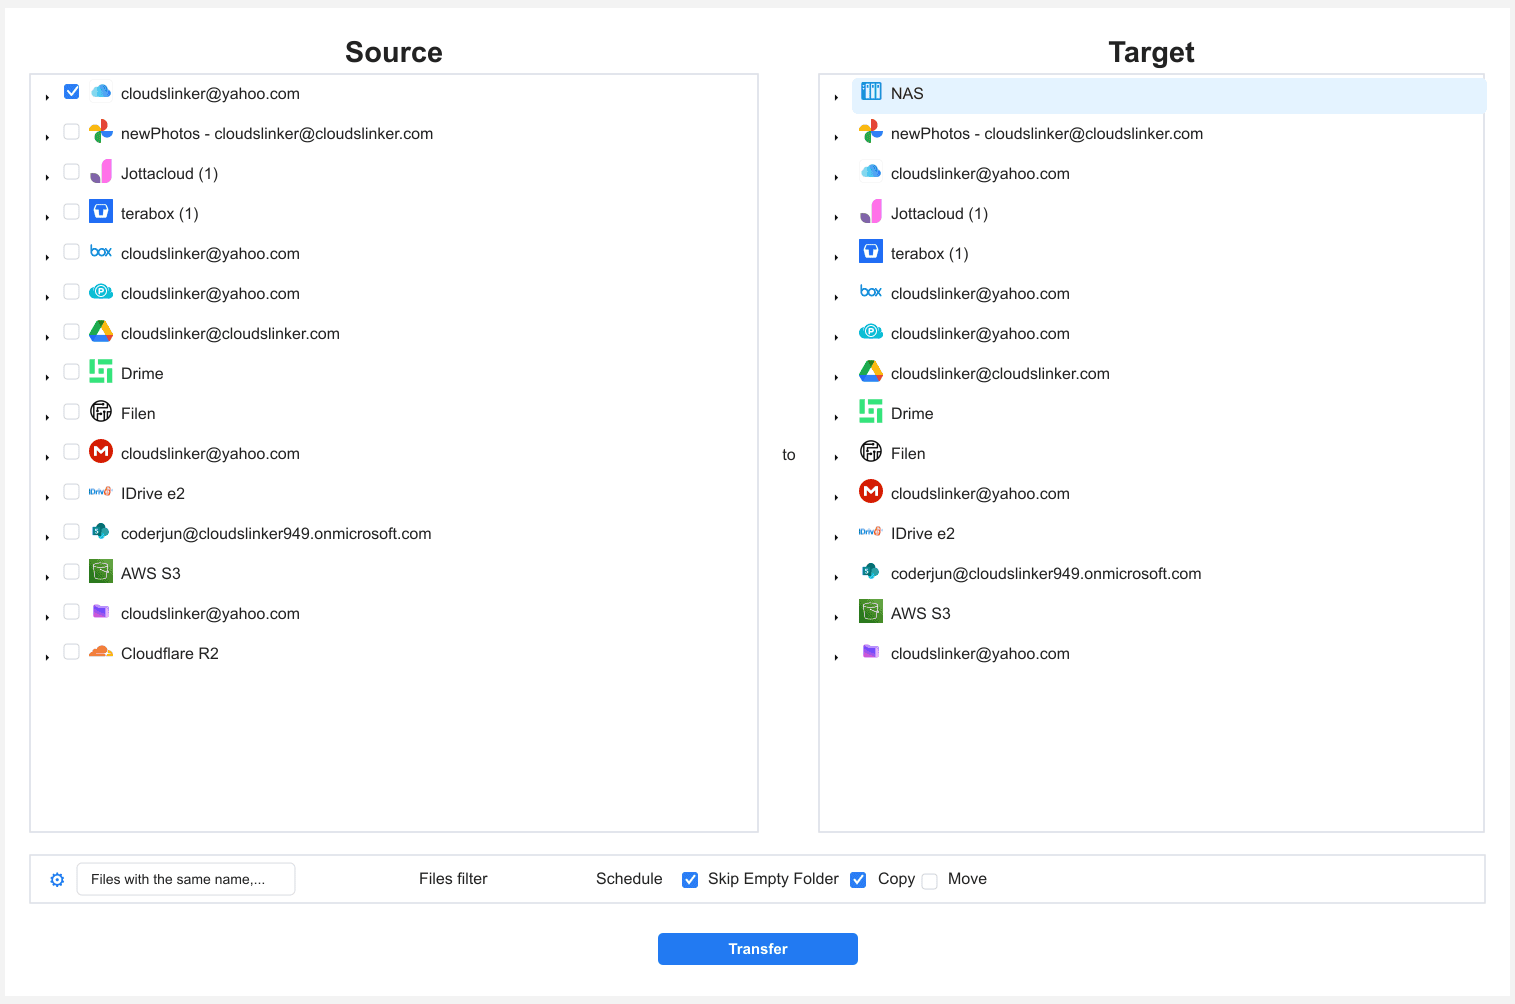
Open the Transfer section. Select iCloud Drive as the source and browse to the folders to move. On the destination side, select the NAS and choose the target shared folder.
Filters let you limit the move to certain file types or a date range, and Copy or Move mode controls whether the iCloud Drive originals remain.
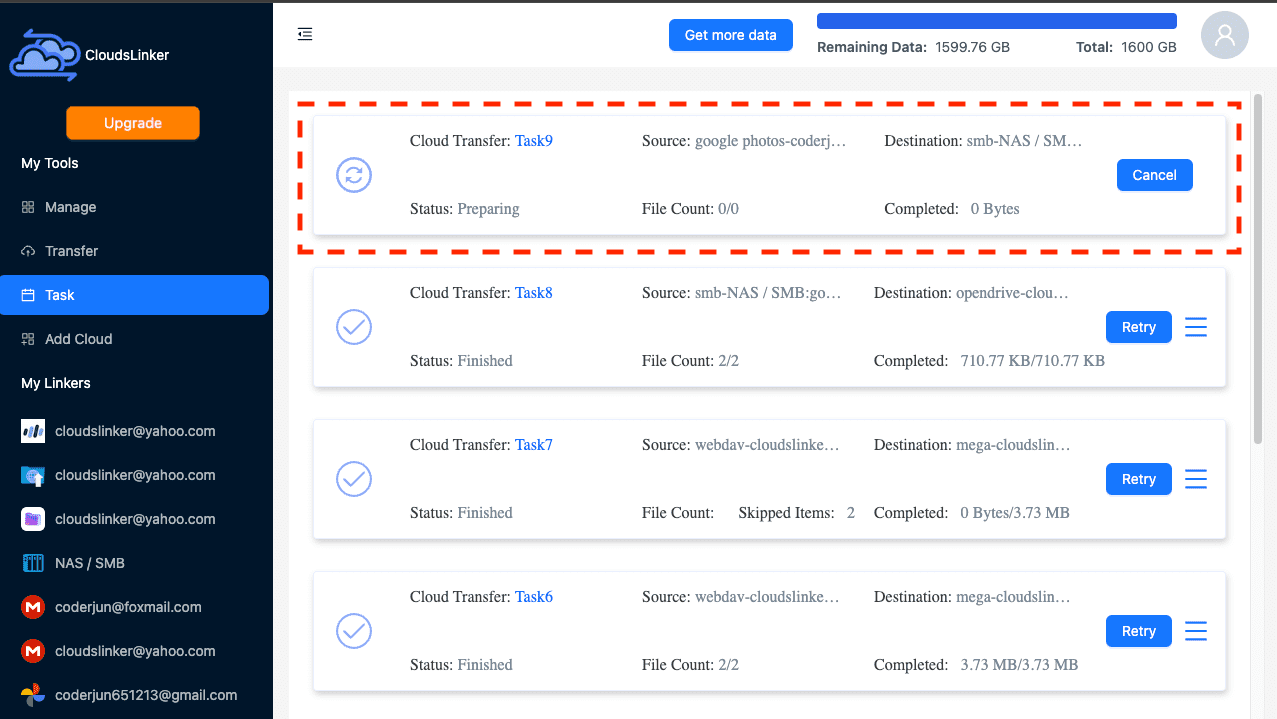
Step 4: Start and Monitor the Transfer
Start the task and track it in the Task List, which shows transferred size, speed, and any skipped items. The transfer runs server-side between iCloud Drive and the NAS.
Comparing the Ways to Transfer From iCloud Drive to a NAS
| Method | Ease of Use | Speed | Best For | Needs Public NAS | Skill Level |
|---|---|---|---|---|---|
| Finder (Mac) | ★★★★★ | ★★★☆☆ | Mac-based moves | No | Beginner |
| iOS Files App | ★★★★☆ | ★★★☆☆ | Files only on iPhone/iPad | No | Beginner |
| Rclone | ★★☆☆☆ | ★★★★☆ | Large or recurring migrations | No | Advanced |
| CloudsLinker | ★★★★★ | ★★★★★ | Internet-reachable NAS, hands-off | Yes | Beginner |
Finder is the simplest path on a Mac, and the Files app covers phone-only files. Rclone suits technical users moving a large archive. If the NAS is already reachable over the internet, CloudsLinker moves everything server-side without a Mac or PC involved.
- Force downloads before Finder or Files app copies: Optimized storage keeps files as placeholders until you request the full download.
- Avoid opening port 445 to the public: Use a VPN or the NAS vendor's secure remote access instead of exposing raw SMB to the internet.
- Downgrade the iCloud+ plan only after verifying the copy: Confirm files open correctly from the NAS before reducing your Apple storage tier.
- Watch for Apple API rate limits: Large Rclone or CloudsLinker transfers may need to run in batches if Apple throttles requests.
- Check volume space and RAID health: Confirm free capacity and drive health before a large transfer.
- Keep a second copy until verified: Do not cancel the iCloud+ subscription until the files are confirmed intact on the NAS.
Frequently Asked Questions
Conclusion
The right method depends on which Apple device holds the files and how many there are. Finder's native SMB support handles a Mac-based move directly. The iOS Files app covers files that live only on an iPhone or iPad. Rclone suits a large or scripted migration. CloudsLinker moves an entire iCloud Drive library straight to the NAS without a Mac or PC in the middle — provided the NAS is reachable from the internet, since a home NAS behind a router needs a public IP, port forwarding, or a VPN first. Choose based on your device and network setup.
Online Storage Services Supported by CloudsLinker
Transfer data between over 50 cloud services with CloudsLinker

OneDrive

Google Drive

Google Photos

Shared Drive

OneDrive for Business

Dropbox

Box

Mega

pCloud

Yandex

ProtonDrive

AWS

GCS

iDrive

Storj

DigitalOcean

Wasabi

1fichier

PikPak

TeleBox

OpenDrive

Backblaze B2

Fastmail file

SharePoint

Nextcloud

ownCloud

Premiumize me

HiDrive

Put.io

Sugar Sync

Jottacloud

Seafile

Ftp

SFtp

NAS

WebDav

4shared

Icedrive

Cloudflare R2

Scaleway

Doi

iCloud Drive

iCloud Photos

FileLU

Zoho WorkDrive

Telia Cloud / Sky

Drime

Filen

TeraBox
Internxt
Didn' t find your cloud service? Be free to contact: [email protected]
Further Reading
Effortless FTP connect to google drive: Transfer Files in 3 Easy Ways
Learn More >
Google Photos to OneDrive: 3 Innovative Transfer Strategies
Learn More >
Google Photos to Proton Drive: 3 Effective Transfer Techniques
Learn More >