Move Your iCloud Photo Library to Drime: HEIC, Live Photos and European Storage
Transfer iCloud Photos to Drime for private European cloud storage. Export via iCloud.com, use macOS Photos, or run a cloud-to-cloud migration with CloudsLinker.
Introduction
Drime stores data in European data centers with end-to-end encryption and GDPR compliance, which makes it a common destination for iCloud Photos users who want their image library outside the Apple ecosystem. iCloud Photos works well inside Apple devices, but exporting a multi-thousand-photo library — with HEIC, Live Photos, and RAW files intact — is a manual process by default. This guide covers three practical paths: a web export from iCloud.com for smaller selections, an Apple Photos app export for Mac users who want full format control, and a cloud-to-cloud transfer through CloudsLinker for libraries that are too large to download.
iCloud Photos keeps the Photos library on iPhone, iPad and Mac synced through Apple's cloud. Originals are stored in the cloud while devices can hold optimized versions to save local space.
- Format support: HEIC, Live Photos, RAW and video alongside JPEG.
- Optimize Storage: devices keep reduced copies while originals sit in the cloud.
- Albums and Memories: grouping and auto-generated events tied to Apple apps.
- Shared Albums: limited-capacity albums shared with other Apple users.
- Plans: 5 GB free, paid iCloud+ tiers up to 12 TB.
Drime is a French cloud storage workspace with end-to-end encryption, GDPR-aligned hosting, and a sharing-first interface. Files are organized in folders rather than in a Photos-style library, so a migration shifts the data model from album-centric to folder-centric.
- European data residency: servers located in France.
- End-to-end encryption: applied to stored and shared files.
- Folder-based layout: no automatic album or Memories features.
- Sharing links: password-protected, expiring links for external access.
- Cross-platform: web, desktop and mobile apps.
iCloud Photos and Drime sit on opposite ends of a spectrum. One is a media library tied to a device ecosystem; the other is a general-purpose file workspace with a stronger residency and encryption posture.
| Feature | iCloud Photos | Drime |
|---|---|---|
| Data model | Photo library with albums, Memories and faces | File and folder storage |
| Data residency | Global Apple infrastructure | France, GDPR-aligned |
| Encryption | Server-side by default; end-to-end with Advanced Data Protection | End-to-end encryption |
| Format preservation | Native HEIC, Live Photos, RAW | Stores any file format as-is |
| Best-fit use case | Daily photo capture and browsing on Apple devices | Long-term private archive with structured folders |
Before you start in iCloud Photos
- Check total library size: open Settings → Apple ID → iCloud on any device to see how many gigabytes you are moving.
- Disable Optimize Storage temporarily on a Mac if you plan to export through the Photos app — originals must be downloaded first.
- Decide on HEIC vs JPEG: HEIC is smaller but not universally supported outside Apple. iCloud.com export converts to JPEG automatically; Photos app export can preserve originals.
- Clean up Recently Deleted — items here are not exported, but they still count against your quota.
On the Drime side
- Verify storage capacity: make sure your Drime plan has enough room for the full library.
- Plan folder structure: decide whether to mirror albums as folders or organize by year/month.
- Generate a developer token: open Drime → avatar → Settings → Developer → Create Token. Save the token; you will need it for CloudsLinker.
Method 1: Export from iCloud.com and Upload to Drime
Step 1: Select and Download Photos from iCloud.com
Open iCloud.com/photos
and sign in with your Apple ID. Use the All Photos or Albums view to select items. Hold
Shift to select a range or Cmd/Ctrl to pick individual items.
Click the download icon at the top right.
iCloud offers two download options: Unmodified Original (keeps HEIC, Live Photos, RAW) or Most Compatible (converts to JPEG/H.264). Choose based on whether you need true originals in Drime. Large selections are packaged as ZIP files.
Step 2: Extract and Organize Locally
Unzip the downloaded archive. iCloud does not preserve album structure in the ZIP — photos come out flat, named by their underlying capture filename. If album structure matters, export albums one by one and create matching folders locally before upload.
Step 3: Upload to Drime
Open the Drime web dashboard, navigate to your target folder, and drag the extracted files in. Drime encrypts files during upload. Uploads pause and resume automatically if the connection drops.
Method 2: macOS Photos App Export Bridge
Best when you want HEIC, Live Photos and RAW preserved
The macOS Photos app exports with more control than iCloud.com. It keeps original formats, respects album organization, and can embed location metadata. This route requires the full library to be downloaded to your Mac first.
Step 1: Download Originals to Your Mac
Open Photos on Mac. Go to Settings → iCloud and select Download Originals to this Mac instead of Optimize Mac Storage. Wait for the library to finish syncing — for a large library this can take hours and requires enough free disk space.
Step 2: Export from Photos
Select photos or full albums in the Photos app. Go to File → Export → Export Unmodified
Originals. This preserves HEIC, Live Photos pairs (.HEIC + .MOV), RAW files, and capture
timestamps. Choose a destination folder outside of ~/Pictures to avoid rescanning.
If you need JPEG for broader compatibility, use Export X Photos instead and set the format to JPEG with the desired quality. This option also lets you include or omit IPTC metadata.
Step 3: Upload to Drime
Install the Drime desktop app or use the web dashboard. Drag the exported folder into your Drime target directory. If you used Export Unmodified Originals, the Live Photos still consist of paired .HEIC and .MOV files — keep them together in the same folder in Drime so you can recombine them if you migrate back to an Apple device later.
Method 3: Cloud-to-Cloud Transfer with CloudsLinker
Move iCloud Photos Without Downloading the Library
CloudsLinker connects iCloud Photos and Drime directly. The library transfers between cloud servers, so hundreds of gigabytes do not need to land on your local disk first. The process continues even if you close the browser.
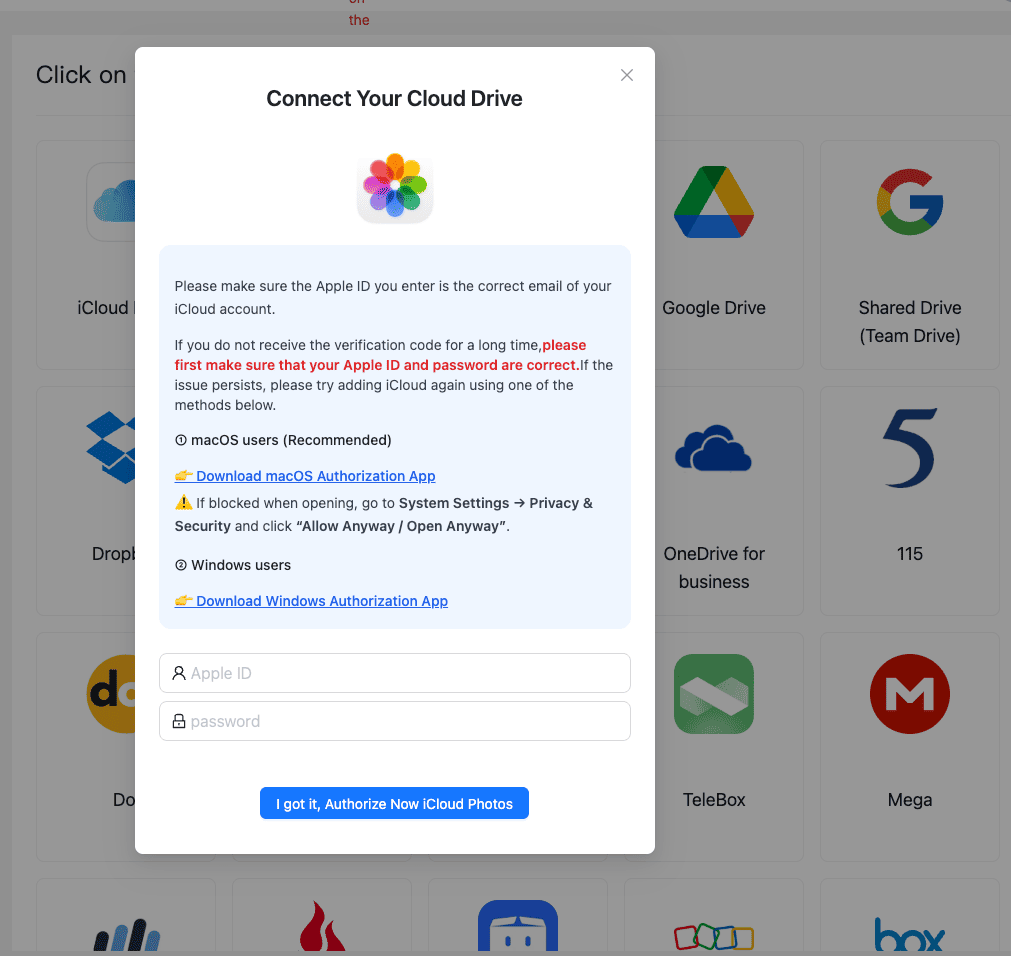
Step 1: Connect iCloud Photos
In CloudsLinker, click Add Cloud and select iCloud Photos. Enter your Apple ID and password, then the 6-digit verification code sent to your trusted Apple device. Make sure Access iCloud Data on the Web is enabled in Apple Account settings — without it, the connection cannot read the library.
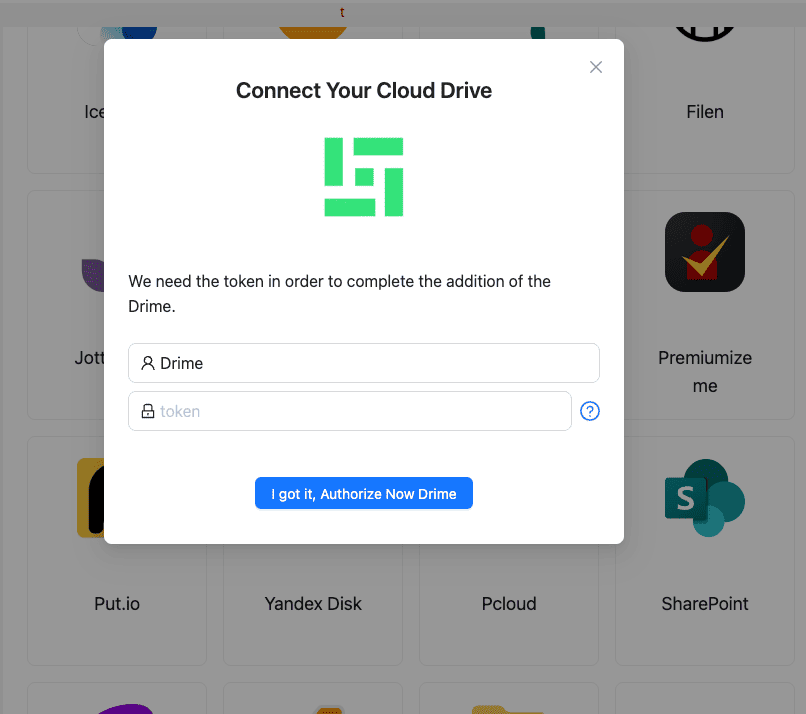
Step 2: Connect Drime
Click Add Cloud again and select Drime. Paste the developer token you generated earlier from Drime → Settings → Developer. Confirm and Drime appears as a connected destination.
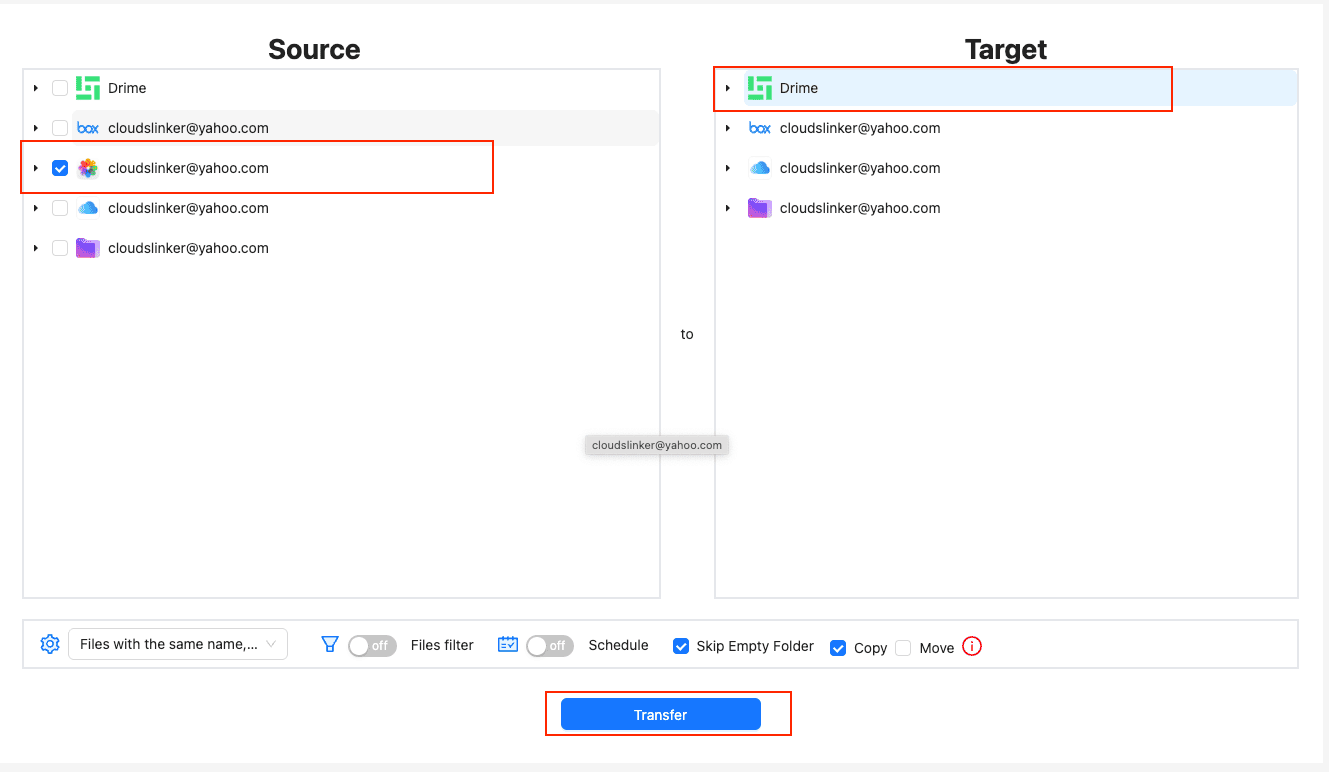
Step 3: Configure the Transfer
Open the Transfer section. Select iCloud Photos as the source and browse the library. You can transfer everything or pick specific albums. On the destination side, select your Drime folder.
Use filters if needed — for example, limit to photos after a given date, exclude videos, or target RAW files only. Choose Copy to keep the iCloud library intact.
Step 4: Start and Monitor
Start the task. The Task List view shows progress, transferred size and remaining items. The transfer runs on CloudsLinker servers — you can close the browser and come back later. When it finishes, open Drime and verify a sample of photos before removing anything from iCloud.
Method Comparison
| Method | Ease of Use | Speed | Best For | Uses Local Bandwidth | Skill Level |
|---|---|---|---|---|---|
| iCloud.com Export | ★★★★☆ | ★★☆☆☆ | Small selections, cross-platform users | Yes | Beginner |
| macOS Photos Export | ★★★☆☆ | ★★★☆☆ | Mac users who want original formats preserved | Yes | Intermediate |
| CloudsLinker | ★★★★★ | ★★★★★ | Large libraries, Windows users, hands-off moves | No | Beginner |
- Keep Live Photos paired: Live Photos export as a .HEIC image plus a .MOV clip. Store them in the same Drime folder so they stay grouped.
- Verify RAW originals: If you shoot RAW, confirm the file sizes in Drime match what you see in Photos. A shrunken file size is a sign the JPEG copy was exported instead of the RAW.
-
Albums become folders: Drime has no Photos-style album feature. Plan your
folder naming — for example,
/Photos/2024/2024-07 Summer Trip/— before you upload. - Mind the HEIC format: HEIC is not universally supported on Windows or older Linux viewers. If you expect to browse photos there, export as JPEG.
- Check Advanced Data Protection: If your iCloud account uses ADP, Apple ID web access may require extra steps. Third-party tools can still read iCloud Photos through Apple's authorized flow.
- Do a test album first: Transfer one small album, confirm it looks right in Drime, then move the rest of the library.
Frequently Asked Questions
Conclusion
For a few hundred photos, the iCloud.com download is enough. Mac users with a full library on disk can use the Photos app to keep HEIC, Live Photos and RAW originals in their native form before uploading to Drime. When the library is hundreds of gigabytes or you are on Windows, the CloudsLinker route avoids local downloads entirely and runs the transfer on server infrastructure. Always start with a test album, confirm the files look correct in Drime, then migrate the rest.
Online Storage Services Supported by CloudsLinker
Transfer data between over 54 cloud services with CloudsLinker

OneDrive

Google Drive

Google Photos

Shared Drive

OneDrive for Business

Dropbox

Box

Mega

pCloud

Yandex

ProtonDrive

AWS

GCS

iDrive

Storj

DigitalOcean

Wasabi

1fichier

PikPak

TeleBox

OpenDrive

Backblaze B2

Fastmail file

SharePoint

Nextcloud

ownCloud

Premiumize me

HiDrive

Put.io

Sugar Sync

Jottacloud

Seafile

Ftp

SFtp

NAS

WebDav

4shared

Icedrive

Cloudflare R2

Scaleway

Doi

iCloud Drive

iCloud Photos

FileLU

Zoho WorkDrive

Telia Cloud / Sky

Drime

Filen

TeraBox

Internxt

Degoo

Gofile
Pixeldrain

Shade
Didn' t find your cloud service? Be free to contact: [email protected]
Further Reading
Effortless FTP connect to google drive: Transfer Files in 3 Easy Ways
Learn More >
Google Photos to OneDrive: 3 Innovative Transfer Strategies
Learn More >
Google Photos to Proton Drive: 3 Effective Transfer Techniques
Learn More >