Bringing iDrive e2 Data into SharePoint Without Downloading Files
iDrive e2 is often used as scalable object storage, but collaboration rarely happens there. This guide explains how teams move active datasets into SharePoint safely, without local downloads or workflow disruption.
Introduction
Object storage and collaboration platforms serve very different purposes, yet they often end up holding the same data. iDrive e2 is commonly used as a reliable, cost-efficient place to store large volumes of files — backups, exports, media assets, or application output that needs to exist, but not be constantly edited. The friction starts when those files become relevant to people rather than systems. Reviewing documents, sharing updates with colleagues, or maintaining version clarity is difficult when data lives inside object storage. Access typically requires specialized tools, and files remain detached from the collaboration layer most teams rely on day to day. For many organizations, that collaboration layer is already SharePoint. It sits behind Teams, integrates directly with Microsoft 365 apps, and provides the structure needed for permissions, version history, and auditing. When files remain isolated in iDrive e2, teams often resort to manual downloads, duplicated uploads, or ad-hoc syncing just to make the data usable. Moving selected data into SharePoint is not about replacing object storage. It’s about recognizing when files shift from being archived assets to active working material. The challenge lies in moving that data efficiently, without routing large volumes through a local machine or introducing unnecessary operational overhead. This article looks at why teams increasingly surface iDrive e2 data inside SharePoint, what to consider before doing so, and how to move files directly between cloud services without local downloads.
iDrive e2 is an S3-compatible object storage service designed for scale and cost efficiency. It’s commonly used for backups, media archives, application exports, and datasets that need to be stored reliably without constant human interaction.
In practice, iDrive e2 works best when files are produced by systems rather than edited by people. Access is typically handled through APIs, compatible tools, or scheduled jobs, making it well suited for backend workflows but less intuitive for day-to-day collaboration.
- Object-based storage: Files are accessed via buckets and keys, not folders in a workspace.
- S3-compatible tooling: Works with a wide range of backup and sync utilities.
- Optimized for scale: Designed to hold large volumes of data efficiently.
- System-oriented access: Best suited for applications and automation.
- Limited collaboration features: No native document-level workflow or version discussion.
Microsoft SharePoint is built around how teams actually work with files. Instead of acting as a passive storage layer, it provides structure, identity-aware access, and deep integration with Microsoft 365 tools.
Files stored in SharePoint live inside sites and document libraries that reflect real business contexts — projects, departments, or shared initiatives — making them easier to manage and collaborate on over time.
- Workspace-oriented design: Content is organized by teams and use cases.
- Native Microsoft 365 integration: Works seamlessly with Teams, Outlook, and Office.
- Identity-driven permissions: Access follows users and groups, not static credentials.
- Automatic version history: Changes are tracked without manual intervention.
- Compliance and governance: Retention, auditing, and policy controls are built in.
While both platforms store files, they are designed for fundamentally different stages of the data lifecycle. iDrive e2 focuses on efficient storage and retrieval at scale, whereas SharePoint is optimized for collaboration, governance, and long-term document use.
| Aspect | iDrive e2 | Microsoft SharePoint |
|---|---|---|
| Primary Role | Scalable object storage | Collaborative document platform |
| Data Organization | Buckets and object keys | Sites and document libraries |
| Access Model | Access keys and API-based tools | User identity and policy-based access |
| Collaboration | External or manual | Built-in and real-time |
| Typical Usage | Backups, archives, system output | Active documents and team workflows |
In short, iDrive e2 is well suited for storing data at scale, while SharePoint is where that data becomes accessible and useful to people.
Moving data from iDrive e2 into SharePoint is rarely about copying everything. It’s usually more effective to identify which datasets have become active and need to be accessible to teams, rather than mirroring entire buckets blindly.
Structure also matters. Object storage does not enforce hierarchy in the same way SharePoint does, so planning target sites and libraries ahead of time helps prevent clutter and permission issues later on.
Finally, consider transfer reliability. Large datasets and ongoing workflows benefit from cloud-based transfer methods that don’t depend on a single workstation staying online for hours or days.
Method 1: Download from iDrive e2 and Upload via SharePoint Web Interface
Step 1: Export Files from iDrive e2 to a Local Workspace
Start by accessing your data stored in iDrive e2 using a compatible web console or a desktop client that supports S3-compatible storage. Once authenticated, browse the relevant bucket and locate the objects or prefixes that need to be made available in SharePoint.
Download the selected files to a local working directory. For small collections, this step is usually straightforward. For larger datasets, however, the download speed will depend on both your network connection and the size of the objects being retrieved. After the download completes, it’s a good idea to confirm that filenames and directory structure match what you expect before continuing.
⬇️ Pull data from iDrive e2 object storage onto a local machine

Step 2: Upload Files into SharePoint Through the Browser
Once the files are available locally, open your SharePoint site in a browser and navigate to the target document library. Files and folders can be uploaded either by using the Upload option in the SharePoint toolbar or by dragging them directly into the library view. SharePoint will automatically recreate the folder structure based on the uploaded content.
This is often the moment where differences between object storage and collaboration platforms become apparent. Data in iDrive e2 is typically organized for storage efficiency or application logic, whereas SharePoint libraries are usually structured around teams, projects, or business processes. Adjusting the destination library or splitting uploads across multiple libraries can help avoid a messy layout later.
⬆️ Push downloaded files into the appropriate SharePoint document library
Downloading files locally and uploading them through the SharePoint web interface works well for limited, one-time transfers. As soon as file counts grow, datasets become larger, or transfers need to be repeated, this approach starts to show its weaknesses. Local storage limits, browser timeouts, and the need to keep a computer online all become constraints. In those situations, more automated or cloud-based transfer methods are usually a better long-term option.
Method 2: Syncing iDrive e2 with SharePoint Using Rclone
Step 1: Install Rclone and Configure Storage Remotes
For teams that prefer scripted workflows or repeatable migrations, rclone provides a powerful bridge between object storage and SharePoint. Rather than working through a browser, rclone treats both systems as addressable storage endpoints that can be copied or synchronized directly.
Begin by installing a recent version of rclone on a machine with a stable
network connection. Once installed, open a terminal and launch the interactive
configuration wizard using rclone config.
Each connection you define becomes a named “remote” that rclone can reference
in commands.
-
iDrive e2 remote:
iDrive e2 is configured using rclone’s
s3backend. During setup, you’ll provide the access key, secret key, and the iDrive e2 endpoint specific to your region. Buckets and object prefixes are then exposed as paths that rclone can read from or write to. -
SharePoint remote:
SharePoint access is configured through the
onedrivebackend. When prompted to select the Microsoft storage type, choose SharePoint. After authenticating with a Microsoft 365 account, you can select the target site and document library where the files should be stored.
Step 2: Execute the Transfer or Sync Operation
Once both remotes are defined, moving data becomes a command-line operation. For example, copying objects from an iDrive e2 bucket into a SharePoint document library can be done with a simple copy command:
rclone copy idrivee2:project-data sharepoint:/SharedDocuments/ProjectData --progress
This performs a one-way transfer and leaves the source bucket unchanged. If your goal is to keep SharePoint continuously aligned with data produced in iDrive e2, a synchronization command may be more appropriate:
rclone sync idrivee2:exports sharepoint:/Exports --progress --exclude "*.tmp"
Before running large jobs, it’s highly recommended to test with
--dry-run.
This allows you to see exactly which objects would be copied or removed
without modifying data on either side.
Rclone works well for scheduled or repeatable transfers and offers fine-grained control over filtering, concurrency, and bandwidth usage. However, it also introduces operational overhead. Credentials are stored locally, SharePoint site selection can be non-obvious, and long-running jobs depend on the stability of the machine where rclone runs. For teams without dedicated automation infrastructure, this complexity can outweigh the flexibility.
Method 3: Direct Cloud-to-Cloud Transfer from iDrive e2 to SharePoint
Overview: Move iDrive e2 Data into SharePoint Without Local Downloads
CloudsLinker is designed for situations where downloading data to a personal computer is impractical or risky. Instead of using a browser or a local sync tool, transfers run entirely in the cloud. Files move directly from iDrive e2 object storage into Microsoft SharePoint Online, without passing through your device. Once a task is started, it continues running even if you close the browser or go offline.
Step 1: Add iDrive e2 as the Source Storage
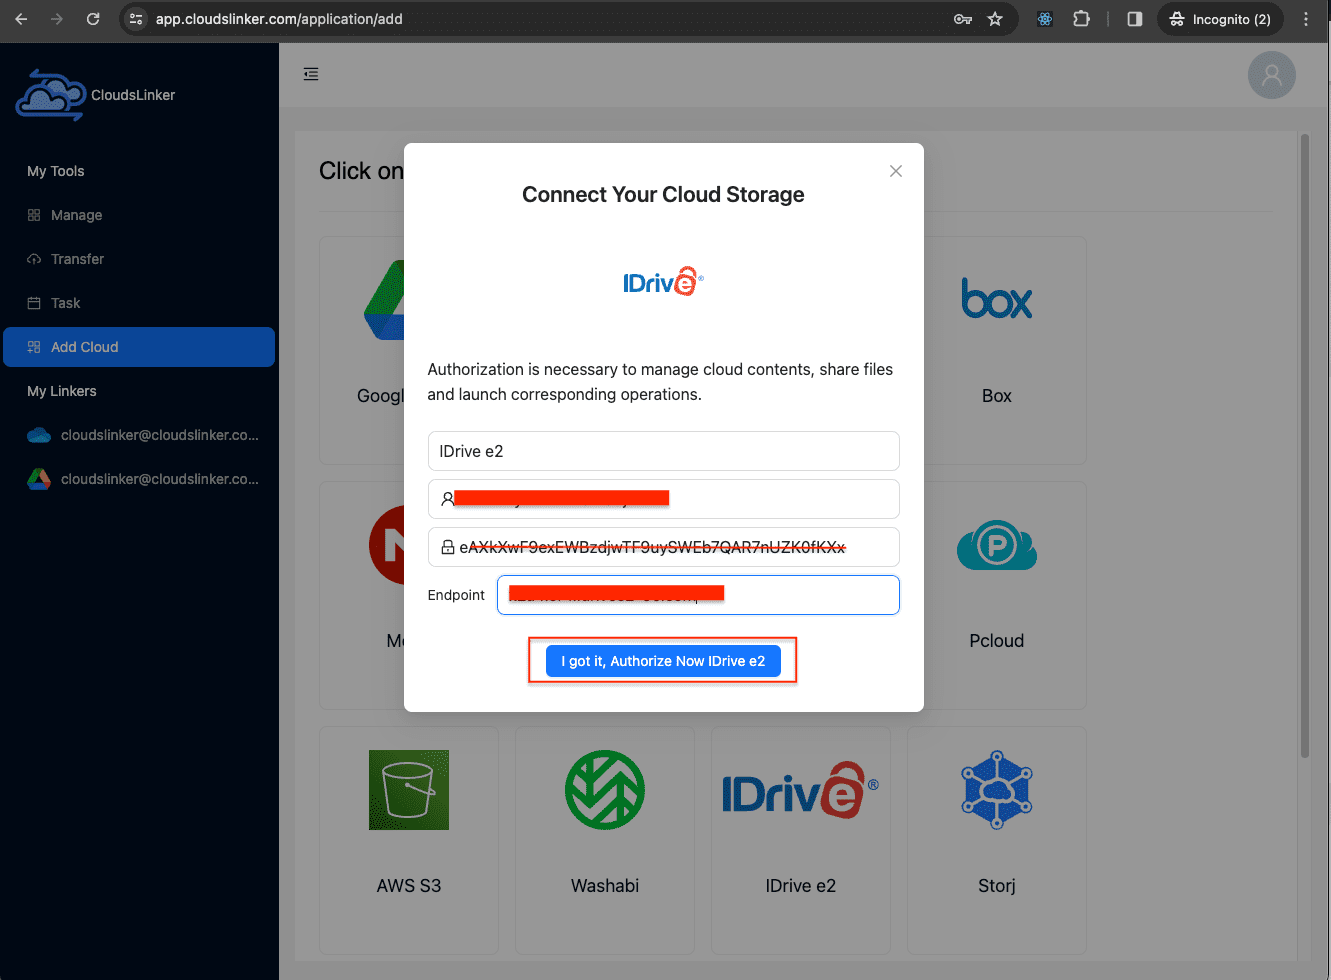
Log in to app.cloudslinker.com and open your dashboard. Click Add Cloud and select iDrive e2 from the supported storage providers.
To connect iDrive e2, you’ll need three pieces of information: an Access Key, a Secret Key, and the correct endpoint for your region. These credentials can be generated from the iDrive e2 management console and are used to grant programmatic access to your buckets.
After entering the credentials, CloudsLinker will validate the connection and list available buckets. You can optionally restrict access to a specific bucket or path, which is useful when you only want to migrate a subset of stored data rather than exposing the entire storage account.
Step 2: Connect SharePoint as the Destination
Next, add Microsoft SharePoint as the destination. Sign in with a Microsoft 365 account and approve access when prompted. CloudsLinker will then ask you to select the target SharePoint site where the transferred files should be placed.
If the selected site contains multiple document libraries, you can choose the exact library in advance. This helps ensure that files land in the correct workspace, especially in environments where different teams rely on separate libraries within the same site.

Step 3: Select Data and Map the Destination Folder
Open the Transfer page. On the left, choose your connected iDrive e2 source and browse the bucket paths you want to move. On the right, select SharePoint and choose the destination folder inside the previously selected document library.
This step is also an opportunity to rethink structure. Data in object storage is often organized around exports, timestamps, or application logic, while SharePoint works best when folders reflect projects, teams, or business context. Mapping the source layout into a clearer SharePoint structure now can save cleanup effort later.

Step 4: Run the Transfer and Track Progress
Start the task and monitor progress from the task panel. CloudsLinker provides visibility into transferred files, current status, and any errors encountered during the process. Tasks can be paused and resumed if adjustments are needed.
Once the transfer completes, a summary shows which files were successfully moved and which were skipped or retried. The data will then be available in SharePoint, ready to be shared and worked on within your existing Microsoft 365 environment.
For large datasets or ongoing workflows, this cloud-to-cloud approach removes common bottlenecks: no temporary local storage, no browser uploads, and no requirement to keep a workstation running for hours or days. Everything runs reliably in the background through CloudsLinker.
Working Across Multiple Cloud Platforms?
In addition to SharePoint, CloudsLinker supports data transfers across a wide range of cloud services, including OneDrive, WebDAV, MEGA, and more. All transfers run online, eliminating the need for long, fragile operations on a local computer.
Moving data out of iDrive e2 and into Microsoft SharePoint often sounds straightforward — until you decide how the transfer should actually run. Are you dealing with a handful of folders or tens of terabytes? Is this a one-time handoff or something that needs to repeat? And most importantly: do you want a laptop involved at all? The comparison below outlines how the three most common approaches tend to behave in real-world iDrive e2 → SharePoint scenarios.
| Approach | Setup Effort | Transfer Efficiency | Where It Works Best | Relies on Local Machine | Operational Complexity |
|---|---|---|---|---|---|
| Manual Download & Upload | Low | Moderate | Small datasets, quick one-off access | Yes | Low |
| Rclone (Command-Line) | Medium | High | Repeatable jobs, automation, controlled sync workflows | Yes | High |
| CloudsLinker (Cloud-to-Cloud) | Low | High | Large datasets, unattended transfers, minimal oversight | No | Low |
For small amounts of data, downloading objects from iDrive e2 and uploading them manually into SharePoint is often “good enough.” It requires almost no setup and gives immediate visual confirmation. The trade-off is scale: browser uploads, local disk limits, and network interruptions quickly become frustrating once data volumes grow.
Rclone is usually the next step when teams want precision and repeatability. It works well with iDrive e2 through its S3 backend and connects to SharePoint via the OneDrive interface. The flexibility is excellent, but it assumes someone is comfortable managing credentials, monitoring long-running jobs, and maintaining a stable execution environment.
When the goal is to avoid local dependencies altogether, a cloud-run transfer is often the least disruptive option. With CloudsLinker, data flows directly from iDrive e2 into SharePoint Online. There’s no browser upload session to babysit and no workstation that needs to stay online for hours or days.
Transferring content from object storage into SharePoint usually works best when a bit of planning happens first. iDrive e2 and SharePoint are designed for different purposes, and treating them as interchangeable file systems often leads to cleanup work later.
- Generate scoped credentials: Create access keys in iDrive e2 that only expose the buckets or paths required for the transfer. This reduces risk and keeps migrations focused.
- Decide what actually needs to move: Not all stored data belongs in SharePoint. Identify which datasets have become active or collaborative, rather than mirroring entire buckets by default.
- Plan SharePoint structure in advance: Choose the correct site and document library before transferring files. Mapping object-style layouts into a clearer SharePoint structure upfront is far easier than reorganizing later.
- Watch naming and path limits: SharePoint enforces limits that object storage does not. Long paths or unsupported characters can cause partial failures, so it’s worth scanning data before a large move.
- Match the method to how you operate: If you don’t want a local machine acting as a transfer engine, a cloud-based approach is usually more reliable. For teams with automation infrastructure, rclone can still be a good fit.
The smoothest transitions treat SharePoint as a collaboration workspace, not just another storage bucket. When the destination is planned properly, moving data out of iDrive e2 becomes far less disruptive.
iDrive e2 to SharePoint Migration FAQ
Video Walkthrough: Moving iDrive e2 Data into SharePoint
This short walkthrough is for readers who prefer to see the process in action. The video demonstrates how data stored in iDrive e2 can be transferred directly into Microsoft SharePoint using a cloud-based workflow. It covers connecting iDrive e2 with access keys and endpoints, selecting a SharePoint site and document library, applying basic transfer options such as filters or schedules, and running the migration without downloading files to a local computer. The entire process runs online and continues even if your browser is closed, making it well suited for both individual projects and business environments.
Conclusion
Making iDrive e2 data available in SharePoint changes how that data is used. Files that were once static become easier to review, share, and manage alongside everyday work. The goal is not migration for its own sake, but better alignment between where data lives and how it is consumed. Instead of downloading files locally and managing re-uploads, teams can transfer content directly between cloud platforms. With Cloudslinker, data moves from iDrive e2 into SharePoint without relying on a local computer or running long-lived desktop processes. Folder structures are preserved, transfers continue independently, and large datasets can be handled without consuming local bandwidth. For organizations that want to keep object storage for scale while enabling collaboration where it matters, bringing iDrive e2 data into SharePoint using Cloudslinker offers a practical and low-friction solution.
Online Storage Services Supported by CloudsLinker
Transfer data between over 48 cloud services with CloudsLinker

OneDrive

Google Drive

Google Photos

Shared Drive

OneDrive for Business

Dropbox

Box

Mega

pCloud

Yandex

ProtonDrive

AWS

GCS

iDrive

Storj

DigitalOcean

Wasabi

1fichier

PikPak

TeleBox

OpenDrive

Backblaze B2

Fastmail file

SharePoint

Nextcloud

ownCloud

Premiumize me

HiDrive

Put.io

Sugar Sync

Jottacloud

Seafile

Ftp

SFtp

NAS

WebDav

4shared

Icedrive

Cloudflare R2

Scaleway

Doi

iCloud Drive

iCloud Photos

FileLU

Zoho WorkDrive

Telia Cloud / Sky

Drime

Filen
Didn' t find your cloud service? Be free to contact: [email protected]
Further Reading
Effortless FTP connect to google drive: Transfer Files in 3 Easy Ways
Learn More >
Google Photos to OneDrive: 3 Innovative Transfer Strategies
Learn More >
Google Photos to Proton Drive: 3 Effective Transfer Techniques
Learn More >