Mega to TeraBox: Trading 20 GB Encrypted for 1 TB Headline Storage
Move files from Mega (20 GB free, E2EE) to TeraBox (1 TB free, 4 GB cap). Three honest methods, the limits that bite, and a practical step-by-step walkthrough.
Introduction
Mega's 20 GB free tier comes with zero-knowledge end-to-end encryption — files are encrypted on your device before they ever reach the server, so even Mega cannot read them. TeraBox advertises 1 TB free and that capacity gap is what brings most users here, but the trade is real: TeraBox stores files in plaintext on its own servers, caps a single free file at 4 GB, lands at roughly 80 GB of practical capacity once the 20-large-file ceiling kicks in, and throttles free downloads to about 200–800 KB/s. Mega has no OAuth — its connection model is email and password with client-side key derivation — and TeraBox has no public API at all, exposing only the browser session cookie as a third-party credential. This guide covers three methods that genuinely work for a Mega → TeraBox move and what each one costs in time, bandwidth, and trust.
Mega is a cloud-storage service operated by Mega Limited, a New Zealand company. It is best known for client-side, zero-knowledge end-to-end encryption: files are encrypted in your browser or app before upload, and the encryption keys are derived from your account password — Mega itself cannot read your files.
- Free tier: 20 GB base, with optional small bonus storage from achievements such as installing the desktop app.
- Paid plans: Pro Lite €4.99/month for 400 GB; Pro I €9.99/month for 2 TB; Pro II €19.99/month for 8 TB; Pro III €29.99/month for 16 TB.
- Encryption: client-side AES; lose the password and the recovery key, and the files are unrecoverable — even by Mega support.
- Connection: no OAuth. Third-party tools authenticate with email + password (and 2FA if enabled), then derive the encryption keys client-side.
- Tooling: MEGAsync (desktop sync), MEGAcmd (command-line, scriptable), browser app, and mobile apps.
TeraBox is a consumer cloud-storage service operated by Flextech Inc., the international spin-off of Baidu Netdisk. It markets a 1 TB free tier and, as of 2026, reports more than 700 million registered users, concentrated in South and Southeast Asia.
- Free tier: 1024 GB advertised, but capped at roughly 20 large files of 4 GB each — a practical ceiling near 80 GB.
- Premium: $2.99/month for 2 TB and a 20 GB single-file limit; Premium+ at $3.33/month.
- Free download throttle: roughly 200–800 KB/s with one concurrent file at a time.
- Connection: no public OAuth — authentication uses the browser login cookie (
ndus,ndut_fmt) exported from a logged-in session. - Service split:
terabox.com(international) and Baidu Netdisk (China) are separate accounts.
The headline gap is 20 GB versus 1 TB, but the real differences are encryption model and connection method — and those shape how a migration runs end-to-end. The table below is the short version.
| Feature | Mega | TeraBox |
|---|---|---|
| Free tier | 20 GB base; small bonus storage from achievements | 1 TB advertised; ~80 GB practical (20 × 4 GB cap) |
| Max single file | No documented per-file cap; bound by plan storage | 4 GB (Free) / 20 GB (Premium) |
| Paid storage entry point | €4.99/mo for 400 GB (Pro Lite) | $2.99/mo for 2 TB (Premium, annual) |
| Encryption | Zero-knowledge end-to-end (client-side AES) | Server-side at rest; no E2EE |
| Connection method | Email + password + 2FA (no OAuth) | Browser cookie (EditThisCookie or DevTools export) |
| Free download speed | Bandwidth-quota model; resets daily on free tier | ~200–800 KB/s, one file at a time |
| Official CLI | MEGAcmd (cross-platform, scriptable) | None published |
| Region / jurisdiction | New Zealand operator; EU and other data centers | Singapore / Asia infrastructure; operator HQ in the British Virgin Islands |
A few checks before the first byte moves will save the most time later. Mega's bandwidth-quota model on the free tier and TeraBox's silent rejection of files over 4 GB are the two edges that catch most first-time migrations.
- Inventory files larger than 4 GB on Mega. They will not upload to a free TeraBox account, and TeraBox returns a non-obvious error when they fail. In the Mega web app, sort the file list by size, or use MEGAcmd's
find --size +4Gto enumerate them. Either split them locally before upload or upgrade to TeraBox Premium ($2.99/month) before transferring. - Confirm your Mega recovery key is saved somewhere safe. Mega's zero-knowledge encryption means a forgotten password without a recovery key destroys the data. If you plan to use Mega's "ephemeral" transfer endpoints during the move (Methods 1–3 all rely on you being logged in), make sure you can still get back into the account afterward.
- Sign in to
www.terabox.com, not Baidu Netdisk. The two services use separate accounts. The cookie fromterabox.comonly authenticates the international service. - Estimate Mega's daily transfer quota for your data. Free Mega accounts share a rolling bandwidth quota across IPs — large downloads can stall mid-job until the quota resets the next day. If your dataset is more than ~5 GB, splitting the move into multiple days, or running it from a Pro account, avoids the surprise pause.
- Decide whether the 80 GB free TeraBox ceiling is enough. If your Mega contents are above that, the $2.99/month TeraBox Premium plan is usually cheaper than splitting the upload across multiple free accounts.
Method 1: MEGAsync or Browser Download, Web Upload to TeraBox
Step 1: Download Files from Mega
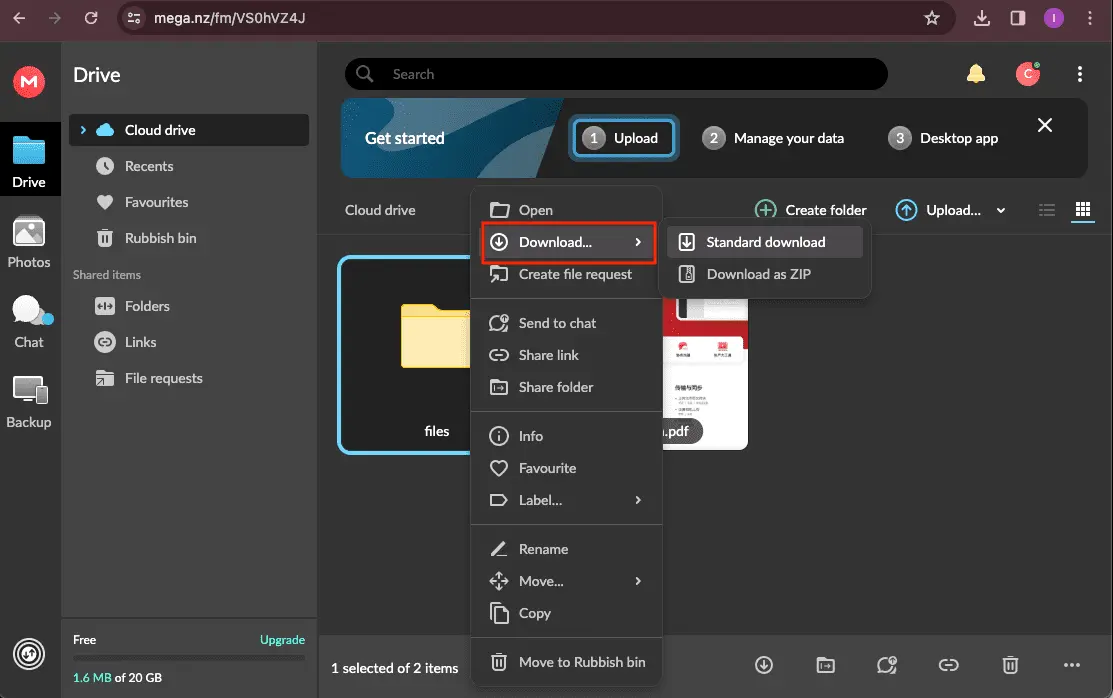
The two practical Mega-side options on this path are the web app and MEGAsync. In the web app at mega.nz, sign in, select the files or folders you want, and click Download. Mega bundles folders into a ZIP on the fly, decrypting client-side as it streams. The ZIP route is fine for a few gigabytes; past that, the browser tab and the encryption overhead make MEGAsync the better choice.
With MEGAsync, install the desktop client, sign in, and configure a one-way sync from your Mega cloud root (or a specific folder) to a local directory. The client decrypts each file on download and writes the plaintext copy to disk. Once the sync settles — the tray icon shows a green check — pause it so it does not push local changes back to Mega while you are uploading to TeraBox.
Step 2: Verify the Local Copy and Inventory Oversized Files
Run a quick sanity check before uploading anything. On macOS or Linux, find ./mega-export -type f | wc -l gives the total file count to compare against what Mega showed. To find files that will fail on free TeraBox, find ./mega-export -type f -size +4G lists the ones over the 4 GB cap. On Windows, sort the extracted folder by size in Explorer and scroll to the top.
This is the only chance to catch a partial Mega download — for example, a paused transfer that resumed but skipped a few files because the bandwidth quota tripped — before the data crosses into TeraBox.
Step 3: Upload to TeraBox via the Web App
Open terabox.com in a browser and sign in. Use Upload → Upload Folder for batches, or drag and drop into the file list. TeraBox's free tier rejects any single file above 4 GB with a non-obvious error message — if an upload silently disappears from the queue, that is almost always why. Premium accounts can push files up to 20 GB.
Free uploads on TeraBox are not as throttled as downloads, but the service does cap concurrent uploads from a single browser session, so a folder of a few thousand small files takes longer than a single multi-GB file. Leave the tab open and the screen unlocked — TeraBox pauses uploads when the browser is backgrounded for too long.
This method is a good fit for working files in the low-tens-of-gigabytes range. It needs no extra accounts and no tooling, but it is bound by your local download speed from Mega and your upload speed to TeraBox, and the browser must stay awake for both halves of the round trip.
Method 2: MEGAcmd CLI Export, Then Upload to TeraBox
Step 1: Install MEGAcmd and Sign In
Download MEGAcmd for your OS — packages exist for Windows, macOS, and major Linux distributions. Once installed, the binary is mega-cmd on Linux/macOS and adds a Windows command shell on Windows. Sign in once with mega-login [email protected]; MEGAcmd prompts for the password and, if 2FA is enabled, the verification code. The session persists across terminal sessions until you run mega-logout.
Step 2: Export the Mega Tree to a Local Directory
Pull the tree with mega-get /Camera /home/you/mega-export — substitute the Mega path you want and the local target. mega-get recursively decrypts and downloads, preserving folder structure. For a sanity check before downloading, mega-ls -lR /Camera | wc -l shows how many items you are about to pull, and mega-du /Camera reports total size.
MEGAcmd respects the same daily bandwidth quota as the GUI on free accounts. If a transfer pauses partway, it is almost always the rolling quota — wait until the next day or run it from a Pro account. The CLI's main advantage over MEGAsync is that it runs cleanly on a headless server (a VPS, a NAS, an old laptop), which lets you decouple the download leg from your laptop's uptime.
Step 3: Upload the Local Tree to TeraBox
TeraBox does not publish a CLI or an upload API, so the upload leg still goes through the web app. From the machine that holds the exported tree, sign in at terabox.com, create a destination folder (for example /Backups/mega-2026-05/), and use Upload Folder on the local export. If you ran MEGAcmd on a remote box, mount that machine's filesystem locally first (over SFTP or SMB) and point the upload there — TeraBox's web app accepts a network drive as a folder source.
This method is the right pick when MEGAsync's GUI is not an option — for example, when running Mega on a small headless server, or scripting the whole export as part of a backup pipeline. It is the wrong pick when the goal is fewest moving parts: Method 1 is simpler if you can stay at a single workstation.
Method 3: Transfer Mega to TeraBox Directly in the Cloud
Cloud-to-Cloud Transfer Without Local Downloads
CloudsLinker moves files directly between Mega and TeraBox on its own servers. Your machine does not need to be online for the duration, Mega's free-tier bandwidth quota does not bind your home IP, and TeraBox's per-session free-tier throttle does not apply because the read happens inside the data center, not over your home connection.
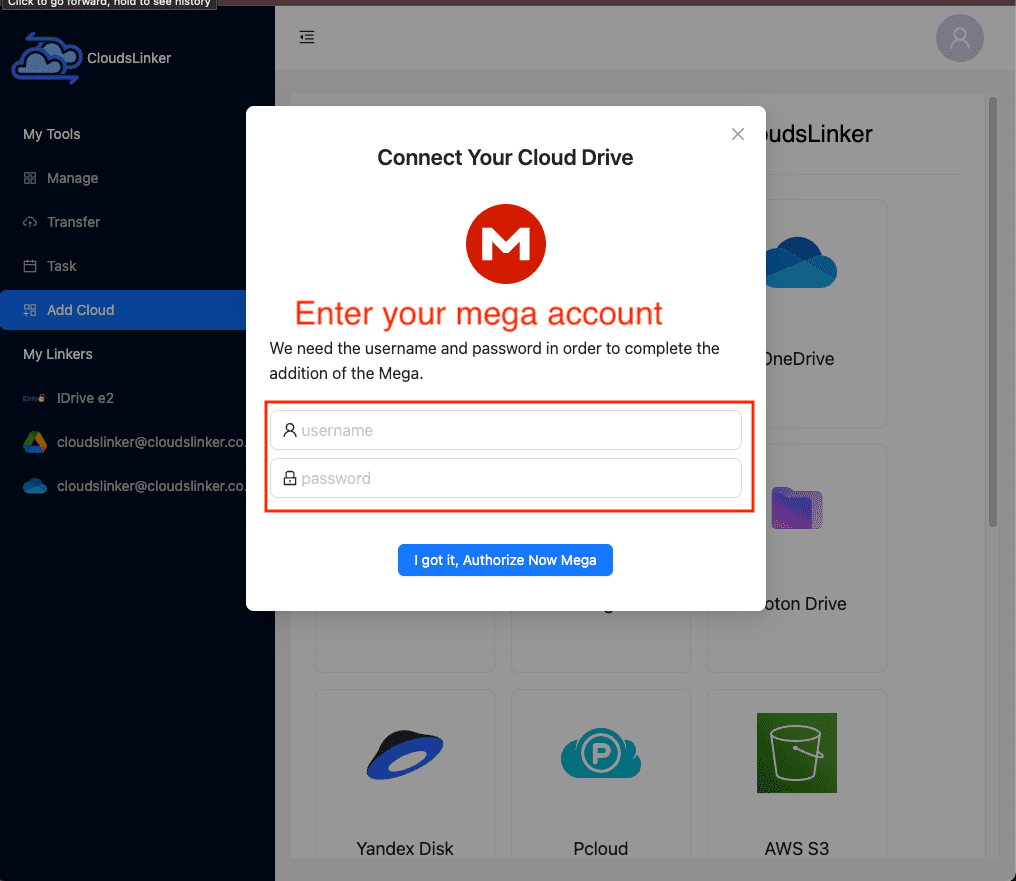
Step 1: Connect Mega (Email + Password)
In CloudsLinker, click Add Cloud → Mega. Enter the Mega account email and password. If 2FA is enabled, you will be prompted for the 6-digit verification code from your authenticator app. Mega's encryption keys are derived from the password client-side during sign-in, which is why the password (rather than an OAuth token) is required — there is no other way to decrypt the files.
To revoke access later, change the Mega password. The next sign-in attempt with the old credentials will fail, and any in-flight CloudsLinker job that still holds an active session will pause once its session expires.
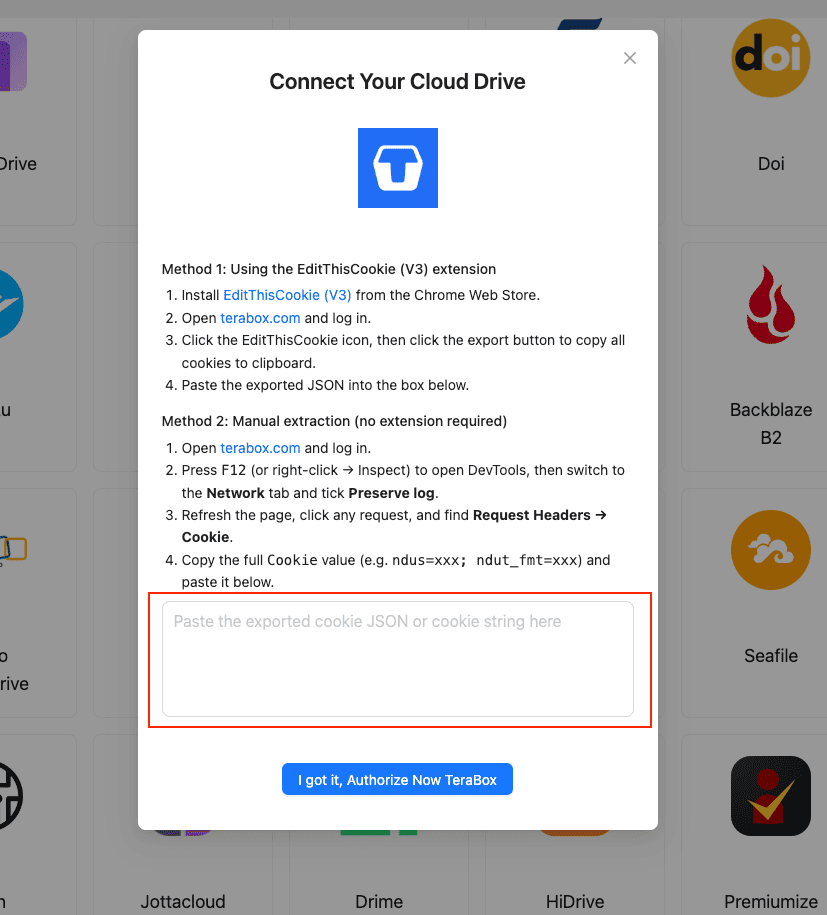
Step 2: Connect TeraBox (Browser Cookie)
TeraBox does not publish an OAuth or developer API, so the connection uses the same browser session cookie your logged-in TeraBox tab already has. The recommended path is the EditThisCookie (V3) Chrome extension:
- Install EditThisCookie (V3) from the Chrome Web Store.
- Open
www.terabox.comin the same browser and confirm you are logged in. - Click the EditThisCookie icon → Export. The cookie set is copied to your clipboard as JSON.
- In CloudsLinker, click Add Cloud → TeraBox → enter a display name → paste the JSON into the cookie field → Confirm.
If you cannot install an extension, the DevTools fallback works: open DevTools (F12) → Network → tick Preserve log → refresh the page → click any request → copy the full Cookie header value (typically ndus=...; ndut_fmt=...) and paste that string into CloudsLinker.
Step 3: Configure the Transfer
Open the Transfer section. Select your connected Mega as the source and browse to the folders you want to move. On the destination side, select TeraBox and pick or create a target directory.
Apply filters to keep oversized files out of a free TeraBox account: a file-size filter at 4 GB for free tier or 20 GB for Premium catches anything that would fail on the destination. Modification-date filters help when archiving — for example, only files older than 12 months. Choose Copy to leave the Mega originals in place, or Move to delete them after a successful transfer (recommended only after you have spot-checked the TeraBox copy).
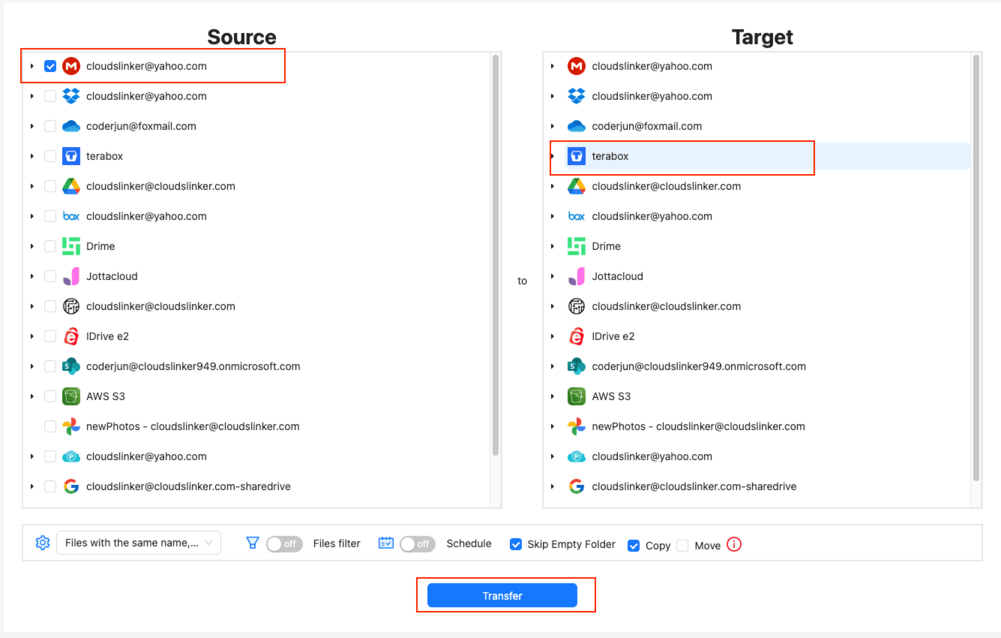
Step 4: Start and Monitor the Transfer
Click Start. The Task List shows transferred size, current speed, and remaining items. The transfer runs entirely in the cloud — closing the browser does not stop it. If your TeraBox cookie expires mid-job (logout, password change, or extended inactivity), the task pauses and CloudsLinker emails you to paste a fresh cookie instead of failing every queued file.
Practical throughput is shaped mostly by Mega's bandwidth-quota behavior on the source side and TeraBox's undocumented rate behavior on the destination. CloudsLinker handles HTTP 429 with exponential backoff so a long job survives short throttles instead of failing. After the run, download the transfer log (CSV with file path, size, status, timestamp) for your records.
Comparing the Three Ways to Transfer Mega to TeraBox
None of these methods is uniformly better — they trade off in different ways. The table below shows where each one fits.
| Method | Ease of Use | Speed | Best For | Uses Local Bandwidth | Skill Level |
|---|---|---|---|---|---|
| MEGAsync / Browser + TeraBox Web Upload | Very Low | Bound by home upload | Working files under ~30 GB | Yes | Beginner |
| MEGAcmd CLI + Manual Upload | Medium | Headless-server-friendly download leg | Scripted exports / NAS or VPS pipelines | Yes | Intermediate |
| CloudsLinker (Cloud-to-Cloud) | Low | Server-side; bypasses TeraBox throttle | Datasets above ~50 GB or unattended jobs | No | Beginner |
For a few gigabytes, Method 1 wins on simplicity. For pipelines you already run on a server — a NAS, a small VPS — MEGAcmd integrates with cron and shell scripts and decouples the download leg from your workstation. Once the dataset is large enough that you stop wanting to babysit a browser tab, or once Mega's bandwidth-quota pauses start interrupting the job, CloudsLinker's server-side path is the practical choice.
- Run a 1 GB test folder first. Pick a representative folder with mixed file types and migrate it end-to-end before committing to the full move. The TeraBox free tier silently drops files over 4 GB; a small dry run surfaces that before the big upload.
-
Understand what you are giving up on the encryption side. Mega is end-to-end encrypted; TeraBox is not. After the move, anything stored on TeraBox is readable by the operator under court order or a successful breach. For sensitive material, encrypt with Cryptomator or
agebefore upload, or keep it on Mega. - Watch the Mega bandwidth quota on free accounts. Mega rate-limits free downloads on a rolling daily quota. A multi-GB pull can pause until the next day. Splitting the move across days, or running a single Pro Lite month for the migration window, avoids the pause.
- Treat the TeraBox cookie like a password. It is account-equivalent for API access. Do not paste it into a screenshot, do not commit it, and rotate the TeraBox password if you suspect the cookie leaked — a password change invalidates the old session immediately.
- Keep the Mega originals until you have spot-checked TeraBox. Open three or four sample files on TeraBox after the transfer to confirm they downloaded and opened correctly. Only delete from Mega once verification is done — Mega's Rubbish Bin keeps deleted files for 30 days on free accounts (and longer on Pro), but a verified copy is cheaper than a recovery.
-
Plan around the international vs Chinese TeraBox split. Cookies from
terabox.comonly work for the international service. If your TeraBox account is on Baidu Netdisk, the migration path is different — neither this guide nor CloudsLinker's TeraBox connector covers it. - Revoke access after a one-shot move. On Mega: change the password, which invalidates active sessions and any third-party tool holding the old credentials. On TeraBox: log out of the source browser session or change the password — both invalidate the exported cookie immediately.
Frequently Asked Questions
age pipeline locally before upload, then upload the ciphertext to TeraBox.
mega-get "/Camera/2025-*" for a year-scoped pull. Method 3 (CloudsLinker) supports the most precise filtering: file-size caps, modification-date ranges, file-type filters, and per-folder source selection — useful if you want only files larger than X, or only files older than 12 months.
www.terabox.com in the source browser or change the TeraBox password. Either action invalidates the cookie on TeraBox's side and CloudsLinker's stored copy stops working at the same moment.
Watch: Transfer Files from Mega to TeraBox with CloudsLinker
A walkthrough of the cloud-to-cloud method, including signing into Mega with email and password, pasting the TeraBox cookie, configuring filters for the 4 GB free-tier cap, and monitoring the transfer in the Task List.
Conclusion
Pick a method by dataset size and how comfortable you are with command-line tooling. For a few gigabytes of working files, the MEGAsync or browser download path paired with TeraBox's web upload is the simplest: no extra accounts, no cookies, just two browser tabs. For a large export from a headless box or a server you already use as a download endpoint, MEGAcmd does the Mega side faster than the GUI and you upload the resulting tree to TeraBox once. For anything past 50 GB or any case where you do not want to keep a machine awake for the duration, CloudsLinker runs both legs server-side: it signs into Mega with your credentials, pushes into TeraBox with the cookie you exported, and survives TeraBox's undocumented rate-limit responses with retries. Whichever path you pick, inventory anything larger than 4 GB on Mega first — those files will not fit on a free TeraBox account.
Online Storage Services Supported by CloudsLinker
Transfer data between over 50 cloud services with CloudsLinker

OneDrive

Google Drive

Google Photos

Shared Drive

OneDrive for Business

Dropbox

Box

Mega

pCloud

Yandex

ProtonDrive

AWS

GCS

iDrive

Storj

DigitalOcean

Wasabi

1fichier

PikPak

TeleBox

OpenDrive

Backblaze B2

Fastmail file

SharePoint

Nextcloud

ownCloud

Premiumize me

HiDrive

Put.io

Sugar Sync

Jottacloud

Seafile

Ftp

SFtp

NAS

WebDav

4shared

Icedrive

Cloudflare R2

Scaleway

Doi

iCloud Drive

iCloud Photos

FileLU

Zoho WorkDrive

Telia Cloud / Sky

Drime

Filen

TeraBox

Internxt
Didn' t find your cloud service? Be free to contact: [email protected]
Further Reading
Effortless FTP connect to google drive: Transfer Files in 3 Easy Ways
Learn More >
Google Photos to OneDrive: 3 Innovative Transfer Strategies
Learn More >
Google Photos to Proton Drive: 3 Effective Transfer Techniques
Learn More >