NAS to TeraBox: Keep an Off-Site Copy on 1 TB of Free Cloud Storage
Back up NAS files to TeraBox for a free off-site copy. Upload from a mounted SMB share or run a cloud-to-cloud transfer through CloudsLinker. Honest 4 GB cap notes.
Introduction
TeraBox offers 1 TB of advertised free storage, which makes it a low-cost candidate for the off-site copy that every NAS setup is supposed to have but often does not. A NAS handles local storage and sharing well, but it sits in one building — a fire, theft, or failed RAID array takes the only copy with it. Pushing important folders to TeraBox creates a second copy outside the home or office at no recurring cost. The trade-off is TeraBox's 4 GB free per-file cap, which matters for disk images and large video masters but not for documents and photos. This guide covers two paths: uploading from a mounted SMB share, and a cloud-to-cloud transfer through CloudsLinker that connects the NAS over SMB and TeraBox through its session cookie.
A NAS (Network-Attached Storage) device — Synology, QNAP, TrueNAS, or similar — provides shared storage on a local network, usually over the SMB protocol on port 445. It is fast on the LAN but tied to a single physical location.
- Protocol: SMB on port 445 (also AFP, NFS on some units).
- Authentication: NAS user account and password; optional domain.
- Capacity: sized by installed drives, often many terabytes.
- Risk: single-location — fire, theft, or RAID failure loses data.
- Access: LAN by default; remote access requires port forwarding or VPN.
TeraBox is a consumer cloud storage service operated by Flextech Inc., the international branch of Baidu Netdisk. It advertises a 1 TB free tier with native apps across platforms.
- Free tier: 1024 GB advertised; ~80 GB practical given the 20 large-file cap.
- Per-file cap: 4 GB free; 20 GB on Premium.
- Off-site: data lives in TeraBox's data centers, outside your building.
- Connection: no public OAuth — third-party tools use the browser session cookie (
ndus,ndut_fmt). - Cross-platform apps: Windows, macOS, Android, iOS, web.
A NAS and TeraBox are complementary rather than competing. The NAS is fast local primary storage; TeraBox is a cheap off-site copy. Most setups keep both, with TeraBox holding a subset of the most important folders.
| Feature | NAS | TeraBox |
|---|---|---|
| Location | On-premises, single site | Off-site cloud data centers |
| LAN speed | Gigabit+ on local network | Internet-bound; free tier throttled |
| Capacity | Sized by drives (multi-TB) | 1 TB advertised; ~80 GB practical free |
| Per-file cap | Filesystem-bound | 4 GB free / 20 GB Premium |
| Disaster resilience | None on its own (single site) | Geographically separate copy |
On the NAS side
- Confirm SMB access: host IP, a user account with read access, password, port (445 default), and domain if used (default WORKGROUP).
- Prioritize what needs an off-site copy: irreplaceable photos and documents first; re-downloadable media is lower priority.
- Identify files over 4 GB: disk images, VM files, and video masters exceed the free TeraBox cap.
- Decide LAN vs remote: CloudsLinker needs the NAS reachable from the internet (port forward or VPN). If you cannot expose it, use the mounted-share method instead.
On the TeraBox side
- Create a TeraBox account at terabox.com.
- Mirror key NAS shares as folders (for example,
/NAS-Photos/,/NAS-Documents/). - Pick a tier: free if everything fits under 4 GB per file, Premium otherwise.
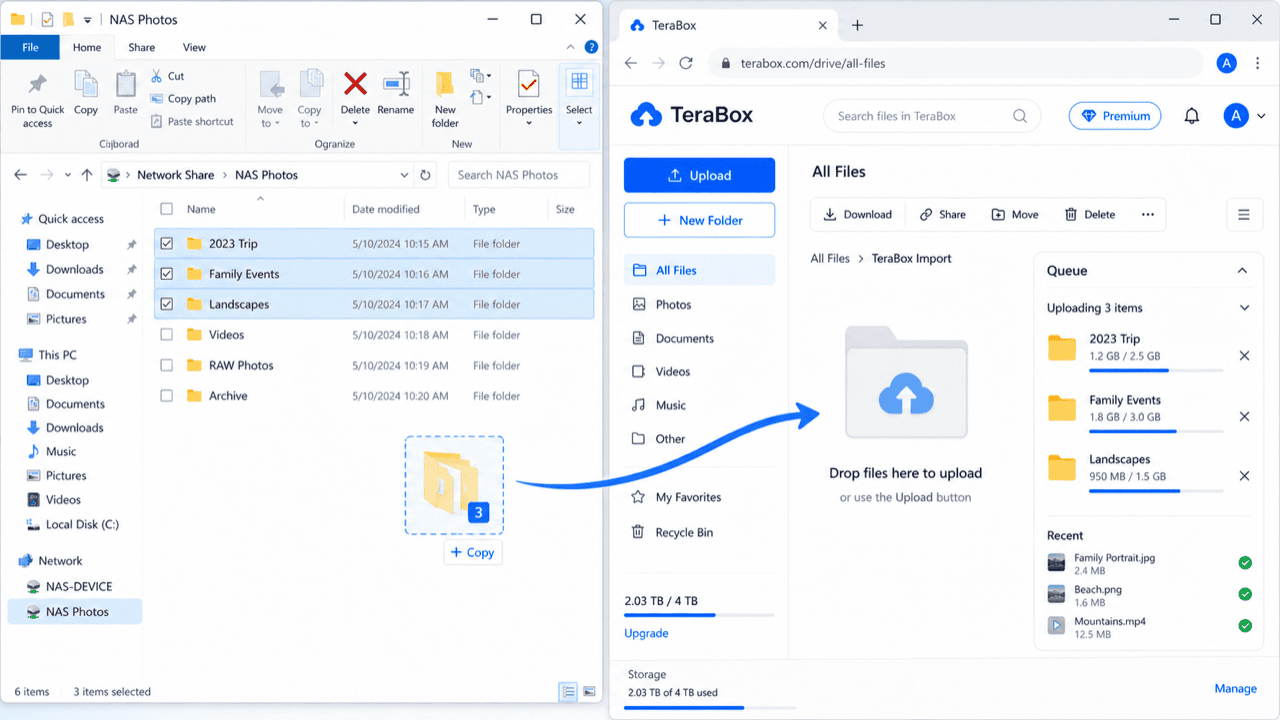
Method 1: Upload from a Mounted SMB Share
Step 1: Mount the NAS Share
On Windows, open File Explorer and enter \\NAS-IP\ShareName in the address bar, or
map it as a network drive. On macOS, use Finder → Go → Connect to Server and
enter smb://NAS-IP/ShareName. Authenticate with the NAS user account.
Step 2: Filter Oversized Files
Browse the share and identify any file over 4 GB if you are on a free TeraBox account. Disk images and large videos are the usual offenders. Plan to upgrade, split, or skip those.
Step 3: Upload to TeraBox
Install the TeraBox desktop app or open the web app. Drag folders from the mounted share into your TeraBox target directory. The desktop app handles large queues more reliably than the browser. Because data flows NAS → workstation → TeraBox, this method uses local bandwidth twice over — fine for a one-time copy of a few folders, slow for a full NAS.
Method 2: Cloud-to-Cloud Transfer with CloudsLinker
Push NAS Files to TeraBox Without a Workstation in the Middle
CloudsLinker connects the NAS over SMB and TeraBox through its session cookie. The transfer runs server-side, so a large off-site copy does not have to route through a desktop machine that stays online. The NAS must be reachable from the internet.
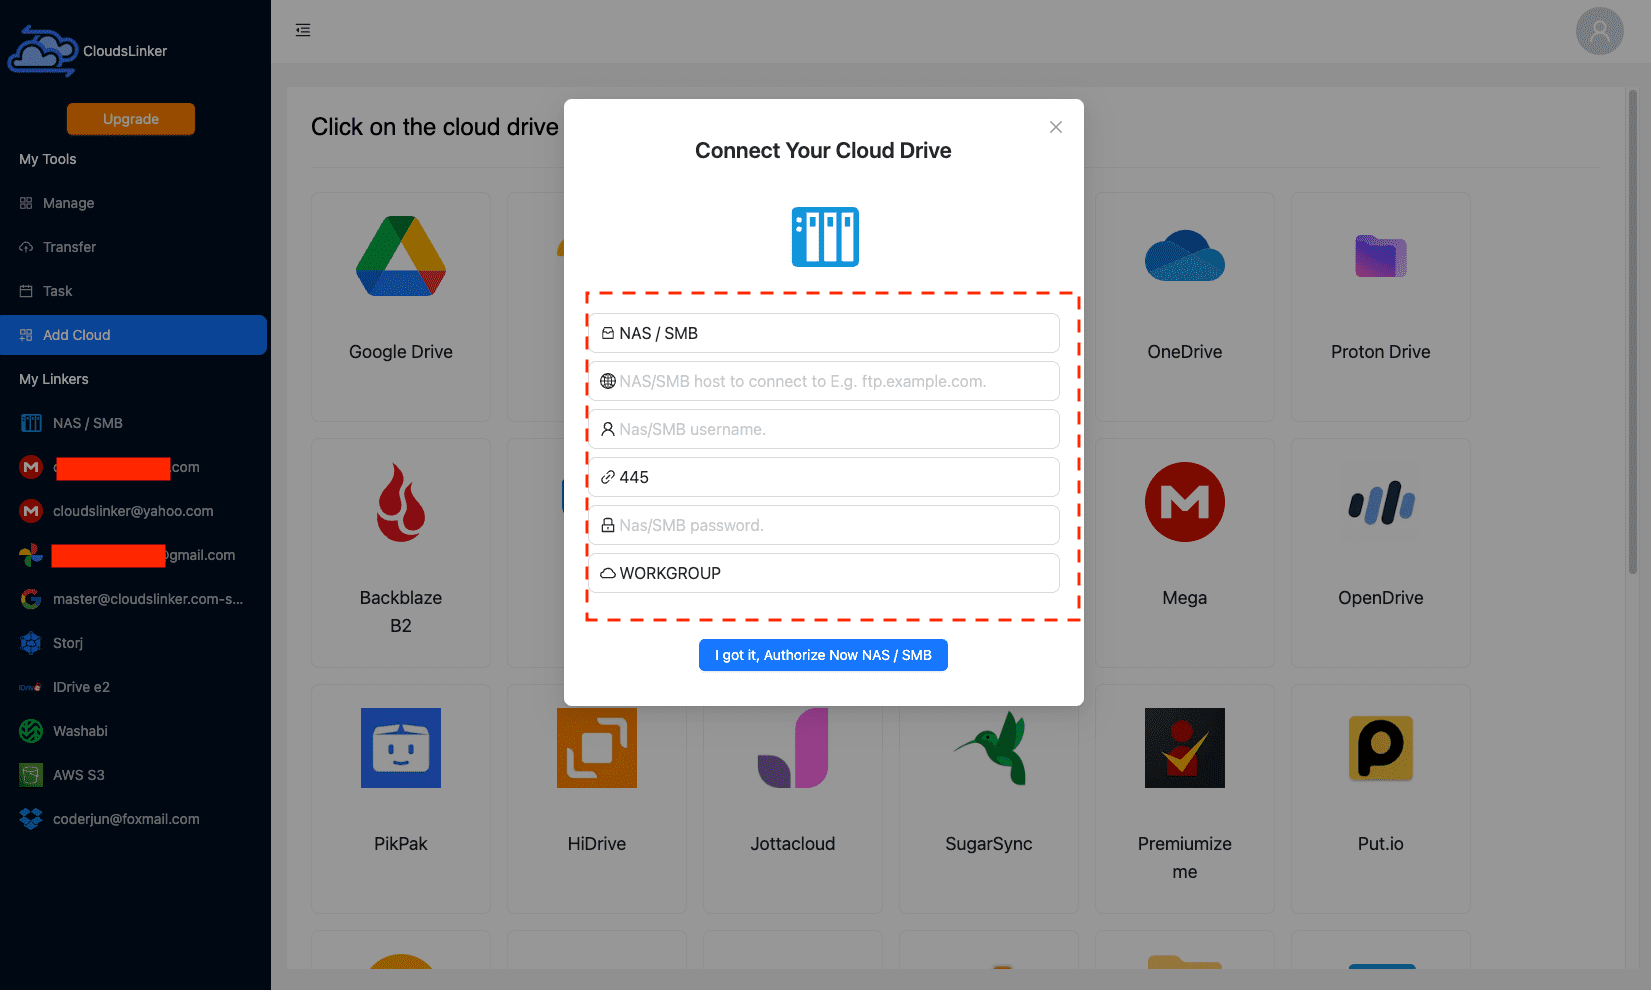
Step 1: Connect the NAS
In CloudsLinker, click Add Cloud and select NAS / SMB. Enter:
- Display name (anything you choose)
- Host — the NAS public IP or DNS name
- User and Password
- Port — 445 by default
- Domain — optional (default WORKGROUP)
The NAS must be network-reachable from CloudsLinker, which means a port-forward on 445 or a VPN path, and a firewall that allows the connection. If you cannot safely expose SMB to the internet, use the mounted-share method instead.
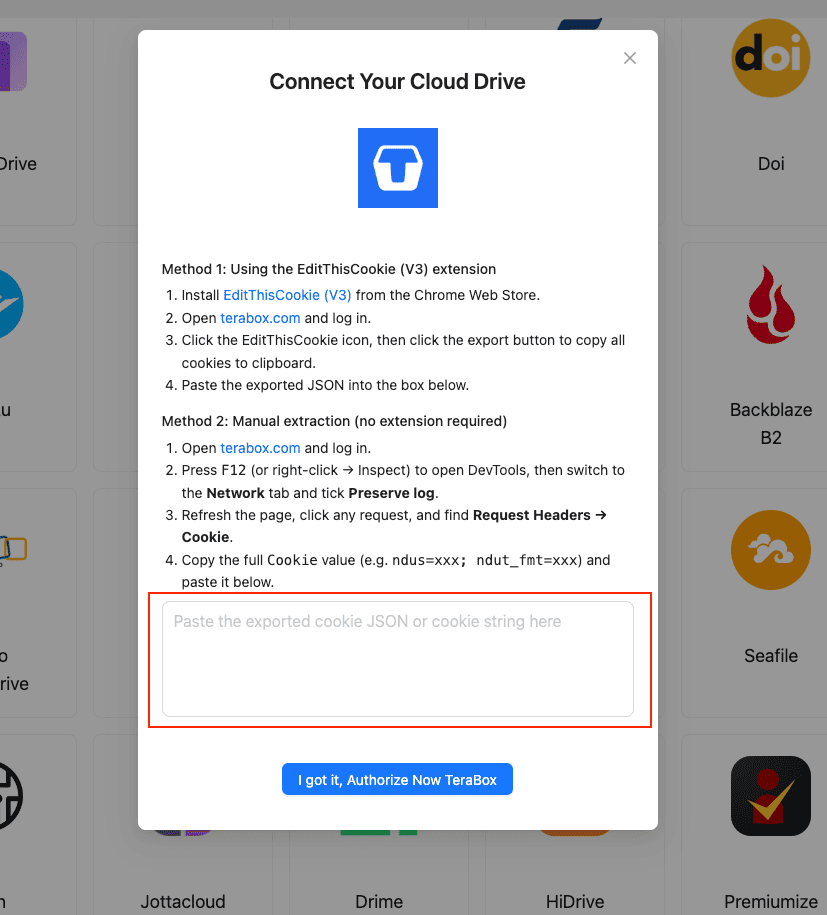
Step 2: Connect TeraBox (Browser Cookie)
TeraBox has no public OAuth, so the connection uses the cookie from your logged-in TeraBox tab:
- Install EditThisCookie (V3).
- Open
www.terabox.comin the same browser and confirm you are signed in. - Click the EditThisCookie icon → Export. The cookie JSON copies to your clipboard.
- In CloudsLinker, click Add Cloud → TeraBox → enter a display name → paste the JSON → Confirm.
Without an extension, open DevTools (F12) → Network, refresh the
page, and copy the full Cookie header (ndus=...; ndut_fmt=...).
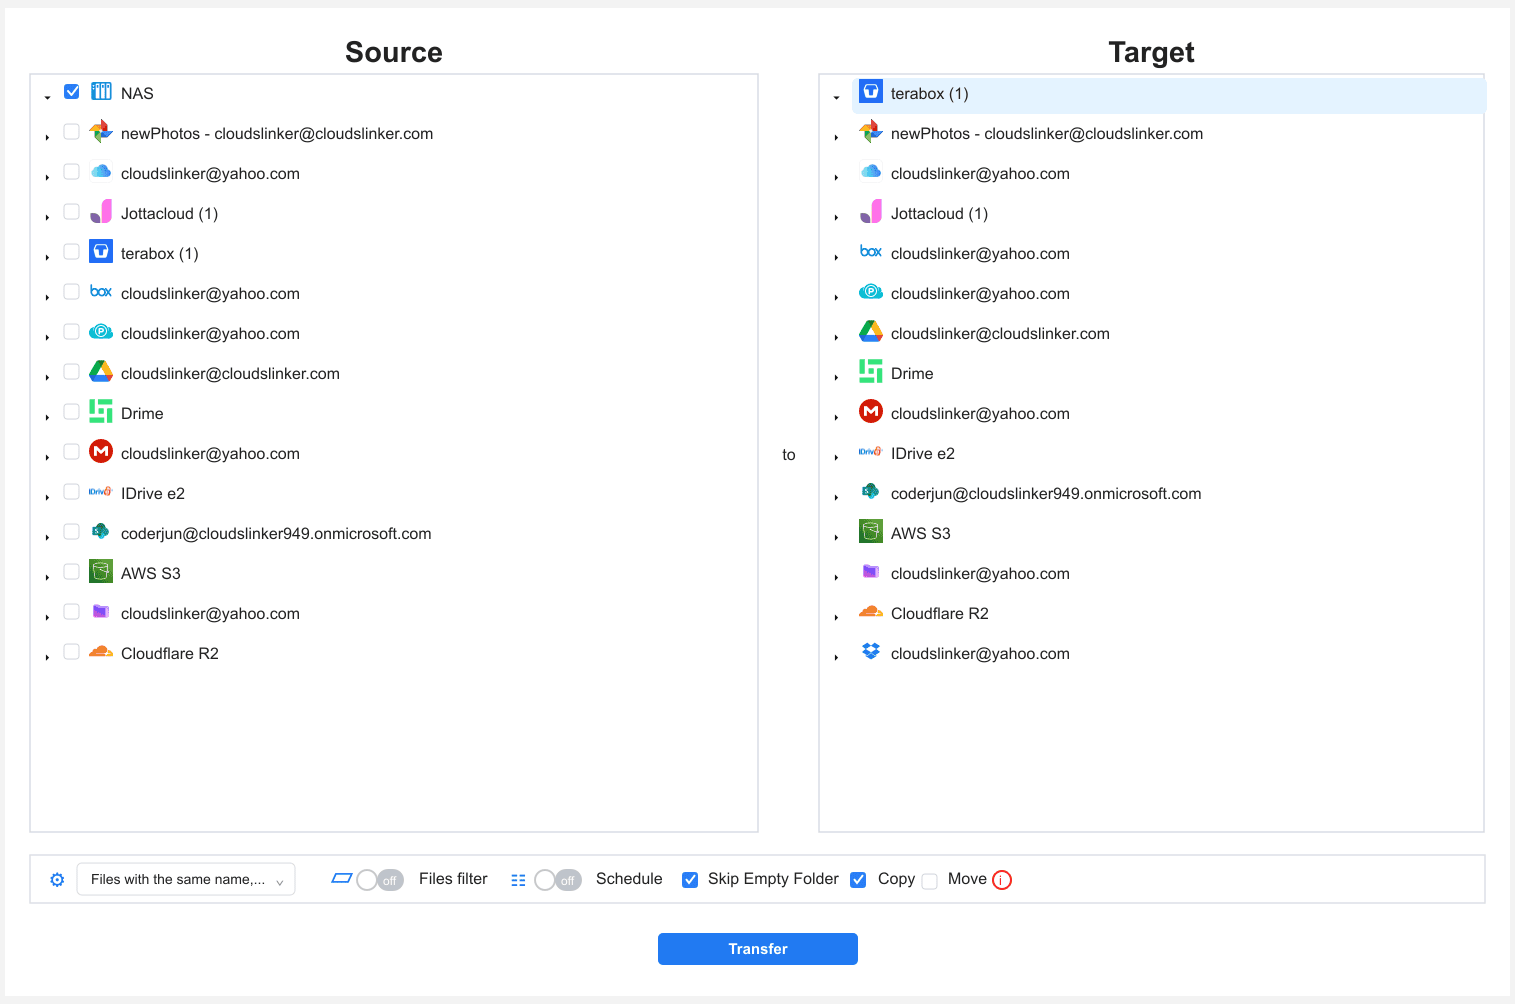
Step 3: Configure the Transfer
Open the Transfer section. Select the NAS source and browse to the shares or
folders you want copied off-site. Select TeraBox and pick the target directory. Apply a
4 GB file-size filter for free TeraBox, and extension filters to skip system files
like @eaDir (Synology thumbnails) or .DS_Store. Use Copy
mode — for a backup you never want Move.
Step 4: Start and Monitor
Click start. The Task List reports transferred volume and remaining items. If the TeraBox cookie expires mid-job, the task pauses and prompts you to paste a fresh cookie. After completion, spot-check files in TeraBox and download the CSV log for your backup records.
Method Comparison
| Method | Ease of Use | Speed | Best For | Uses Local Bandwidth | Skill Level |
|---|---|---|---|---|---|
| Mounted SMB Share + Upload | ★★★★☆ | ★★☆☆☆ | A few folders, NAS not exposed to internet | Yes (twice over) | Beginner |
| CloudsLinker | ★★★★☆ | ★★★★★ | Large standing off-site copy, internet-reachable NAS | No | Intermediate |
- Treat TeraBox as one leg of 3-2-1: three copies, two media types, one off-site. TeraBox is a good off-site leg, not a replacement for a local backup.
-
Exclude NAS system folders: Synology
@eaDir, QNAP.@__thumb, and recycle-bin folders clutter the copy. Filter them out. - Be careful exposing SMB to the internet: port 445 is a frequent attack target. Prefer a VPN path, or restrict the port-forward to CloudsLinker's address range, and use a dedicated read-only NAS account.
- Plan for the 4 GB cap: VM images, disk images, and 4K masters exceed it. Split, upgrade to Premium, or keep those only on the NAS.
- Use a read-only NAS account: for a backup push, the account CloudsLinker uses never needs write access. Limit it to read to reduce risk.
- Schedule periodic re-runs: a backup is only current if refreshed. Re-run the CloudsLinker task on a cadence so the off-site copy stays close to live.
Frequently Asked Questions
Conclusion
For a one-time copy of a few folders, mounting the NAS share and uploading through the TeraBox web or desktop app is straightforward. For a standing off-site copy of a large NAS — media libraries, project archives, photo collections — CloudsLinker connects the NAS over SMB and TeraBox via its cookie, running the transfer without routing everything through a workstation. Either way, identify files over 4 GB before the run, and treat TeraBox as one copy in a 3-2-1 backup plan rather than the only backup.
Online Storage Services Supported by CloudsLinker
Transfer data between over 51 cloud services with CloudsLinker

OneDrive

Google Drive

Google Photos

Shared Drive

OneDrive for Business

Dropbox

Box

Mega

pCloud

Yandex

ProtonDrive

AWS

GCS

iDrive

Storj

DigitalOcean

Wasabi

1fichier

PikPak

TeleBox

OpenDrive

Backblaze B2

Fastmail file

SharePoint

Nextcloud

ownCloud

Premiumize me

HiDrive

Put.io

Sugar Sync

Jottacloud

Seafile

Ftp

SFtp

NAS

WebDav

4shared

Icedrive

Cloudflare R2

Scaleway

Doi

iCloud Drive

iCloud Photos

FileLU

Zoho WorkDrive

Telia Cloud / Sky

Drime

Filen

TeraBox
Internxt

Degoo
Didn' t find your cloud service? Be free to contact: [email protected]
Further Reading
Effortless FTP connect to google drive: Transfer Files in 3 Easy Ways
Learn More >
Google Photos to OneDrive: 3 Innovative Transfer Strategies
Learn More >
Google Photos to Proton Drive: 3 Effective Transfer Techniques
Learn More >