OneDrive for Business to Drime: Escape Per-Seat Licensing for European Storage
Migrate OneDrive for Business to Drime with browser export, sync client bridge or cloud-to-cloud transfer through CloudsLinker. Keep files encrypted and GDPR-hosted.
Introduction
OneDrive for Business ties storage to Microsoft 365 seats — each licensed user gets 1 TB or more, and the bill scales with headcount rather than with actual data usage. For teams that do not need Office co-editing or SharePoint workflows, flat-rate storage on Drime can cut costs while moving data to French, GDPR-aligned hosting with end-to-end encryption. The migration path depends on size: a direct browser download for individual mailbox-sized folders, the OneDrive Sync client as a local bridge when you already have it running, or a cloud-to-cloud transfer through CloudsLinker when the volume is larger or spans multiple users.
OneDrive for Business is Microsoft's personal cloud storage for Microsoft 365 users. Each licensed seat receives a dedicated OneDrive with its own quota, sharing controls and Sync client.
- 1 TB (or more) per user: tied to Microsoft 365 licenses.
- Office integration: native co-editing with Word, Excel, PowerPoint.
- Sync client: Windows, Mac, iOS, Android.
- Retention and DLP: available through Microsoft Purview.
- Data residency: determined by Microsoft 365 tenant region.
Drime is a French cloud storage workspace with end-to-end encryption and flat-rate pricing. It runs outside the Microsoft stack and does not require per-user licensing.
- Flat storage pricing: priced by volume, not by seat.
- French data residency: servers in France under GDPR.
- End-to-end encryption: on stored files and shared links.
- Sharing controls: password-protected, expiring links with access logs.
- Folder-based layout: no site collection or document library concept.
The difference is structural. OneDrive for Business is a layer inside Microsoft 365 — billing, admin and identity are all tenant-level. Drime is a standalone storage account with its own admin area and no license coupling.
| Feature | OneDrive for Business | Drime |
|---|---|---|
| Billing model | Per-user Microsoft 365 seat | Flat storage tier |
| Data residency | Microsoft 365 tenant region | France |
| Encryption | Server-side; BYOK available on enterprise plans | End-to-end encryption |
| Office co-editing | Native | Not supported |
| Admin model | Microsoft 365 admin center, Azure AD | Drime account-level admin |
On the OneDrive side
- Note which users are in scope — every user has their own OneDrive. A tenant migration means one transfer job per user.
- Remove or archive retired data: do not carry over 2015 chat logs or duplicate drafts.
- List external shares you still want to keep alive — these will be reissued in Drime.
- Resolve long paths: OneDrive allows paths up to 400 characters; shorten deep folder names before transfer.
On the Drime side
- Create one folder per user (for example,
/Users/jane.doe/) to keep data scoped. - Verify plan capacity: total volume across OneDrive users must fit in the Drime plan.
- Generate a developer token: Drime → avatar → Settings → Developer → Create Token.
Method 1: Browser Download from OneDrive for Business
Step 1: Download from OneDrive
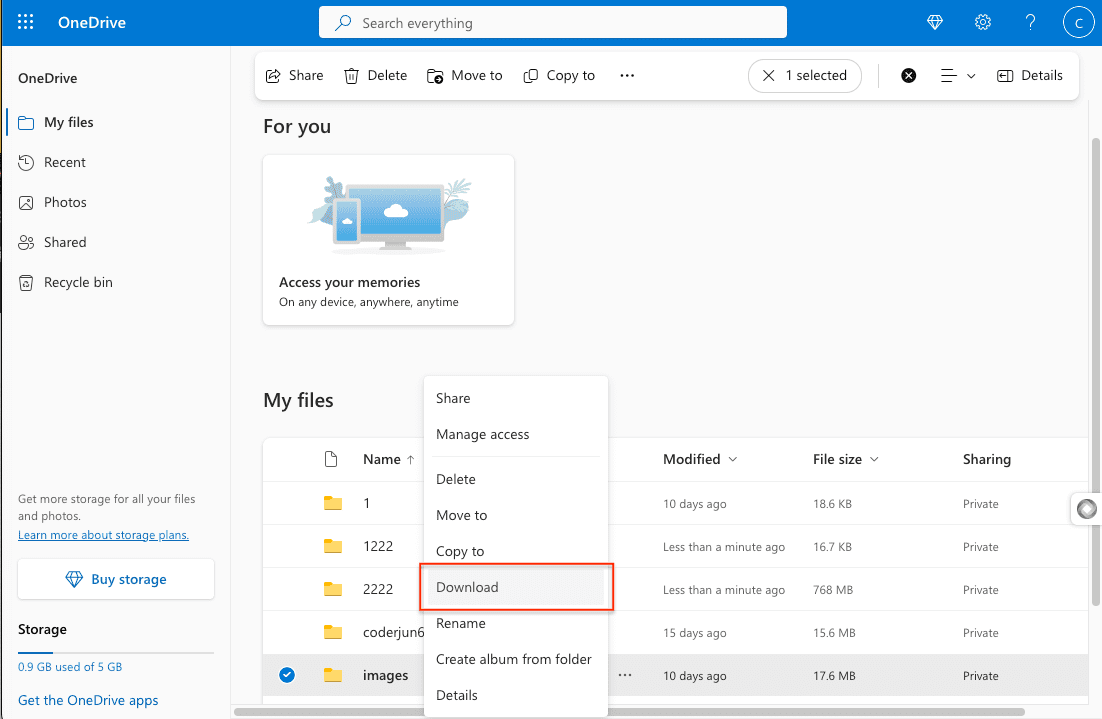
Open office.com,
sign in with the work account, and open OneDrive. Select folders or files — hold
Ctrl/Cmd for multi-select — and click Download. OneDrive
packages the selection into a ZIP file.
Very large libraries may exceed the per-request ZIP limit and download in pieces. In that case, download by subfolder or switch to the Sync or cloud-to-cloud method.
Step 2: Upload to Drime
Extract the ZIP and open the Drime web dashboard. Drag the extracted folder into your target directory. Drime preserves the folder structure and encrypts files on arrival.
Method 2: OneDrive Sync Client Bridge
Useful when OneDrive is already synced locally
If the OneDrive Sync client is already running on a Windows or Mac workstation, the synced folder can act as a staging area. Copy files out of OneDrive's folder into a neutral folder, then push them to Drime.
Step 1: Pin Files Locally
Open File Explorer or Finder and navigate to the OneDrive folder. Right-click the folders to migrate and choose Always keep on this device. This forces cloud-only files to land on disk. Wait for sync to complete — files should show a green check, not a cloud icon.
Step 2: Stage Files Outside OneDrive
Create a folder such as ~/Desktop/OneDrive-Migration/ outside the OneDrive directory.
Copy the pinned files into it. This detaches the copies from OneDrive sync, so deleting them
later will not affect the OneDrive source.
Step 3: Upload to Drime
Install Drime Desktop or use the web app, then drag the staging folder into the target directory. Once transfer completes and the files look right in Drime, delete the staging folder to free disk space.
Method 3: Cloud-to-Cloud Transfer with CloudsLinker
Move OneDrive for Business Without Local Staging
CloudsLinker connects OneDrive for Business and Drime directly, then transfers files server-side. The approach scales to multi-user migrations without needing a workstation to act as a staging host.
Step 1: Connect OneDrive for Business
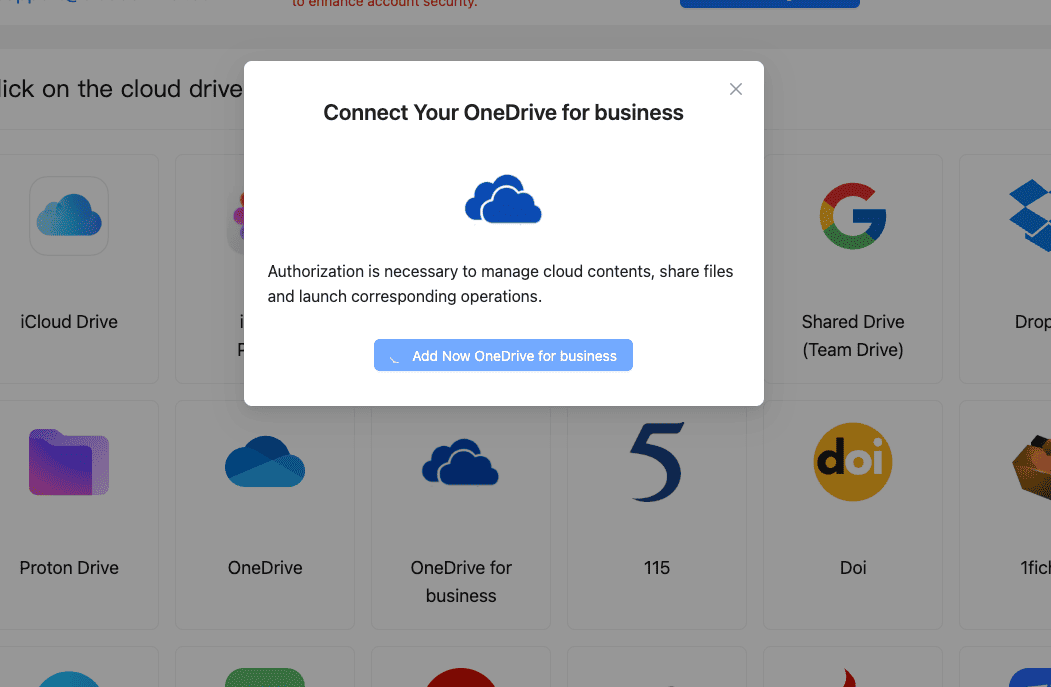
In CloudsLinker, click Add Cloud and select OneDrive for Business. Sign in with the Microsoft 365 work account. If your tenant has multiple drive resources, pick the one you want to connect. The account must have a valid Microsoft 365 license with OneDrive enabled.
Step 2: Connect Drime
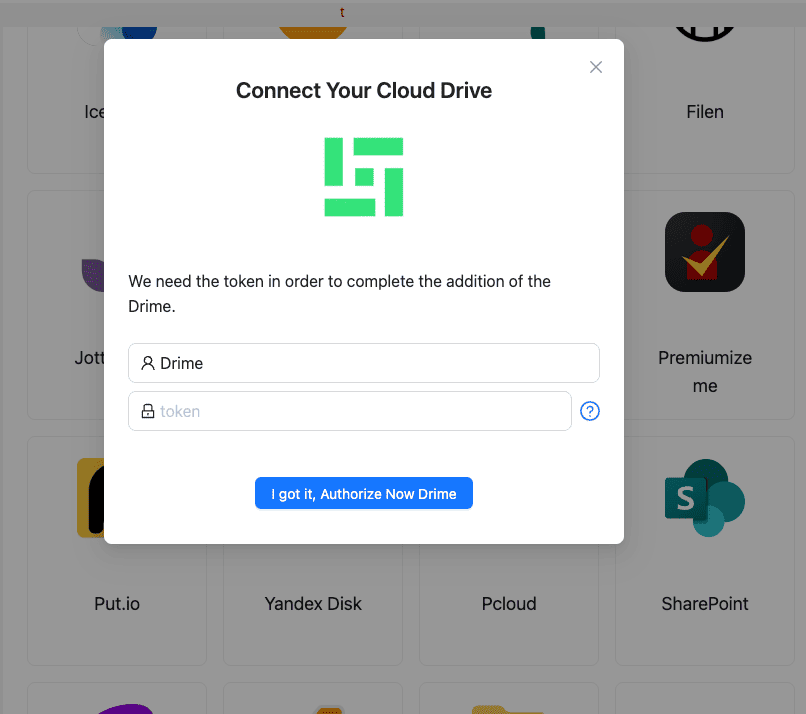
Click Add Cloud and select Drime. Paste the developer token from Drime → Settings → Developer. Confirm to add Drime as a destination.
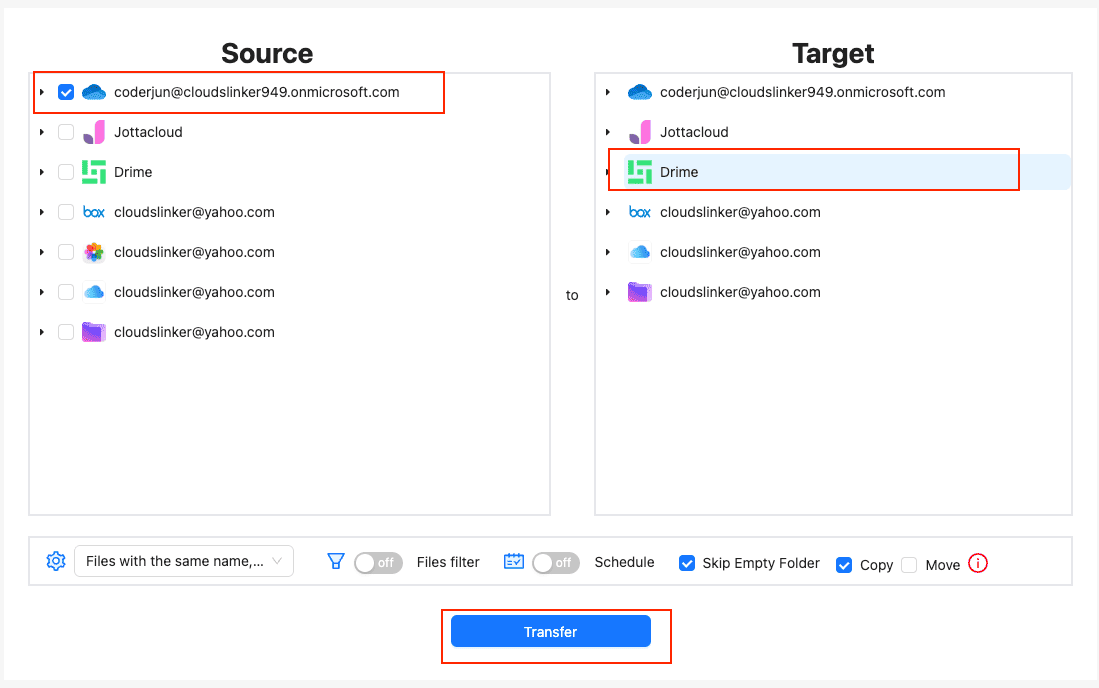
Step 3: Configure the Transfer
In the Transfer section, pick OneDrive for Business as the source and browse to the folders you want to move. Select the Drime destination folder. If you are migrating multiple users, create a task per user rather than a single mixed task — it makes retries easier.
Apply filters to skip files like .tmp, ~$* (Office lock files), or anything
older than a cut-off date.
Step 4: Start and Monitor
Start the transfer. Progress is visible in the Task List. CloudsLinker continues running server-side, so browser or workstation availability is not required. When the job completes, verify file counts in Drime per folder before instructing users to delete the OneDrive copies.
Method Comparison
| Method | Ease of Use | Speed | Best For | Uses Local Bandwidth | Skill Level |
|---|---|---|---|---|---|
| Browser Download + Upload | ★★★★☆ | ★★☆☆☆ | Single user, small libraries | Yes | Beginner |
| OneDrive Sync Bridge | ★★★☆☆ | ★★★☆☆ | Already-synced workstations | Yes | Intermediate |
| CloudsLinker | ★★★★★ | ★★★★★ | Multi-user tenants, large volumes, hands-off moves | No | Beginner |
- Migrate one user at a time: each OneDrive for Business is scoped to a user. Handling them individually makes ownership and verification easier.
- Respect admin policies: some tenants restrict third-party app access. Check with your Microsoft 365 admin before running OAuth consent for CloudsLinker.
-
Handle Office lock files: temporary lock files like
~$Report.docxare transferred as plain files. Filter them out at the CloudsLinker task level. - Recreate external shares: OneDrive share links do not migrate. Reissue access through Drime's password-protected, expiring links.
- Accept feature gaps: Drime has no version history, co-editing or retention labels. If those matter, keep a subset of files on Microsoft 365 or use a separate archiving tool.
- Watch license timing: do not remove Microsoft 365 licenses until you have confirmed Drime has the data. A removed license puts OneDrive into the 30-day retention window, and files disappear after that.
Frequently Asked Questions
/Users/ folder in Drime with a subfolder per
person. Migrations run one-by-one into their respective subfolder. This keeps the
equivalent of per-user OneDrives intact in Drime's flat structure.
Conclusion
Individual users with a few gigabytes can download from OneDrive for Business directly and upload to Drime through the web dashboard. If OneDrive is already synced on Windows or Mac, the sync folder makes a convenient staging area. For team-wide migrations or anything over ten or twenty gigabytes, CloudsLinker avoids the local download by moving data between the two services server-side. Keep OneDrive active until the Drime copy has been verified and external share links have been reissued.
Online Storage Services Supported by CloudsLinker
Transfer data between over 54 cloud services with CloudsLinker

OneDrive

Google Drive

Google Photos

Shared Drive

OneDrive for Business

Dropbox

Box

Mega

pCloud

Yandex

ProtonDrive

AWS

GCS

iDrive

Storj

DigitalOcean

Wasabi

1fichier

PikPak

TeleBox

OpenDrive

Backblaze B2

Fastmail file

SharePoint

Nextcloud

ownCloud

Premiumize me

HiDrive

Put.io

Sugar Sync

Jottacloud

Seafile

Ftp

SFtp

NAS

WebDav

4shared

Icedrive

Cloudflare R2

Scaleway

Doi

iCloud Drive

iCloud Photos

FileLU

Zoho WorkDrive

Telia Cloud / Sky

Drime

Filen

TeraBox

Internxt

Degoo

Gofile
Pixeldrain

Shade
Didn' t find your cloud service? Be free to contact: [email protected]
Further Reading
Effortless FTP connect to google drive: Transfer Files in 3 Easy Ways
Learn More >
Google Photos to OneDrive: 3 Innovative Transfer Strategies
Learn More >
Google Photos to Proton Drive: 3 Effective Transfer Techniques
Learn More >