PikPak to TeraBox: Trade Streaming Quotas for 1 TB of Cold Storage
Move PikPak files to TeraBox: archive what you no longer need to stream, free up PikPak quota, and use TeraBox's 1 TB free tier as a cold layer.
Introduction
TeraBox advertises 1 TB free with paid tiers that scale to 2 TB at consumer prices, which makes it useful as a cold archive layer behind a streaming-oriented service like PikPak. PikPak's value is in playback, magnet support, and offline downloads — paying for storage there means paying for features you only use once. Moving the libraries you no longer actively stream onto TeraBox frees up PikPak quota for new content while keeping the old files reachable. This guide covers two paths: a manual browser export, and a cloud-to-cloud transfer through CloudsLinker that connects PikPak via WebDAV and TeraBox via its browser cookie.
PikPak is a Singapore-headquartered cloud storage service built around magnet-link offline downloads, in-browser streaming, and a large free tier. It is popular among users who collect media files and want to play them without downloading first.
- Free tier: 6 GB baseline plus referral and task bonuses.
- Magnet support: download torrents and HTTP links directly into the cloud.
- Streaming: built-in video player with subtitle support.
- Third-party access: email + password is the standard option; a dedicated WebDAV endpoint is available as an alternative in experimental features.
- Clients: web, Windows, macOS, Android, iOS.
TeraBox is a consumer cloud storage service operated by Flextech Inc., the international branch of Baidu Netdisk. It markets a 1 TB free tier targeted at South and Southeast Asian users, plus paid plans with larger per-file caps and faster downloads.
- Free tier: 1024 GB advertised; ~80 GB practical due to a 20 large-file ceiling.
- Per-file cap: 4 GB free; 20 GB on Premium.
- Download throttle: ~200–800 KB/s on free; lifted on Premium.
- Connection: no public OAuth — third-party tools use the browser login cookie (
ndus,ndut_fmt). - Pricing: Premium $2.99/month, Premium+ around $3.33/month.
PikPak optimizes for fetching and playing media; TeraBox optimizes for raw capacity. They are complements more than competitors — the migration here is usually about offloading cold files rather than fully leaving one for the other.
| Feature | PikPak | TeraBox |
|---|---|---|
| Primary use case | Magnet downloads, in-browser streaming | Large free-tier storage, cold archive |
| Free quota | 6 GB + bonuses | 1 TB advertised; ~80 GB practical |
| Per-file cap | No fixed small cap; tied to plan | 4 GB free / 20 GB Premium |
| Third-party connection | Email + password (primary); WebDAV (alternative) | Browser session cookie (ndus, ndut_fmt) |
| Best-fit role | Active streaming library | Cold storage and long-term retention |
On the PikPak side
- Inventory by file size: anything over 4 GB will not fit on a free TeraBox account. List those candidates and decide whether to split, compress, or upgrade.
- Have your PikPak login ready: CloudsLinker connects PikPak with the same email and password you use to sign in at mypikpak.com. WebDAV credentials (generated in Settings → Experimental Features) are available as an alternative if you prefer scoped access.
- Resolve incomplete downloads: files still queued or partially downloaded inside PikPak will not transfer cleanly.
On the TeraBox side
- Create a TeraBox account at terabox.com (the international service). The China-based Baidu Netdisk uses a separate login.
- Plan a folder layout: create top-level folders for the categories you are archiving (for example,
/Movies-Archive/,/Anime/) before the transfer. - Decide on a tier: stay on free if every file is under 4 GB; otherwise upgrade to Premium for the 20 GB cap and faster downloads.
Method 1: Browser Download from PikPak and Web Upload to TeraBox
Step 1: Download from PikPak
Open mypikpak.com and sign in. Select the files or folders you want to archive and click Download. PikPak packages folders into ZIP archives. Free-tier downloads run slower than paid ones, and very large folders should be split into smaller batches.
Step 2: Extract and Filter Oversized Files
Unzip the archive locally. Sort by file size and pull out anything larger than 4 GB if you are using a free TeraBox account — these will fail on upload. Either upgrade TeraBox, compress the file into smaller parts, or move the large items separately.
Step 3: Upload to TeraBox
Open terabox.com, navigate to your target folder, and drag the extracted files in. TeraBox throttles free-tier uploads compared with Premium, so very large uploads will take their time. Watch the per-file status — failures show inline rather than at the end.
Method 2: Cloud-to-Cloud Transfer with CloudsLinker
Move PikPak to TeraBox Without Local Downloads
CloudsLinker pulls from PikPak over its WebDAV endpoint and pushes into TeraBox using your logged-in cookie. The job runs server-side, which avoids the slow free-tier TeraBox upload throttle on a home connection.
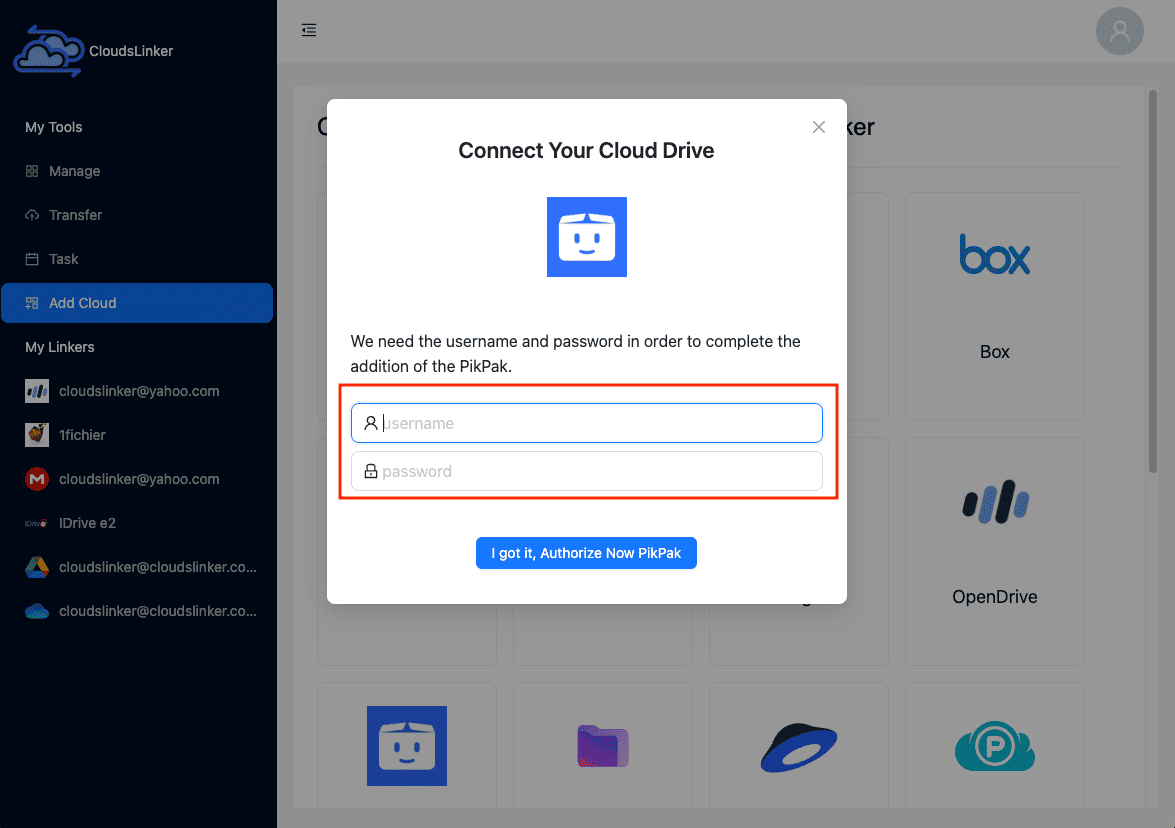
Step 1: Connect PikPak
In CloudsLinker, click Add Cloud and select PikPak. Enter the email and password you use to sign in at mypikpak.com and confirm. PikPak appears as a connected source.
If you would rather not give CloudsLinker your account password, PikPak also exposes a dedicated WebDAV endpoint with separate credentials. Enable it under PikPak Settings → Experimental Features → WebDAV and use those credentials instead — the rest of the flow is identical.
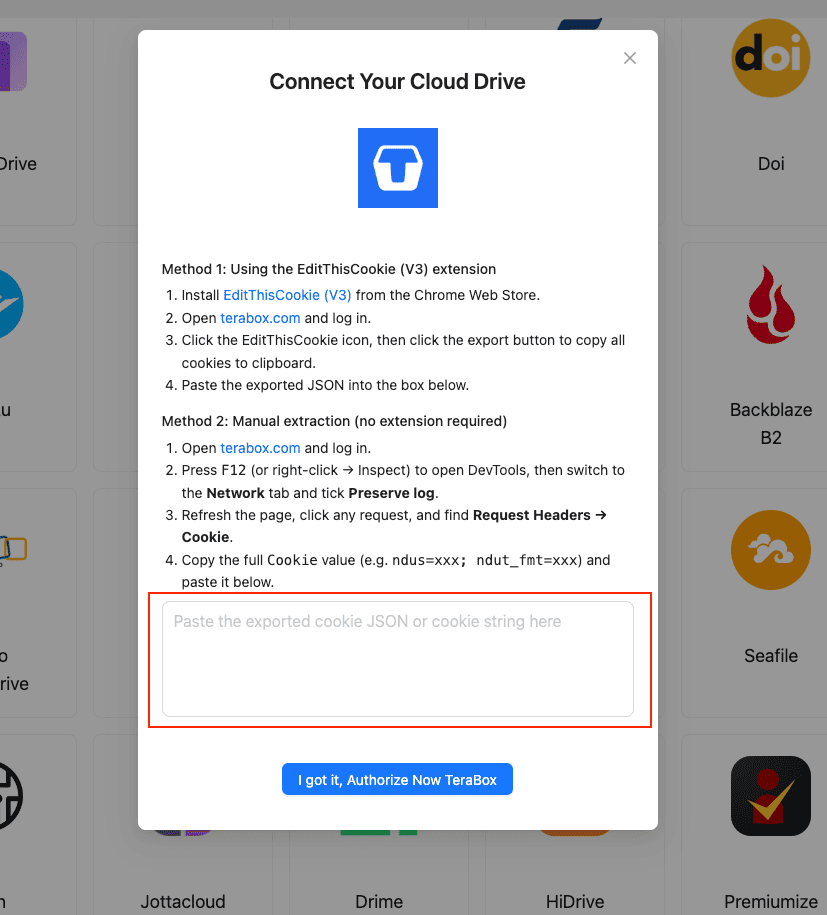
Step 2: Connect TeraBox (Browser Cookie)
TeraBox does not publish an OAuth API, so the connection uses the session cookie from your logged-in TeraBox browser tab. The cleanest method is the EditThisCookie (V3) extension:
- Install EditThisCookie (V3) in Chrome.
- Open
www.terabox.comin the same browser and confirm you are signed in. - Click the EditThisCookie icon → Export. The cookie JSON copies to your clipboard.
- In CloudsLinker, click Add Cloud → TeraBox → enter a display name → paste the JSON into the cookie field → Confirm.
If you cannot install an extension, open DevTools (F12) → Network →
refresh the page → copy the full Cookie header (usually ndus=...; ndut_fmt=...)
and paste that into CloudsLinker.
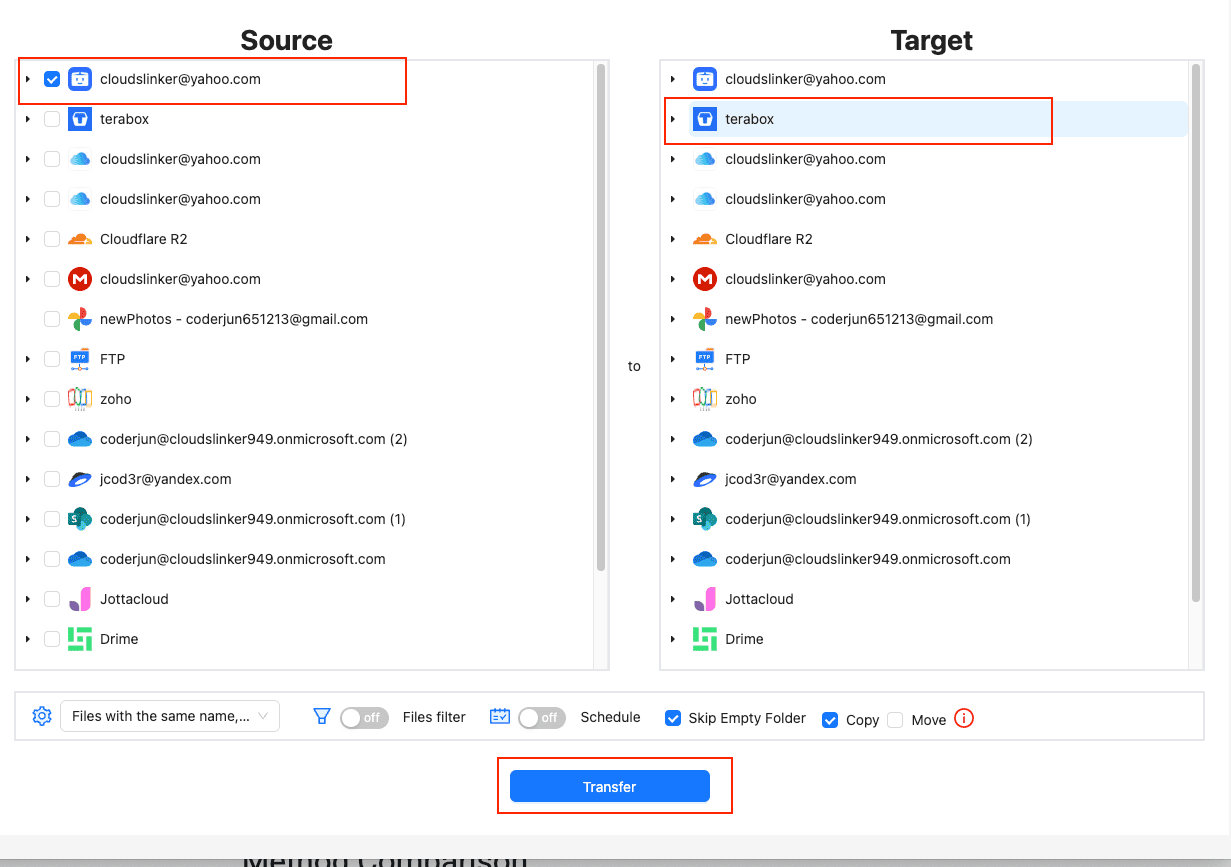
Step 3: Configure the Transfer
Open the Transfer section. Select PikPak as the source and browse to the folders you want to archive. Select TeraBox on the destination side and pick the target directory.
Apply a file size filter at 4 GB for a free TeraBox account, or 20 GB for Premium. This stops oversized files from queuing and failing. Date filters help when you only want to archive items older than a cut-off. Use Move mode to reclaim PikPak quota automatically after a successful transfer.
Step 4: Start and Monitor
Click start. The Task List shows transferred volume, current speed and remaining items. If the TeraBox cookie expires (logout, password change, long inactivity), the task pauses and CloudsLinker prompts you to paste a fresh cookie instead of failing the whole queue. After completion, download the CSV transfer log for reference.
Method Comparison
| Method | Ease of Use | Speed | Best For | Uses Local Bandwidth | Skill Level |
|---|---|---|---|---|---|
| Browser Download + Upload | ★★★★☆ | ★★☆☆☆ | A few folders under 50 GB | Yes | Beginner |
| CloudsLinker | ★★★★☆ | ★★★★★ | Large archives, scheduled offload from PikPak | No | Beginner-Intermediate |
- Apply the 4 GB filter early: on a free TeraBox tier, every file above 4 GB has to be repackaged. Filtering at the source is cheaper than chasing failures.
- Use Move mode to clear PikPak quota: if the goal of the migration is to free space for new PikPak downloads, the Move option in CloudsLinker removes source files only after a confirmed write to TeraBox.
- Rotate credentials after the run: if you used your PikPak email and password, change the password once the migration is done. If you used WebDAV credentials, rotate or disable them from Experimental Features → WebDAV.
- Refresh the TeraBox cookie before long jobs: session cookies expire on inactivity. Re-login to TeraBox right before exporting the cookie, so the token is fresh.
- Mind the practical free-tier ceiling: TeraBox's 1 TB headline includes a 20-large-file cap. If you are archiving many large videos, the cap will land before the quota does.
- Verify with a sample folder: run a small folder first, open a couple of files in TeraBox, then queue the rest.
Frequently Asked Questions
.mp4, .mkv) older than
a chosen date and leave active downloads on PikPak.
Watch: Transfer PikPak Files to TeraBox with CloudsLinker
A walkthrough of connecting PikPak and TeraBox in CloudsLinker, configuring the transfer with a 4 GB file-size filter, and monitoring the task as it runs server-side.
Conclusion
For a few folders of finished downloads, the PikPak web export plus TeraBox web upload works fine, just remember TeraBox's 4 GB free-tier per-file cap. For larger collections — completed downloads, archived video libraries, mobile photo backups — CloudsLinker bridges PikPak's WebDAV endpoint and TeraBox's cookie-based connection in a single task. The server-side run avoids the slow free-tier TeraBox upload throttle and survives PikPak session timeouts. Before the move, inventory anything over 4 GB on the PikPak side: it will need a TeraBox Premium plan or be split first.
Online Storage Services Supported by CloudsLinker
Transfer data between over 51 cloud services with CloudsLinker

OneDrive

Google Drive

Google Photos

Shared Drive

OneDrive for Business

Dropbox

Box

Mega

pCloud

Yandex

ProtonDrive

AWS

GCS

iDrive

Storj

DigitalOcean

Wasabi

1fichier

PikPak

TeleBox

OpenDrive

Backblaze B2

Fastmail file

SharePoint

Nextcloud

ownCloud

Premiumize me

HiDrive

Put.io

Sugar Sync

Jottacloud

Seafile

Ftp

SFtp

NAS

WebDav

4shared

Icedrive

Cloudflare R2

Scaleway

Doi

iCloud Drive

iCloud Photos

FileLU

Zoho WorkDrive

Telia Cloud / Sky

Drime

Filen

TeraBox

Internxt

Degoo
Didn' t find your cloud service? Be free to contact: [email protected]
Further Reading
Effortless FTP connect to google drive: Transfer Files in 3 Easy Ways
Learn More >
Google Photos to OneDrive: 3 Innovative Transfer Strategies
Learn More >
Google Photos to Proton Drive: 3 Effective Transfer Techniques
Learn More >