Proton Drive to SharePoint: Two Straightforward Ways to Move Your Files
Moving files from Proton Drive to Microsoft SharePoint can be trickier than it looks, especially when encryption, storage limits, and large folders are involved. This guide focuses on two practical approaches: a traditional manual download-and-upload workflow, and a cloud-based transfer using CloudsLinker that avoids local handling altogether.
Introduction
Proton Drive and Microsoft SharePoint are built with very different goals in mind. Proton Drive emphasizes privacy and encrypted storage, while SharePoint is designed for collaboration inside the Microsoft 365 ecosystem. When users need to bring files from a private Proton Drive space into SharePoint—whether for teamwork, long-term archiving, or company-wide access—there’s no built-in transfer option between the two. As a result, most people rely on one of two paths. The first is a manual approach: downloading files from [Proton Drive](https://proton.me/drive) and uploading them into [SharePoint](https://www.microsoft.com/microsoft-365/sharepoint/collaboration) through a browser or desktop sync client. The second approach skips local storage entirely by using a cloud-to-cloud service such as [CloudsLinker](https://www.cloudslinker.com), which handles the transfer online. In this article, we’ll walk through both methods and explain when each one makes the most sense.
Proton Drive is a privacy-focused cloud storage service developed by Proton, the same company behind Proton Mail. It is designed for users who want strong encryption and control over their data, rather than deep collaboration features. Files stored in Proton Drive are protected with end-to-end encryption, meaning only you can access their contents.
- End-to-end encryption: Files are encrypted before they leave your device.
- Privacy-first design: Proton cannot read or scan your stored data.
- Cross-platform access: Available via web and official desktop apps.
- Simple folder structure: Organized like a traditional file system.
- Best for personal storage: Less focused on multi-user collaboration.
Microsoft SharePoint is a collaboration and document management platform built into Microsoft 365. Unlike personal cloud drives, SharePoint is structured around teams, sites, and document libraries, making it a common choice for organizations that need shared access, permissions, and compliance controls.
- Shared workspaces: Files live inside team sites and libraries.
- Microsoft 365 ecosystem: Tight integration with Teams, OneDrive, and Office.
- Permission management: Control access at site, folder, or file level.
- Version tracking: Automatically keeps a history of file changes.
- Enterprise-ready: Supports auditing, retention rules, and compliance policies.
Before transferring files from Proton Drive to Microsoft SharePoint, it helps to understand why these two platforms feel so different in day-to-day use. While both store files in the cloud, Proton Drive is built around personal privacy and encryption, whereas SharePoint is designed as a shared workspace for teams operating inside Microsoft 365.
| Aspect | Proton Drive | Microsoft SharePoint |
|---|---|---|
| Primary Focus | Private, encrypted personal storage | Team-based document management |
| Storage Model | User-owned folders and files | Sites and document libraries |
| Collaboration Style | Limited sharing, privacy-first | Multi-user collaboration with permissions |
| Platform Integration | Works within the Proton ecosystem | Deeply integrated with Microsoft 365 and Teams |
| Security Approach | End-to-end encryption by default | Enterprise security, auditing, and compliance |
| Typical Use Case | Personal or sensitive data storage | Organizational file sharing and workflows |
In practice, Proton Drive excels at keeping data private and under individual control, while SharePoint shines when files need to be organized, shared, and governed across teams. This difference is exactly why many users eventually need a reliable way to move data between the two.
A smooth transfer from Proton Drive to SharePoint starts with a quick review of your existing files. Check how much data you plan to move and whether your folders are already organized in a way that makes sense for a shared environment. What works for private storage doesn’t always translate perfectly to team libraries.
On the SharePoint side, confirm that you have access to the correct site and document library. Upload permissions are typically managed at the site or library level, so it’s worth verifying your role in advance—either through your Microsoft 365 settings or with help from your organization’s administrator.
At this point, you can decide how hands-on you want the transfer to be. Smaller sets of files can be downloaded from Proton Drive and uploaded manually into SharePoint. For larger transfers, or when you don’t want to rely on local storage and a running computer, an online service like CloudsLinker can handle the migration directly between platforms. Spending a little time planning upfront helps avoid permission issues, missing folders, and unnecessary rework later on.
Method 1: Download and Upload Files Manually
Step 1: Download Files from Proton Drive
Begin by opening the
Proton Drive web interface
and signing in to your account. Browse through your folders and locate the files you plan to move
into
SharePoint. If you need to select multiple items, use Ctrl on Windows or
Command on
macOS while clicking.
Once selected, use the download option from the toolbar or context menu. Proton Drive will prepare the files for download, and folders are typically delivered as compressed archives. After the download finishes, extract the contents locally so they’re ready to be uploaded in their original structure.
⬇️ Download files and folders from Proton Drive to your local computer
Step 2: Upload Files to SharePoint
Next, open your organization’s SharePoint site in a browser and sign in with your Microsoft 365 account. Navigate to the document library where you want the files to be stored.
Use the Upload button to add files or folders, or drag and drop them directly into the library window. This is also a good opportunity to adjust folder names or reorganize content so it fits more naturally into a shared, team-based structure.
⬆️ Upload extracted files from your computer into a SharePoint document library
This manual approach works best when you’re moving a limited number of files or performing a one-time transfer. If your Proton Drive contains a large amount of data, or if you prefer not to rely on local storage, a cloud-based solution like CloudsLinker can transfer files directly between platforms without keeping your browser or computer running.
Method 2: Cloud-to-Cloud Transfer with CloudsLinker
Overview: Move Files Without Local Downloads
CloudsLinker runs transfers entirely in the cloud, allowing files to move directly from Proton Drive to Microsoft SharePoint without being downloaded to your computer. Once a task starts, it continues in the background even if you close your browser.
Step 1: Add Proton Drive as the Source
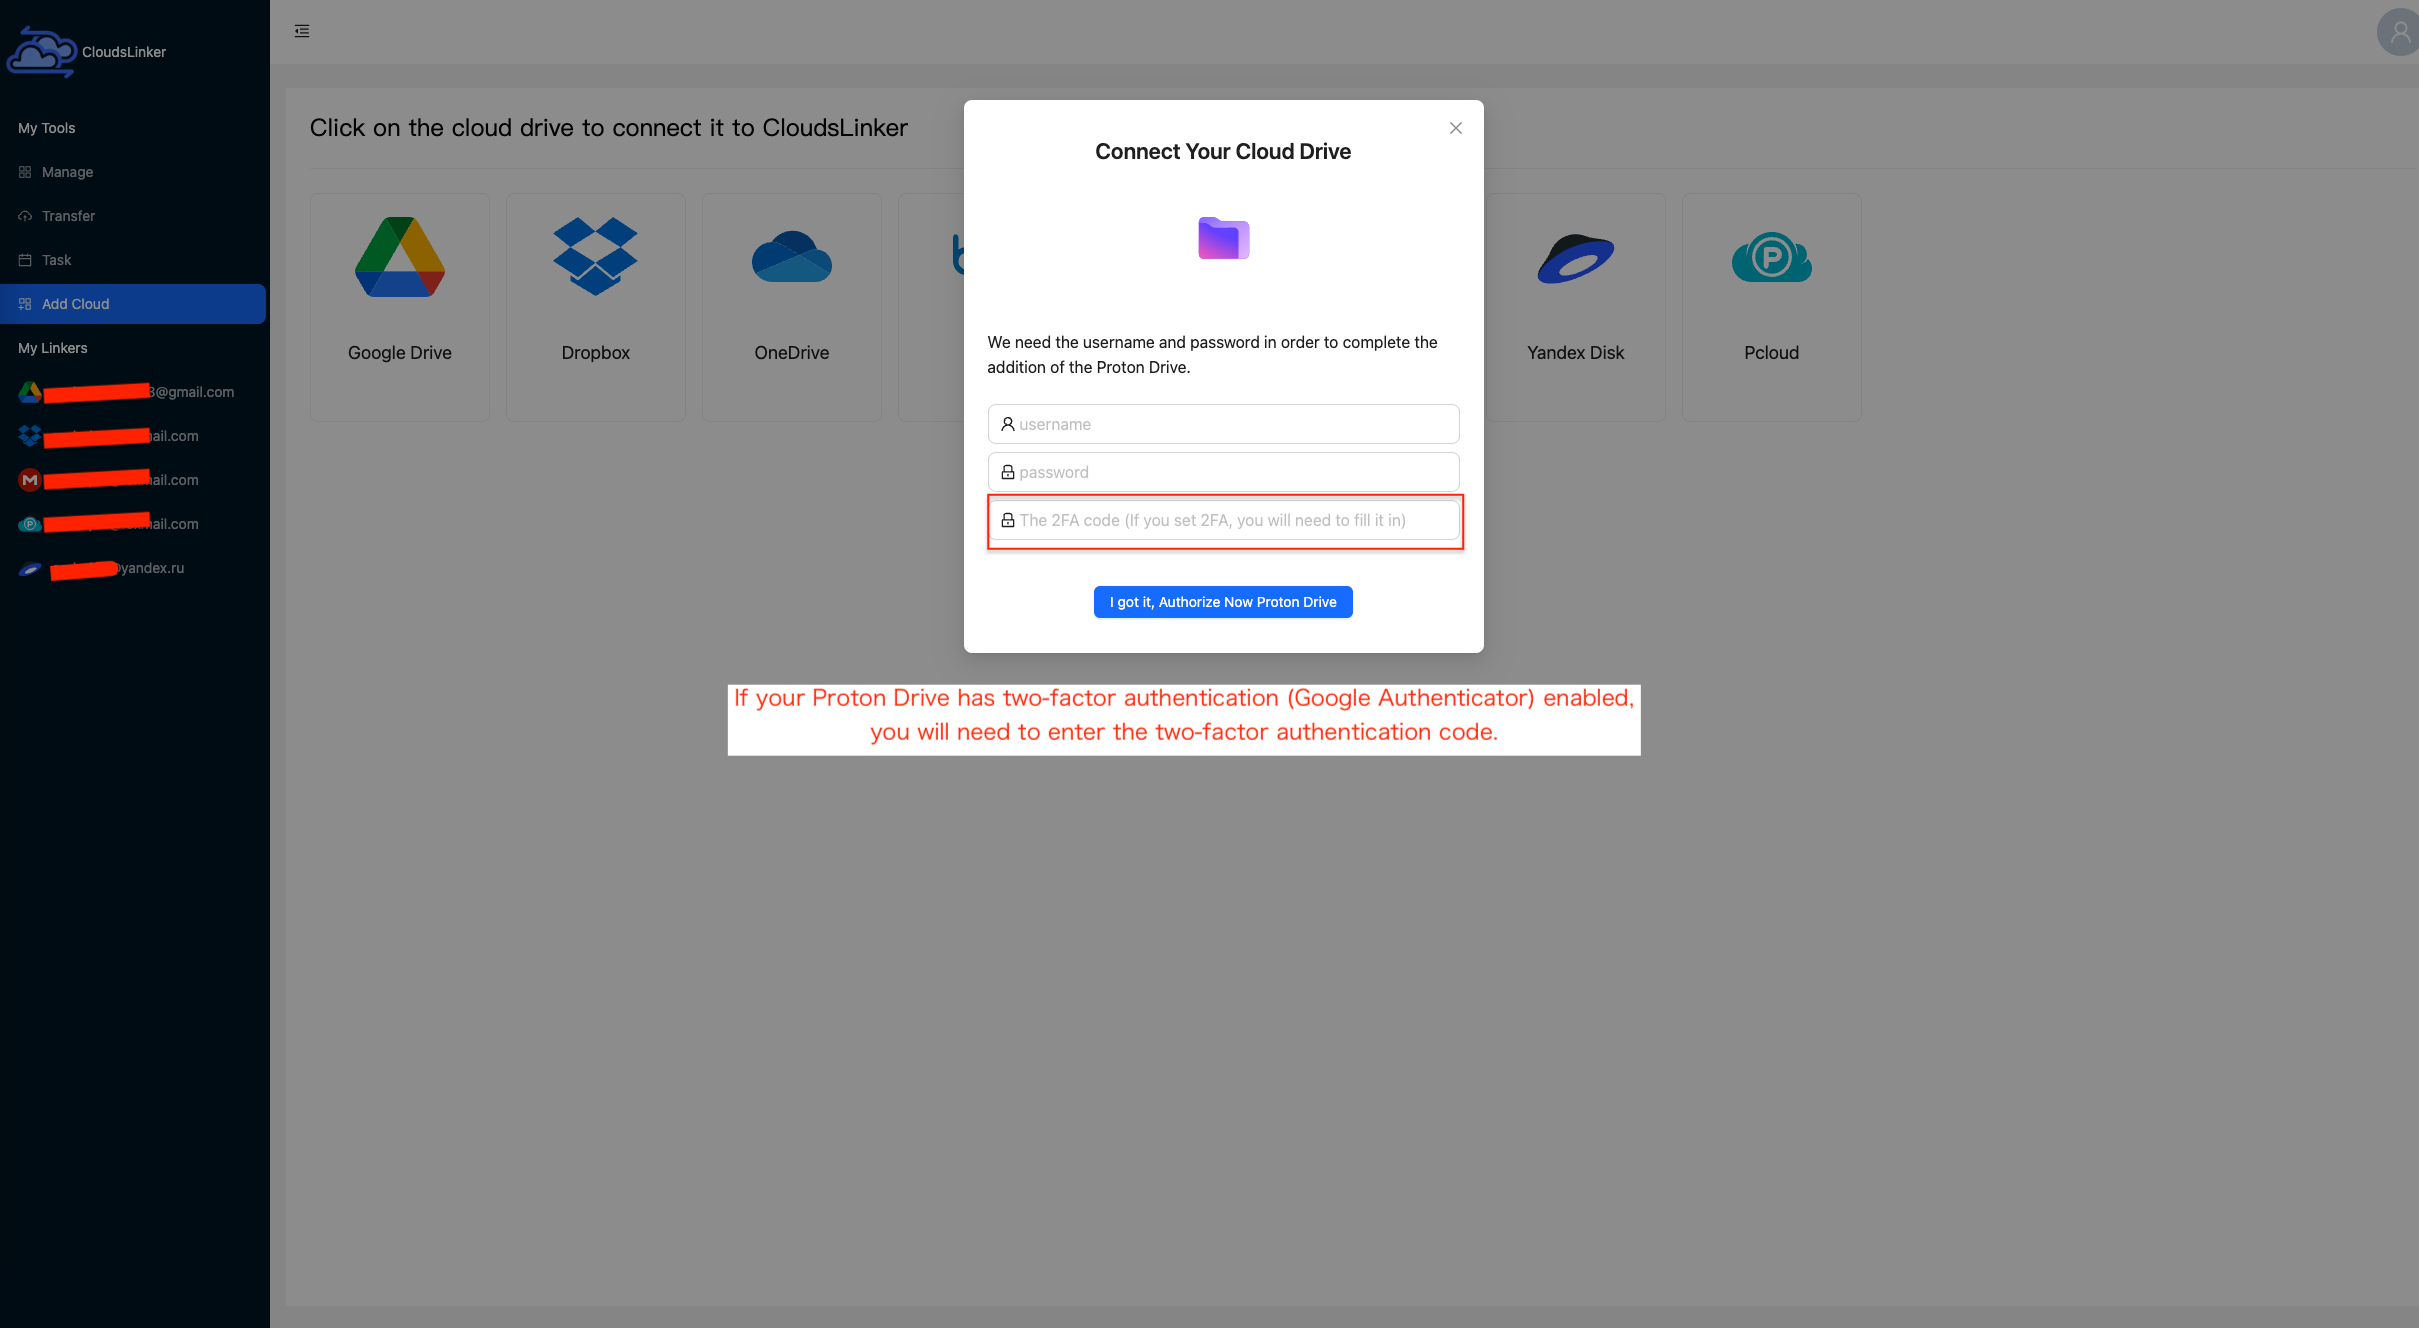
Sign in to app.cloudslinker.com and open the dashboard. Click Add Cloud, locate Proton Drive in the list of supported services, and select it.
To complete the connection, simply enter the email address associated with your Proton account and follow the authorization prompts. No advanced configuration is required. Once added, Proton Drive will appear as an available source inside CloudsLinker.
Step 2: Add SharePoint as the Destination
Next, add Microsoft SharePoint as the destination cloud. When prompted, sign in with your Microsoft 365 account and confirm the SharePoint site you want to use.
If your SharePoint site contains multiple document libraries, CloudsLinker will list them during setup. Select the appropriate library to receive the transferred files.

Step 3: Choose Source and Destination
Open the Transfer section. On the left side, choose your connected Proton Drive and select the files or folders you want to move. On the right side, select your SharePoint library and the target folder.
This step defines exactly where your data comes from and where it will land in SharePoint, giving you a chance to adjust folder placement before the transfer begins.

Step 4: Start and Monitor the Transfer
Start the transfer and monitor progress from the task list. CloudsLinker displays real-time status updates, processed files, and any items that require attention. Tasks can be paused or resumed if needed.
After completion, a summary report shows which files were transferred successfully. Your Proton Drive data will now be available in SharePoint, ready for collaboration and sharing.
For users who want to avoid manual downloads and local bandwidth limits, CloudsLinker provides a practical and low-maintenance way to move files from Proton Drive to SharePoint.
Need to Move Files Between Other Cloud Services?
In addition to SharePoint, CloudsLinker supports cloud-to-cloud transfers involving OneDrive, MEGA, Box, WebDAV, and more. All tasks run online, so your computer doesn’t need to stay connected.
Comparing Two Ways to Transfer Files from Proton Drive to SharePoint
When moving files from Proton Drive to Microsoft SharePoint, there isn’t a single approach that works best for everyone. The right choice mainly depends on how much data you’re transferring, whether you want hands-on control, and how much time you’re willing to spend managing the process. The table below compares the two most common and practical options.
| Method | Ease of Use | Transfer Speed | Best Suited For | Uses Local Bandwidth | Technical Skill |
|---|---|---|---|---|---|
| Manual Download & Upload | ★★★★★ | ★★★☆☆ | Small or one-time transfers | Yes | Beginner |
| CloudsLinker (Cloud-to-Cloud) | ★★★★★ | ★★★★★ | Large folders or unattended transfers | No | Beginner |
If you’re only moving a few files and want full visibility at every step, manually downloading from Proton Drive and uploading to SharePoint is often enough. However, as file counts grow or transfer time becomes a concern, a cloud-based option like CloudsLinker can significantly reduce effort by handling the transfer online without relying on your local network or keeping your browser open.
Moving data from Proton Drive to Microsoft SharePoint is usually straightforward, but a few checks beforehand can prevent common issues—especially when dealing with encrypted files, large folders, or shared team libraries.
- Confirm File Accessibility: Files stored in Proton Drive must be fully accessible before transfer. When using manual downloads, make sure all selected files are available locally before uploading them into SharePoint.
- Plan Your SharePoint Structure: SharePoint organizes content by sites and document libraries rather than personal folders. Decide where files should live ahead of time to avoid reorganizing content after the migration.
- Account for Network Constraints: Manual uploads rely on your local internet connection. For large transfers or unstable networks, a cloud-based option like CloudsLinker helps reduce interruptions by running transfers entirely online.
- Review File Size Limits: SharePoint supports individual files up to 250 GB, though limits may vary by tenant configuration. Large archives should be checked in advance to avoid failed uploads.
- Verify Permissions Early: Ensure your Microsoft 365 account has write access to the target SharePoint site and document library before starting the transfer.
- Think Beyond One-Time Moves: If you expect to transfer large volumes of data or repeat the process later, look for features like retry handling, progress reports, and unattended execution.
A small amount of preparation can significantly improve the outcome of a Proton Drive to SharePoint migration. Understanding SharePoint’s structure and choosing the right transfer method helps keep files organized, accessible, and ready for collaboration.
Proton Drive to SharePoint Migration FAQ
Step-by-Step Video: Transfer Proton Drive Files to SharePoint
If you prefer learning visually, this video walks you through how to move your files from Proton Drive to Microsoft SharePoint. You’ll see how to connect both cloud accounts, configure the transfer, filter specific files if needed, and complete the entire migration without downloading anything to your local device. It’s straightforward, efficient, and ideal for both personal and team data migration.
Conclusion
Transferring data from Proton Drive to SharePoint doesn’t require complex tooling if your needs are simple. Manual downloading and uploading remains a workable option for small batches of files or one-time moves, though it can be slow and dependent on your local network and storage. For larger transfers, or for users who prefer not to keep their computer running for hours, a cloud-based solution like CloudsLinker offers a more efficient alternative by moving files directly between platforms. Choosing between these two methods comes down to file size, time constraints, and how much manual effort you’re willing to invest.
Online Storage Services Supported by CloudsLinker
Transfer data between over 48 cloud services with CloudsLinker

OneDrive

Google Drive

Google Photos

Shared Drive

OneDrive for Business

Dropbox

Box

Mega

pCloud

Yandex

ProtonDrive

AWS

GCS

iDrive

Storj

DigitalOcean

Wasabi

1fichier

PikPak

TeleBox

OpenDrive

Backblaze B2

Fastmail file

SharePoint

Nextcloud

ownCloud

Premiumize me

HiDrive

Put.io

Sugar Sync

Jottacloud

Seafile

Ftp

SFtp

NAS

WebDav

4shared

Icedrive

Cloudflare R2

Scaleway

Doi

iCloud Drive

iCloud Photos

FileLU

Zoho WorkDrive

Telia Cloud / Sky

Drime

Filen
Didn' t find your cloud service? Be free to contact: [email protected]
Further Reading
Effortless FTP connect to google drive: Transfer Files in 3 Easy Ways
Learn More >
Google Photos to OneDrive: 3 Innovative Transfer Strategies
Learn More >
Google Photos to Proton Drive: 3 Effective Transfer Techniques
Learn More >