How to Transfer Files from FTP or SFTP to PikPak (2026)
Move files from an FTP/SFTP server into PikPak without downloading them locally: manual, rclone, and cloud-to-cloud methods compared, with the exact connection settings each one needs.
Introduction
Short answer: the cleanest way to move files from an FTP or SFTP server into PikPak is a server-to-server copy — connect both to a cloud transfer service and let the data move between data centres, so nothing routes through your computer. That matters here because the typical FTP-to-PikPak job is media: video libraries sitting on a seedbox, NAS export, or hosting server that you want in PikPak for its in-browser playback and mobile apps. Those folders are large, and pulling them down over a home connection just to re-upload them is the slow way around. This guide covers three routes: the manual download-and-upload, an rclone job for command-line users, and a cloud-to-cloud transfer with CloudsLinker. It also lists the connection details each method needs — including the one hard requirement for any cloud-run method: your FTP/SFTP endpoint must be reachable from the public internet.
FTP and SFTP servers are where files accumulate as a side effect of infrastructure: seedbox downloads, NAS exports, camera archives, build outputs, hosting backups. They are dependable and scriptable — and inconvenient the moment you want to watch or casually browse what is on them.
- Access by credentials: host, port, username, password or SSH key.
- No playback layer: video files must be downloaded to be watched.
- Server-bound: content lives and dies with that machine and its disk.
PikPak approaches storage from the media side: it is built around cloud downloads, smooth in-browser video playback, and polished mobile apps. That makes it a natural landing zone for exactly the kind of content that piles up on FTP servers.
- Streams instead of downloads: video plays directly in the browser and apps.
- Phone-friendly: a server library becomes browsable from a pocket.
- Storage tiers: free accounts have limited space — size your migration against your quota, or go Premium for large libraries.
Method 1: Download from FTP/SFTP and Upload to PikPak Manually
The zero-tooling route. Connect to your server with a client such as FileZilla or WinSCP, authenticate with your credentials or SSH key, and download the folders you want to a local directory. Then sign in to the PikPak web app, open the target folder, and upload the files — PikPak recreates the folder hierarchy as uploaded.
This works fine for a handful of documents. For the media libraries that usually motivate this migration it is the worst of both worlds: every gigabyte crosses your home connection twice (server → you, you → PikPak), the files occupy local disk in between, and the upload stops if the machine sleeps. Treat it as the small-batch option.
Method 2: Rclone from FTP/SFTP to PikPak
For command-line users, rclone can bridge the two directly. Run
rclone config and define two remotes: an ftp or sftp remote
for the server (host, port, username, password or key), and a
pikpak
remote authenticated with your PikPak account. Then copy:
rclone copy sftp:/data/media pikpak:Media --progress
Test with --dry-run first, and use --exclude filters to skip logs or
temporary files. The catch is operational: the job runs on whichever machine hosts rclone, so that
machine's uptime, bandwidth and credentials management become part of the migration. Running rclone
directly on the FTP server (or inside its network) is the strongest variant — it also works when the
server is not publicly reachable.
Method 3: Cloud-to-Cloud Transfer from FTP/SFTP to PikPak with CloudsLinker
Overview: No Local Download, No Machine to Babysit
CloudsLinker runs the transfer in the cloud: files move from your FTP/SFTP endpoint straight into PikPak without touching your computer. Once a task starts it keeps running even if you close the tab — useful when the source folder is tens of gigabytes of video.
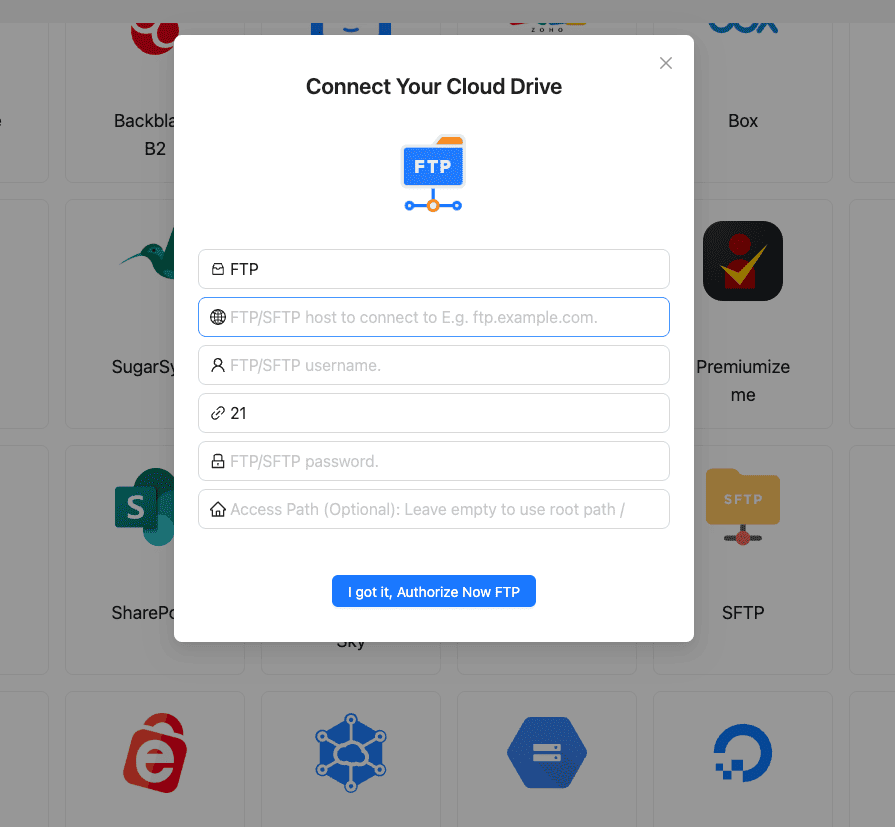
Step 1: Add FTP or SFTP as the Source
Sign in to app.cloudslinker.com, click Add Cloud, and pick FTP or SFTP. Enter the server endpoint (host or IP), the port (SFTP commonly uses 22), and your username and password. If access should stay inside one directory, set the Access Path to that folder.
One hard requirement: the endpoint must be reachable from the public internet — CloudsLinker's servers connect to it directly. A LAN-only or VPN-only server needs to be exposed first, or migrated with Method 2 from inside its network.
Step 2: Connect PikPak as the Destination
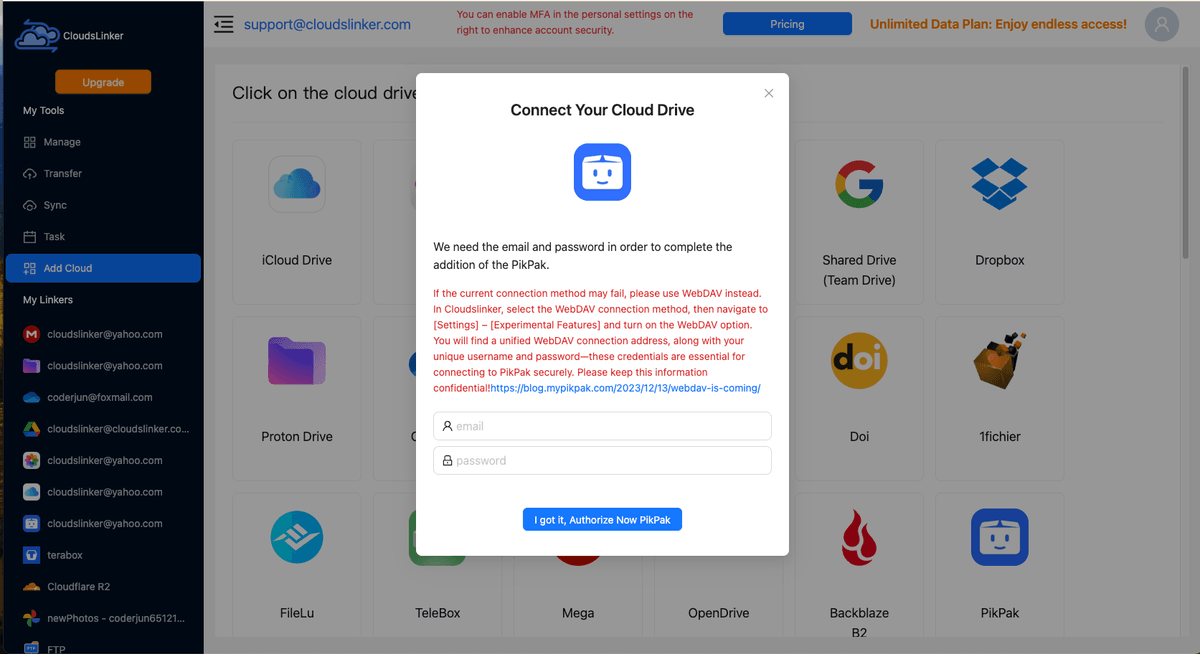
Click Add Cloud again and choose PikPak. Enter your PikPak
account email and password — the standard connection, which works on any PikPak
tier and in both directions. In the rare case the direct connection fails, PikPak Premium members
can enable WebDAV under Settings → experimental features and connect
with the dedicated credentials PikPak generates instead.
Step 3: Configure and Start the Transfer
Open the Transfer page. Select the FTP/SFTP source on the left and browse to the
folders to move; select PikPak on the right and choose (or create) the destination folder. Filters
can limit the copy to certain file types — for a media migration, restricting to video extensions
keeps server clutter like logs and .nfo files behind.
Start the task and follow it in the Task List: progress, transferred counts, and per-file errors if anything fails. The task runs in the cloud, so closing the browser or shutting the laptop does not interrupt it. When it completes, spot-check a large video in PikPak's player and compare file counts before cleaning anything off the server.
Which method fits depends on how much data is moving and where the server lives:
| Approach | Best Fit | Depends on Local Machine | Works with Private-Network Servers | Skill Level |
|---|---|---|---|---|
| Manual Download & Upload | A few files, one-off moves | Yes — twice (download + upload) | Yes | Beginner |
| Rclone (Command-Line) | Scripted, repeatable jobs; servers behind a firewall | Yes — wherever rclone runs | Yes (run it inside the network) | Advanced |
| CloudsLinker (Cloud-to-Cloud) | Large media folders, unattended migration | No | No — endpoint must be publicly reachable | Beginner |
Rule of thumb: below a few GB, do it manually; behind a strict firewall, use rclone on the server; everything else — especially the multi-GB video folders PikPak is usually chosen for — is easiest as a cloud-to-cloud task you start once and forget.
FTP/SFTP to PikPak — Frequently Asked Questions
Conclusion
Moving files from FTP or SFTP into PikPak is mostly a question of scale. A handful of files: download and re-upload manually and be done. A media library: let the transfer run server-to-server instead of through your house. With [CloudsLinker](https://www.cloudslinker.com), the FTP/SFTP server connects with its endpoint, port and credentials, PikPak connects with your account email and password, and the copy runs in the cloud — resumable, schedulable, and independent of your own bandwidth. Files keep their folder structure, and once they land in PikPak they get its player and apps for free. Going the other direction, or juggling shares? See the reverse guide [PikPak to FTP/SFTP](/guides/transfer-files-from-pikpak-to-ftp-sftp/) and [how to save PikPak shared links](/guides/download-pikpak-shared-link-files/).
Online Storage Services Supported by CloudsLinker
Transfer data between over 58 cloud services with CloudsLinker

OneDrive

Google Drive

Google Photos

Shared Drive

OneDrive for Business

Dropbox

Box

Mega

pCloud

Yandex

ProtonDrive

AWS

GCS

iDrive

Storj

DigitalOcean

Wasabi

1fichier

PikPak

TeleBox

OpenDrive

Backblaze B2

Fastmail file

SharePoint

Nextcloud

ownCloud

Premiumize me

HiDrive

Put.io

Sugar Sync

Jottacloud

Seafile

Ftp

SFtp

NAS

WebDav

4shared

Icedrive

Cloudflare R2

Scaleway

Hetzner Object Storage

Synology C2 Object Storage

S3 Compatible

Doi

iCloud Drive

iCloud Photos

FileLU

Zoho WorkDrive

Telia Cloud / Sky

Drime

Filen

TeraBox

Internxt

Degoo

Gofile

Pixeldrain

Shade

Koofr
Didn' t find your cloud service? Be free to contact: [email protected]
Further Reading
Effortless FTP connect to google drive: Transfer Files in 3 Easy Ways
Learn More >
Google Photos to OneDrive: 3 Innovative Transfer Strategies
Learn More >
Google Photos to Proton Drive: 3 Effective Transfer Techniques
Learn More >